
Sensors
Post-Reversing Paper Feed Sensor
Position
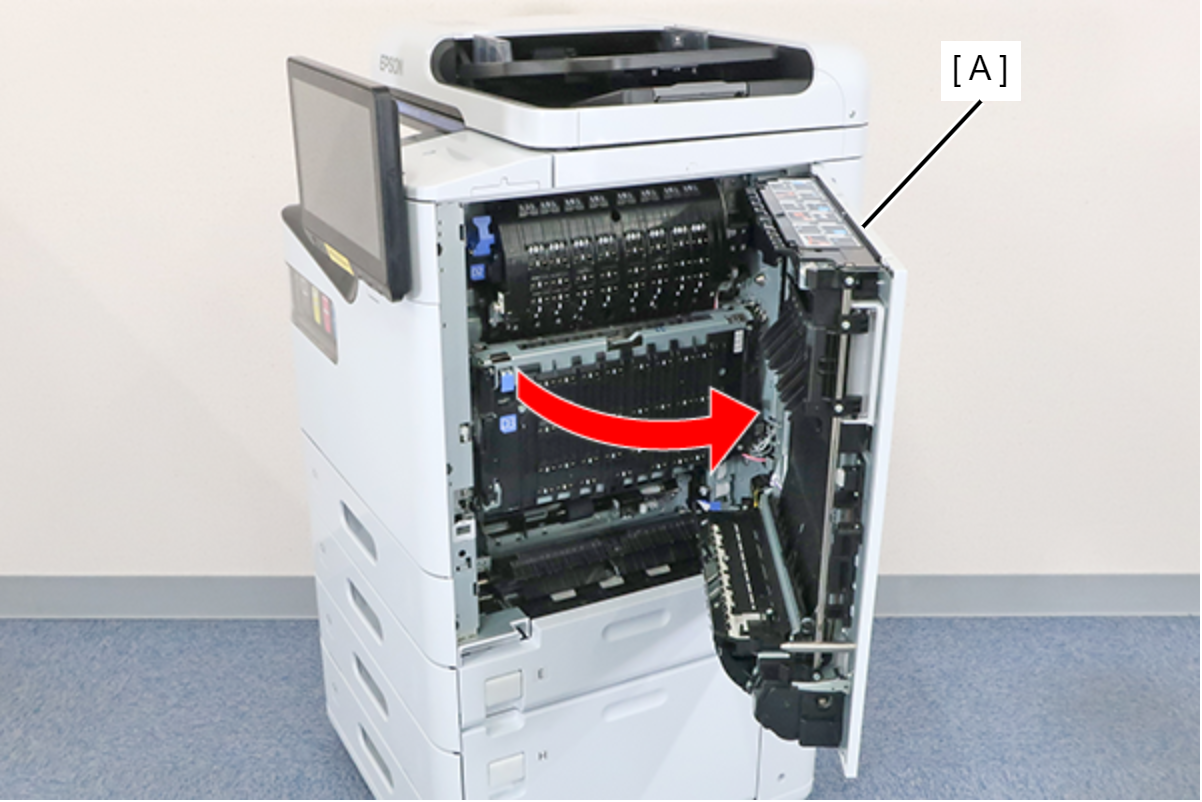
- Open the right door unit (A).
 Assembly / 組み立て
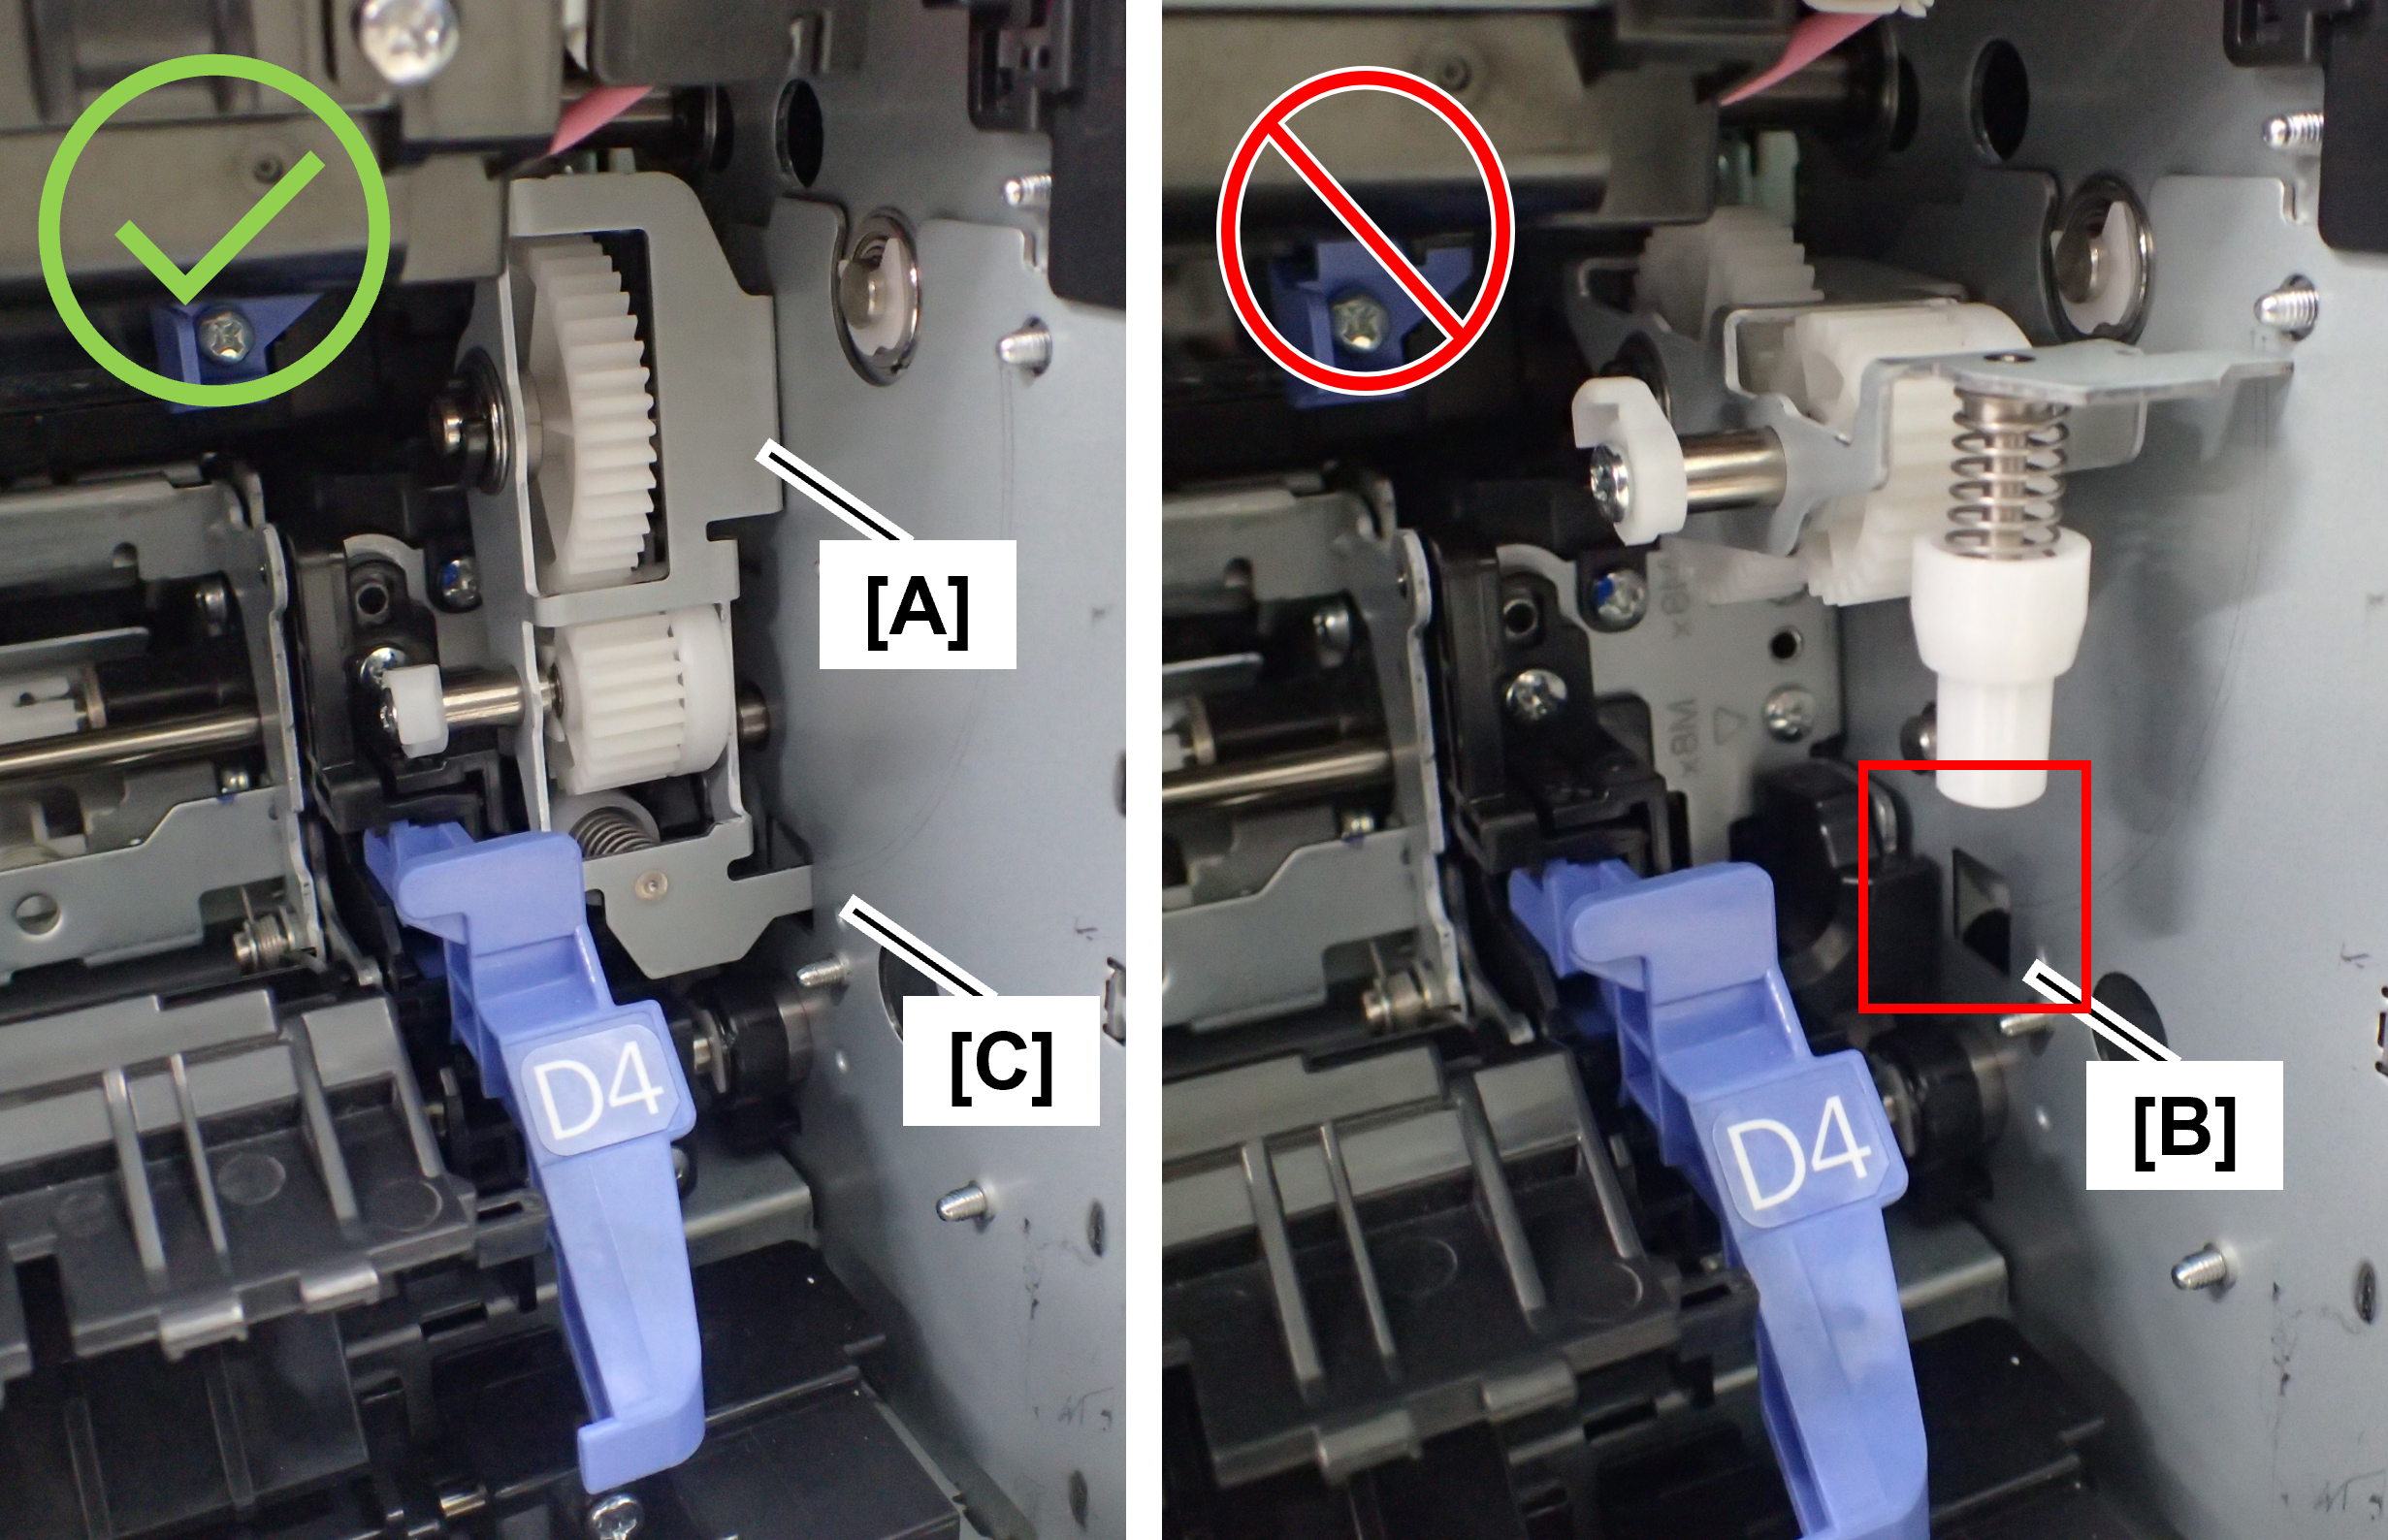
When closing the right door unit, it may not close due to interference with the tumbler (A) that was tilted toward the front when other parts were repaired.
If the right door unit does not close, check the position of the tumbler, and if it is protruding toward the front, fit the tip of the tumbler plate (C) into the hole (B) in the main unit.
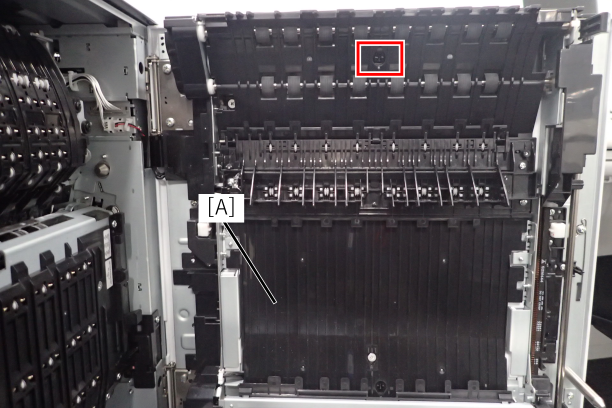
- It is installed at the top of the right door unit (A).
Cleaning method
Wipe the sensor surface with the small sponge part of the cleaner stick lightly. If the sponge becomes dirty, wipe with a clean cloth moistened with pure water by gently stroking the surface of the sponge.
Tray Pre-Eject Sensor
Position
- Open the right door unit (A).Assembly / 組み立て
When closing the right door unit, it may not close due to interference with the tumbler (A) that was tilted toward the front when other parts were repaired.
If the right door unit does not close, check the position of the tumbler, and if it is protruding toward the front, fit the tip of the tumbler plate (C) into the hole (B) in the main unit.
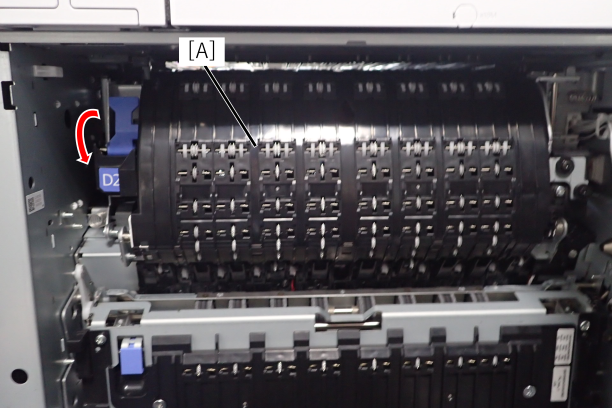
- Pull the lever and open the EJ Unit (A).
- Remove the 3 screws and remove the paper guide (A). (using stabilizer driver)
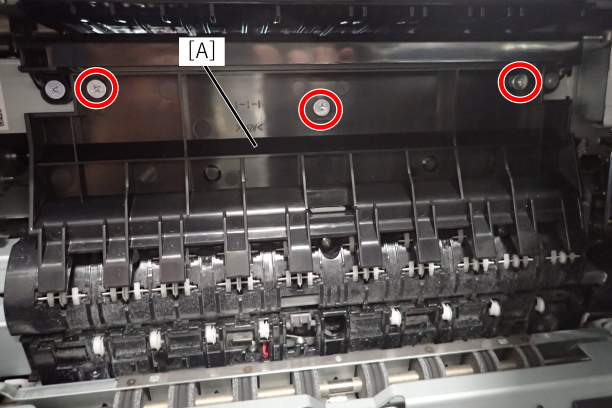
 : 3x5D
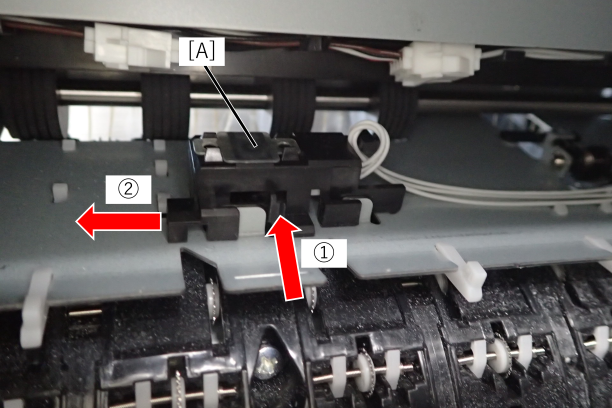
- Push the face-down tray pre-ejection sensor lever (A) in the direction of arrow (1) and slide it in the direction of arrow (2) to remove it from the plate.
Cleaning method
Wipe the sensor surface with the small sponge part of the cleaner stick lightly. If the sponge becomes dirty, wipe with a clean cloth moistened with pure water by gently stroking the surface of the sponge.
Post-Belt Sensor
Position
- Open the right door unit (A).Assembly / 組み立て
When closing the right door unit, it may not close due to interference with the tumbler (A) that was tilted toward the front when other parts were repaired.
If the right door unit does not close, check the position of the tumbler, and if it is protruding toward the front, fit the tip of the tumbler plate (C) into the hole (B) in the main unit.
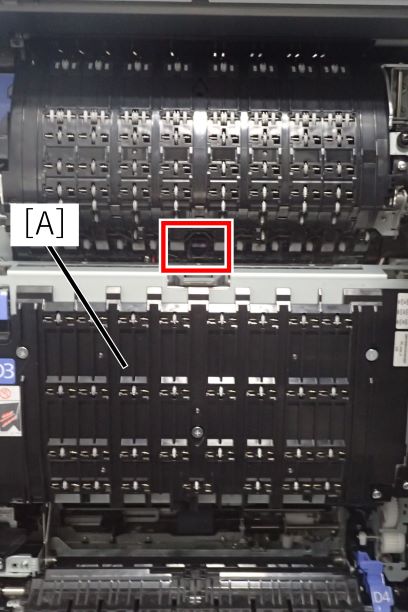
- it is installed above the center of the belt unit (A).
Cleaning method
Wipe the sensor surface with the small sponge part of the cleaner stick lightly. If the sponge becomes dirty, wipe with a clean cloth moistened with pure water by gently stroking the surface of the sponge.
Post-Head Paper Sensor
Position
- Open the right door unit (A).Assembly / 組み立て
When closing the right door unit, it may not close due to interference with the tumbler (A) that was tilted toward the front when other parts were repaired.
If the right door unit does not close, check the position of the tumbler, and if it is protruding toward the front, fit the tip of the tumbler plate (C) into the hole (B) in the main unit.
- Pull the lever and open the EJ Unit (A).
- Pull the lever (A) to open the belt unit (B).
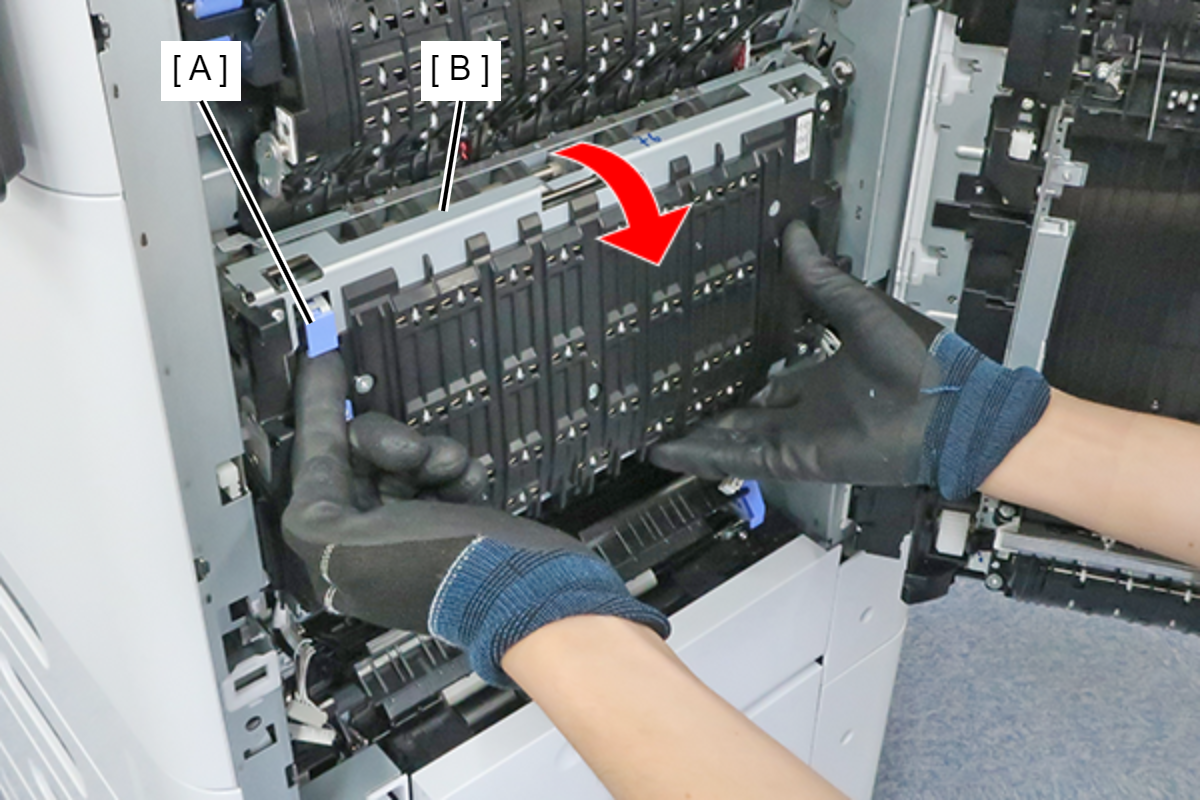
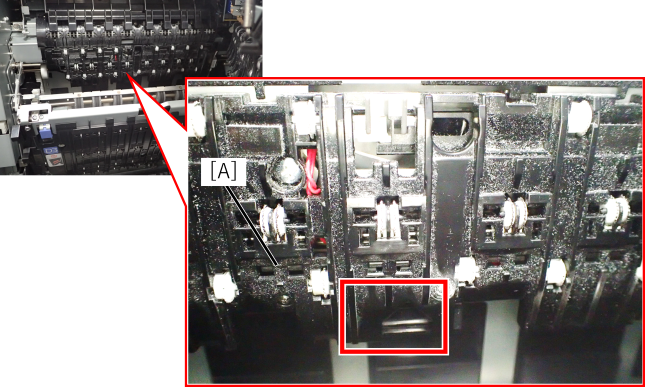
- It is installed in the triangular hole at the bottom center of the EJ unit (A).
Cleaning method
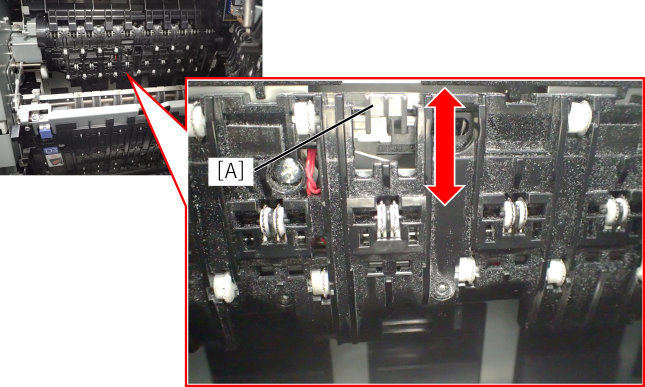
Slide the cleaning lever (A) left and right multiple times.
Pre-Printing Sensor
Position
- Open the right door unit (A).Assembly / 組み立て
When closing the right door unit, it may not close due to interference with the tumbler (A) that was tilted toward the front when other parts were repaired.
If the right door unit does not close, check the position of the tumbler, and if it is protruding toward the front, fit the tip of the tumbler plate (C) into the hole (B) in the main unit.
- Pull the lever (A) to open the belt unit (B).
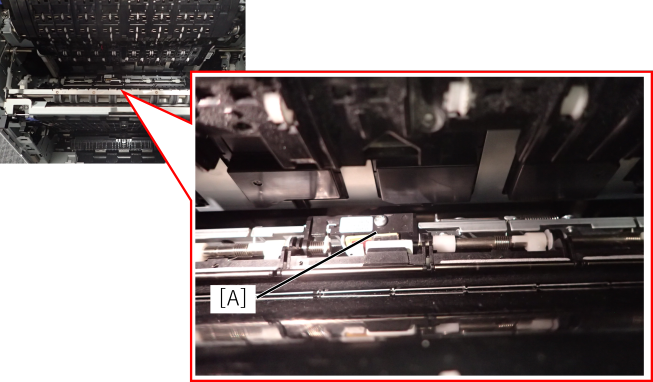
- It is held by the Anti Static Brush Unit (A).
Cleaning method
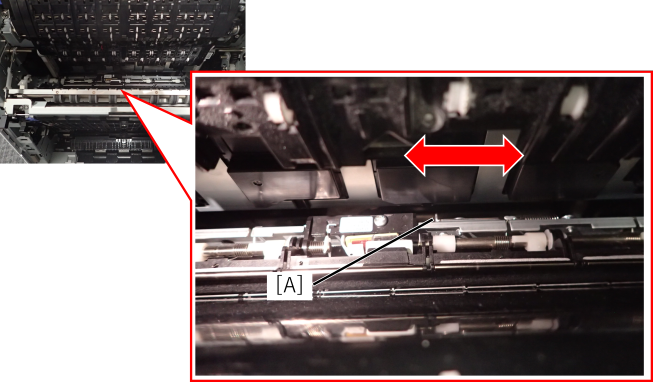
Slide the cleaning lever (A) left and right multiple times.
Duplex Paper Feed Sensor
Position
- Open the right door unit (A).Assembly / 組み立て
When closing the right door unit, it may not close due to interference with the tumbler (A) that was tilted toward the front when other parts were repaired.
If the right door unit does not close, check the position of the tumbler, and if it is protruding toward the front, fit the tip of the tumbler plate (C) into the hole (B) in the main unit.
- It is installed at the bottom of the right door unit (A).
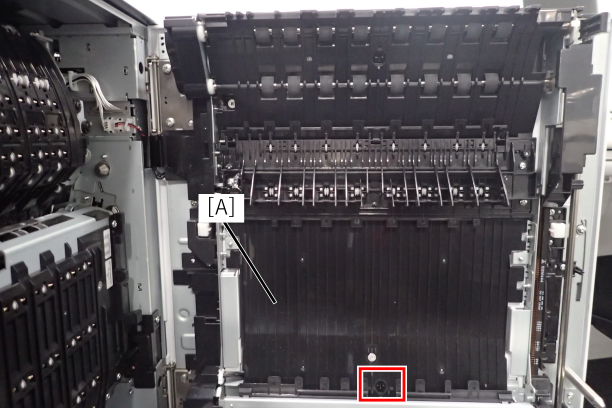
Cleaning method
Wipe the sensor surface with the sponge part of the cleaner stick lightly. If the sponge becomes dirty, wipe with a clean cloth moistened with pure water by gently stroking the surface of the sponge.
Glass of the PW Sensor.
Position
- Open the right door unit (A).Assembly / 組み立て
When closing the right door unit, it may not close due to interference with the tumbler (A) that was tilted toward the front when other parts were repaired.
If the right door unit does not close, check the position of the tumbler, and if it is protruding toward the front, fit the tip of the tumbler plate (C) into the hole (B) in the main unit.
- Clean the glass of the PW sensor.
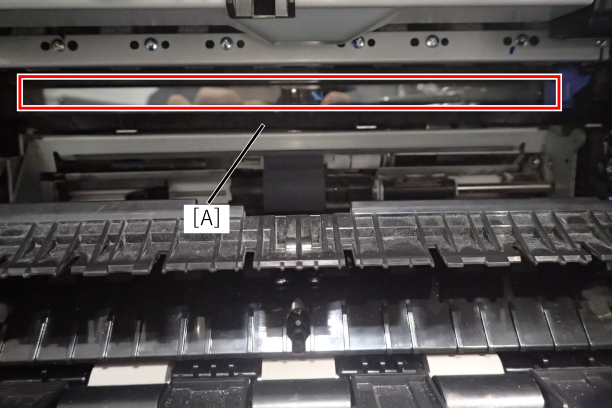
Cleaning method
Wipe the sensor surface with the sponge part of the cleaner stick lightly. If the sponge becomes dirty, wipe with a clean cloth moistened with pure water by gently stroking the surface of the sponge.
Slide the lever (B) of the PW sensor (A) to the right, and clean the area that has been slid.
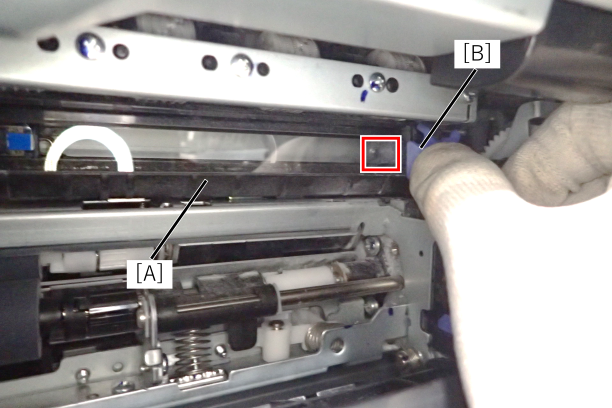
Right door reflector
Position
- Open the right door unit (A).Assembly / 組み立て
When closing the right door unit, it may not close due to interference with the tumbler (A) that was tilted toward the front when other parts were repaired.
If the right door unit does not close, check the position of the tumbler, and if it is protruding toward the front, fit the tip of the tumbler plate (C) into the hole (B) in the main unit.
- This is the plate at the bottom of the right door unit (A).
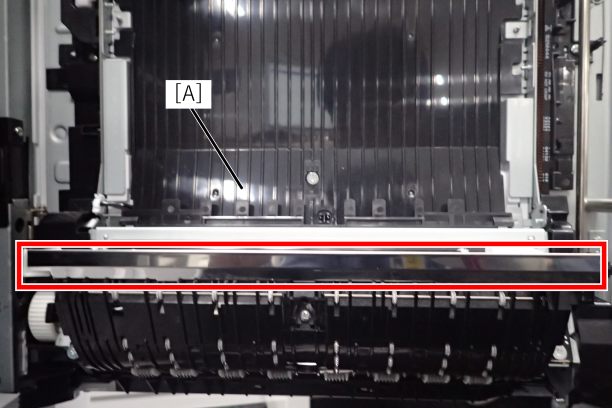
Cleaning method
Wipe the sensor surface with the sponge part of the cleaner stick lightly. If the sponge becomes dirty, wipe with a clean cloth moistened with pure water by gently stroking the surface of the sponge.
C1 Paper Feed Sensor
Position
- Open the right door unit (A).Assembly / 組み立て
When closing the right door unit, it may not close due to interference with the tumbler (A) that was tilted toward the front when other parts were repaired.
If the right door unit does not close, check the position of the tumbler, and if it is protruding toward the front, fit the tip of the tumbler plate (C) into the hole (B) in the main unit.
- This is the sensor at the bottom of the right door unit (A).
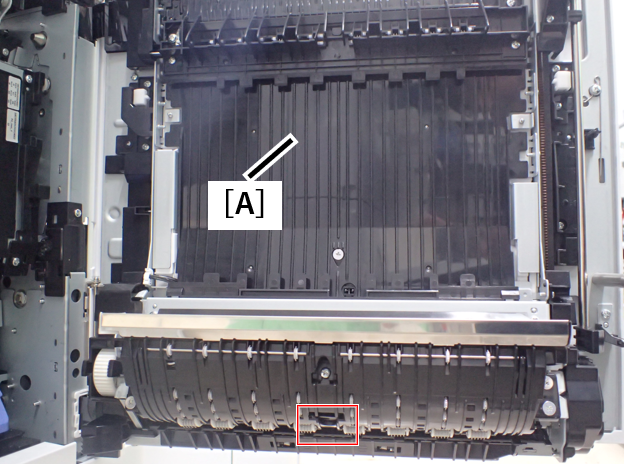
Cleaning method
Wipe the sensor surface with the sponge part of the cleaner stick lightly. If the sponge becomes dirty, wipe with a clean cloth moistened with pure water by gently stroking the surface of the sponge.
C2 Paper Feed Sensor
Position
- Open the C2 Additional Paper Feed Cover (A).
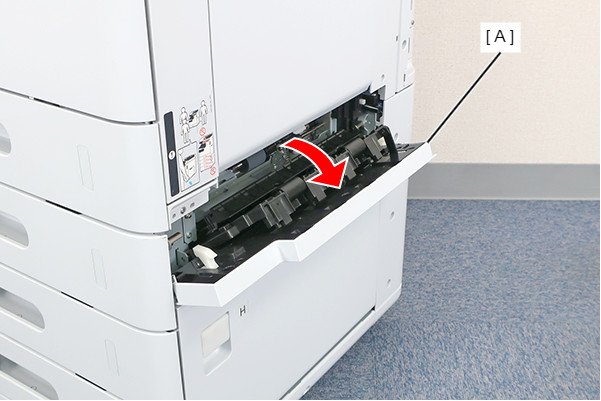
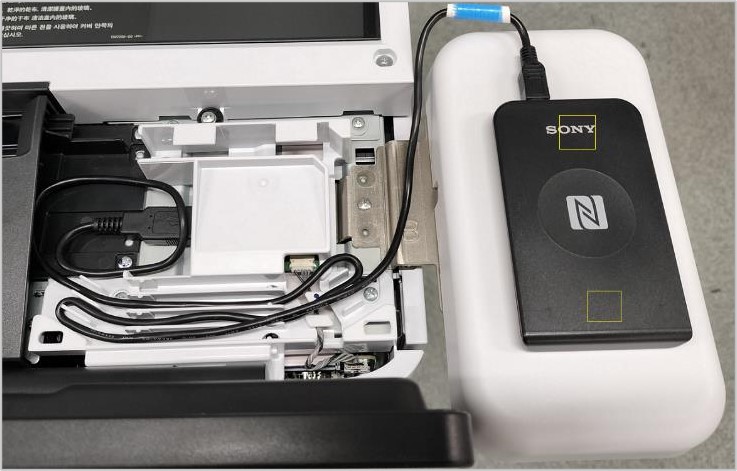
- Located inside the hole of C2 paper feed unit (A).
Cleaning method
Wipe the sensor surface with the sponge part of the cleaner stick lightly. If the sponge becomes dirty, wipe with a clean cloth moistened with pure water by gently stroking the surface of the sponge.
C3 Paper Feed Sensor
Position
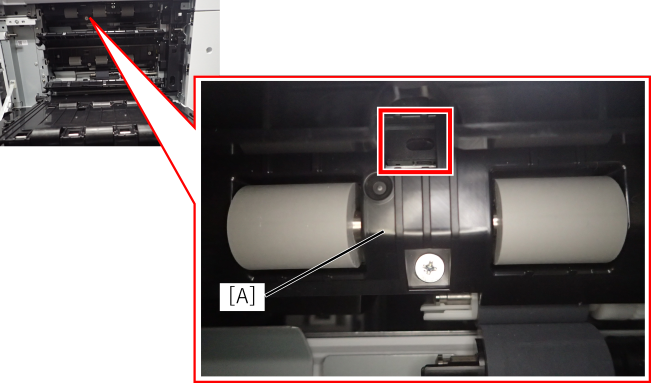
- Open the C3C4 Additional Paper Feed Cover (A).
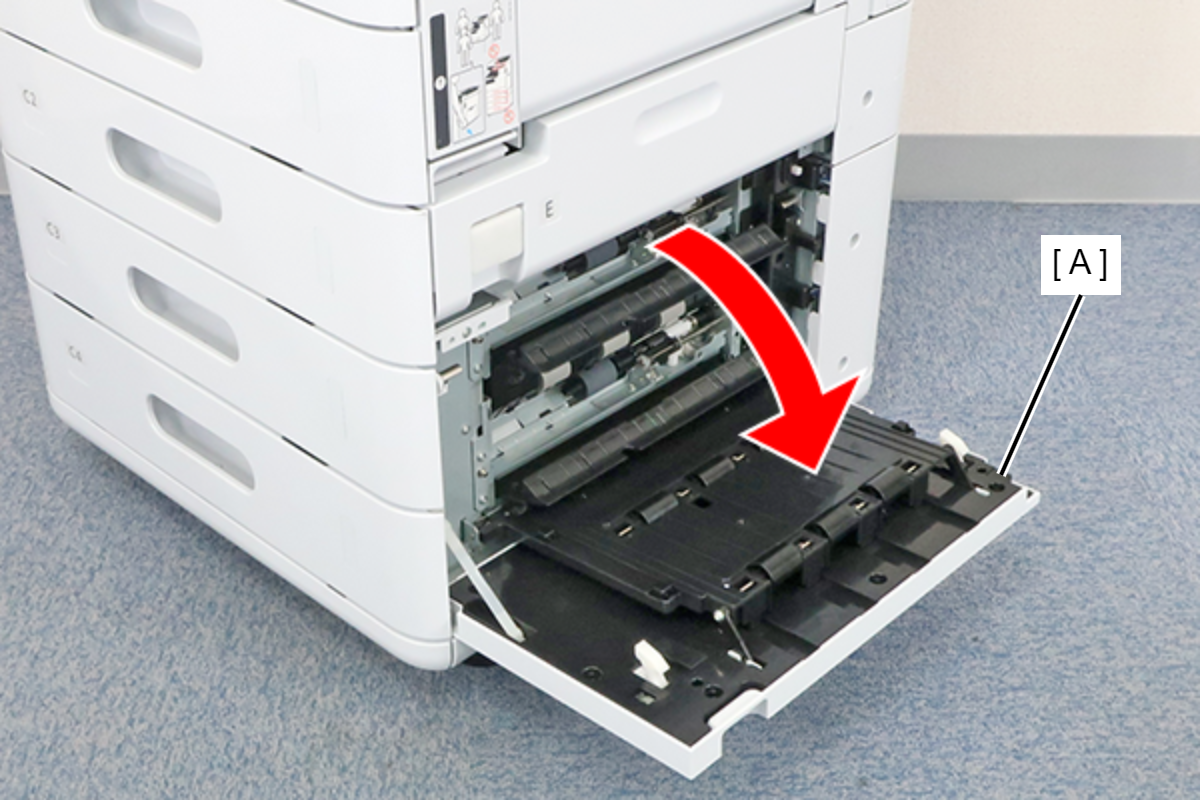
- Located inside the hole of C3 paper feed unit (A).
Cleaning method
Wipe the sensor surface with the sponge part of the cleaner stick lightly. If the sponge becomes dirty, wipe with a clean cloth moistened with pure water by gently stroking the surface of the sponge.
C4 Paper Feed Sensor
Position
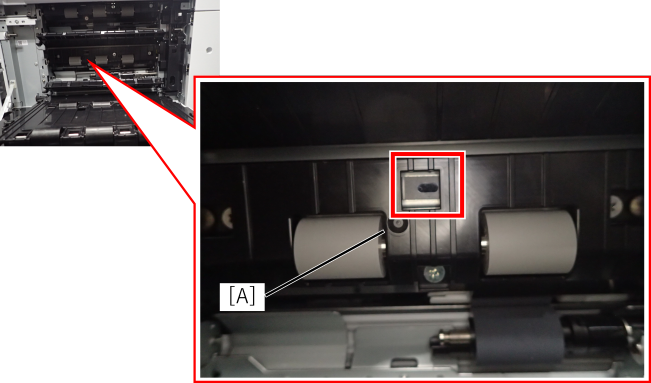
- Open the C3C4 Additional Paper Feed Cover (A).
- Located inside the hole of C4 paper feed unit (A).
Cleaning method
Wipe the sensor surface with the sponge part of the cleaner stick lightly. If the sponge becomes dirty, wipe with a clean cloth moistened with pure water by gently stroking the surface of the sponge.