
WF-C579R/C579Ra
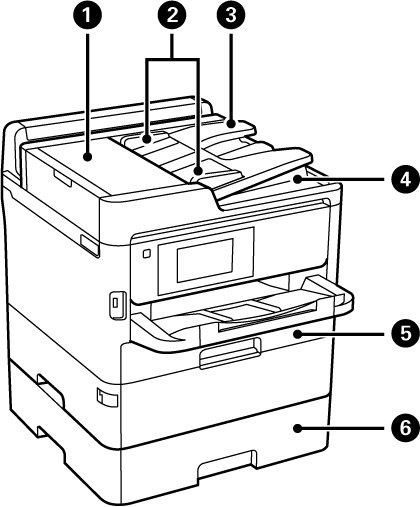
| No. | Name | Explanation |
|---|---|---|
| 1 | ADF (Automatic Document Feeder) cover (F) | Open when removing jammed originals in the ADF. |
| 2 | ADF edge guides | Feeds originals straight into the printer. Slide to the edges of the originals. |
| 3 | ADF input tray | Feeds originals automatically. |
| 4 | ADF output tray | Holds originals ejected from the ADF. |
| 5 | Paper Cassette1 (C1) |
Loads paper. |
| 6 | Paper cassette 2 (C2) | Loads paper. |
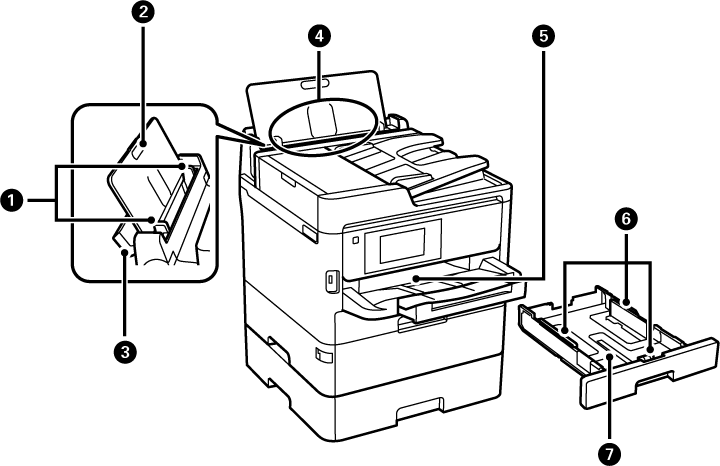
| No. | Name | Explanation |
|---|---|---|
| 1 | Edge guides | Feeds the paper straight into the printer. Slide to the edges of the paper. |
| 2 | Paper support | Supports loaded paper. |
| 3 | ASF Cover | Prevents foreign substance from entering the printer. Usually keep this cover closed. |
| 4 | Rear ASF | Loads paper. |
| 5 | Eject Tray | Holds the ejected paper. |
| 6 | Edge guides | Feeds the paper straight into the printer. Slide to the edges of the paper. |
| 7 | Paper cassette | Loads paper. |
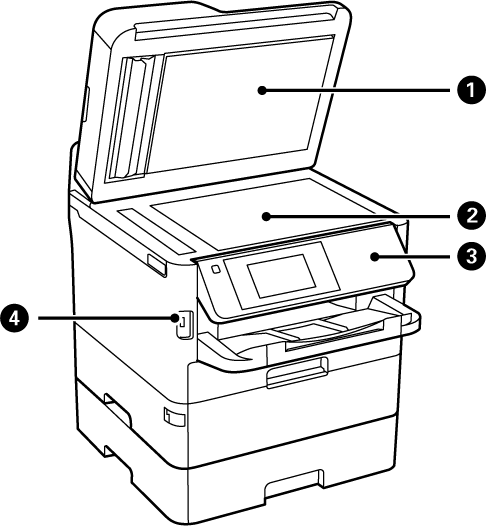
| No. | Name | Explanation |
|---|---|---|
| 1 | Document cover | Blocks external light while scanning. |
| 2 | Scanner glass | Place the originals. |
| 3 | Operation Panel | Operates the printer. You can change the angle of the panel. |
| 4 | External interface USB port | Connects memory devices. |
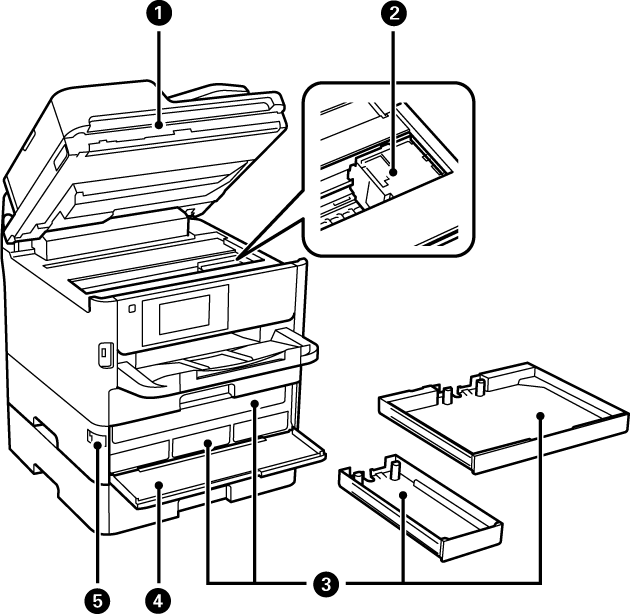
| No. | Name | Explanation |
|---|---|---|
| 1 | Scanner unit (J) | Scans placed originals. Open when removing jammed paper inside the printer. |
| 2 | Printhead | Fires ink. |
| 3 | Ink Pack Tray | Sets an ink supply unit. |
| 4 | Front cover (A) | Open when replacing ink supply units. |
| 5 | Front cover lock | Locks the front cover. |
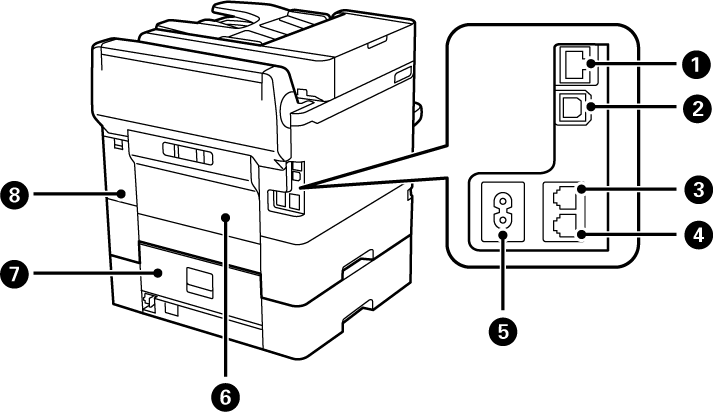
| No. | Name | Explanation |
|---|---|---|
| 1 | LAN port | Connects a LAN cable. |
| 2 | USB port | Connects a USB cable to connect with a computer. |
| 3 | LINE port | Connects a phone line. |
| 4 | EXT. port | Connects external phone devices. |
| 5 | Power Supply Connector | Connect the power cable. |
| 6 | Rear Cover (D) | Open when removing jammed paper. |
| 7 | Rear cover (E) | Open when removing jammed paper. |
| 8 | Maintenance box cover (H) | Open when replacing the maintenance box. |
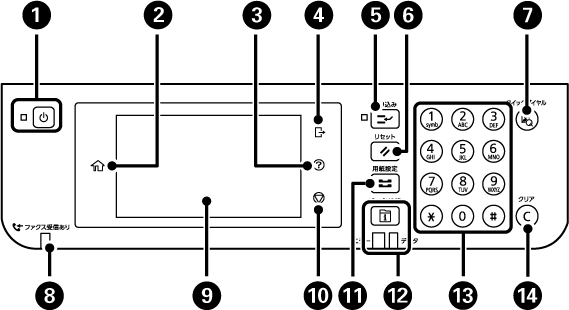
| No. | Explanation |
|---|---|
| 1 | Turns the printer on or off. |
| 2 | Displays the home screen. |
| 3 | Displays the Help screen. Displays the Help screen. You can check solutions to problems from here. |
| 4 | Logs off from the printer when Access Control is enabled.When Access Control is disabled, this is also disabled. |
| 5 | Pauses the current printing job and allows you to interrupt another job. However, you cannot interrupt a new job from the computer. Press this button again to restart a paused job. |
| 6 | Resets the current settings to user default settings. If user default settings have not been made, resets to the factory default. |
| 7 | Displays the Contacts list. You can register, edit or delete the contacts. |
| 8 | Turns on when received documents that have not yet been read, printed, or saved, are stored in the printer's memory. |
| 9 | Displays menus and messages. Touch the screen to select items. Drag the screen to scroll. |
| 10 | Stops the current operation. |
| 11 | Displays the Paper Setting screen. You can select the paper size and paper type settings for each paper source. |
| 12 | Displays the Job/Status menu. Displays the Job/Status menu. You can check the printer's status and job history. The error light on the left flashes or turns on when an error occurs. The data light on the right flashes when the printer is processing data. It turns on when there are queued jobs. |
| 13 | Enters numbers, characters, and symbols. |
| 14 | Clears number settings such as the number of copies. |