
SCN Unit
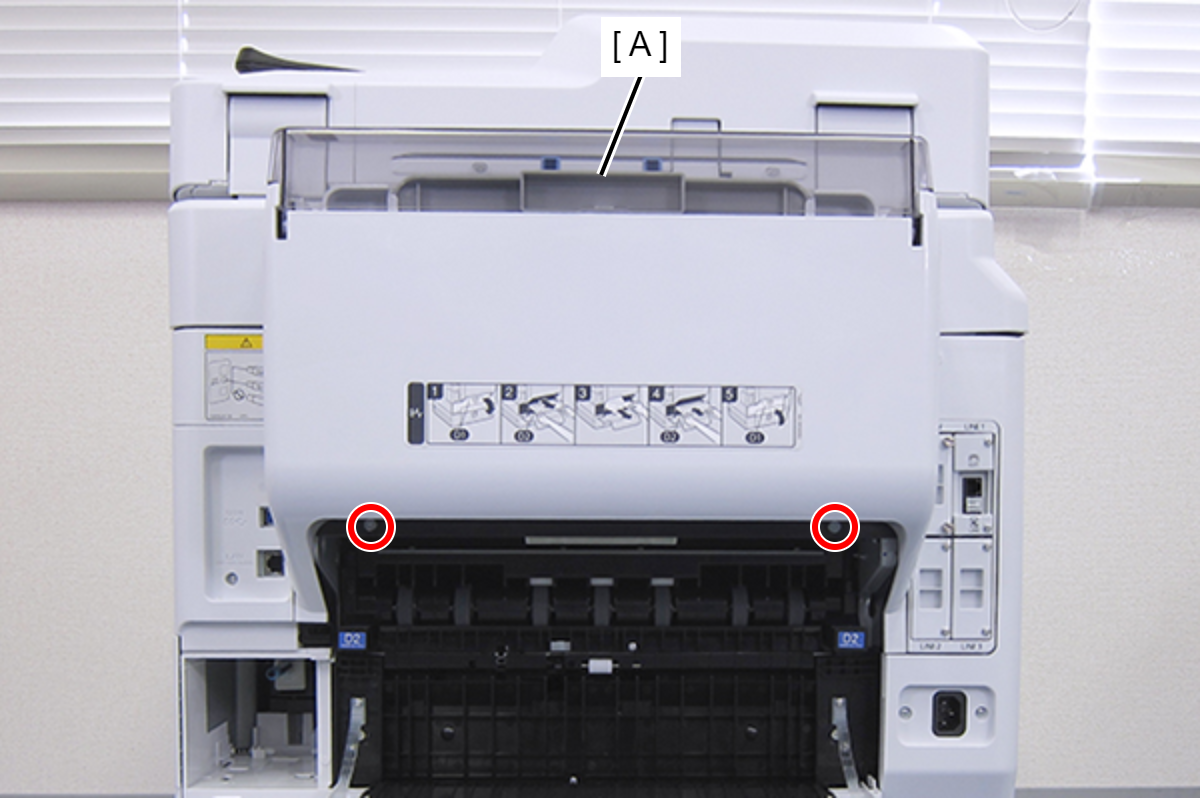
- Remove the 5 screws, then remove the Rear ADF Cover Assy (A).
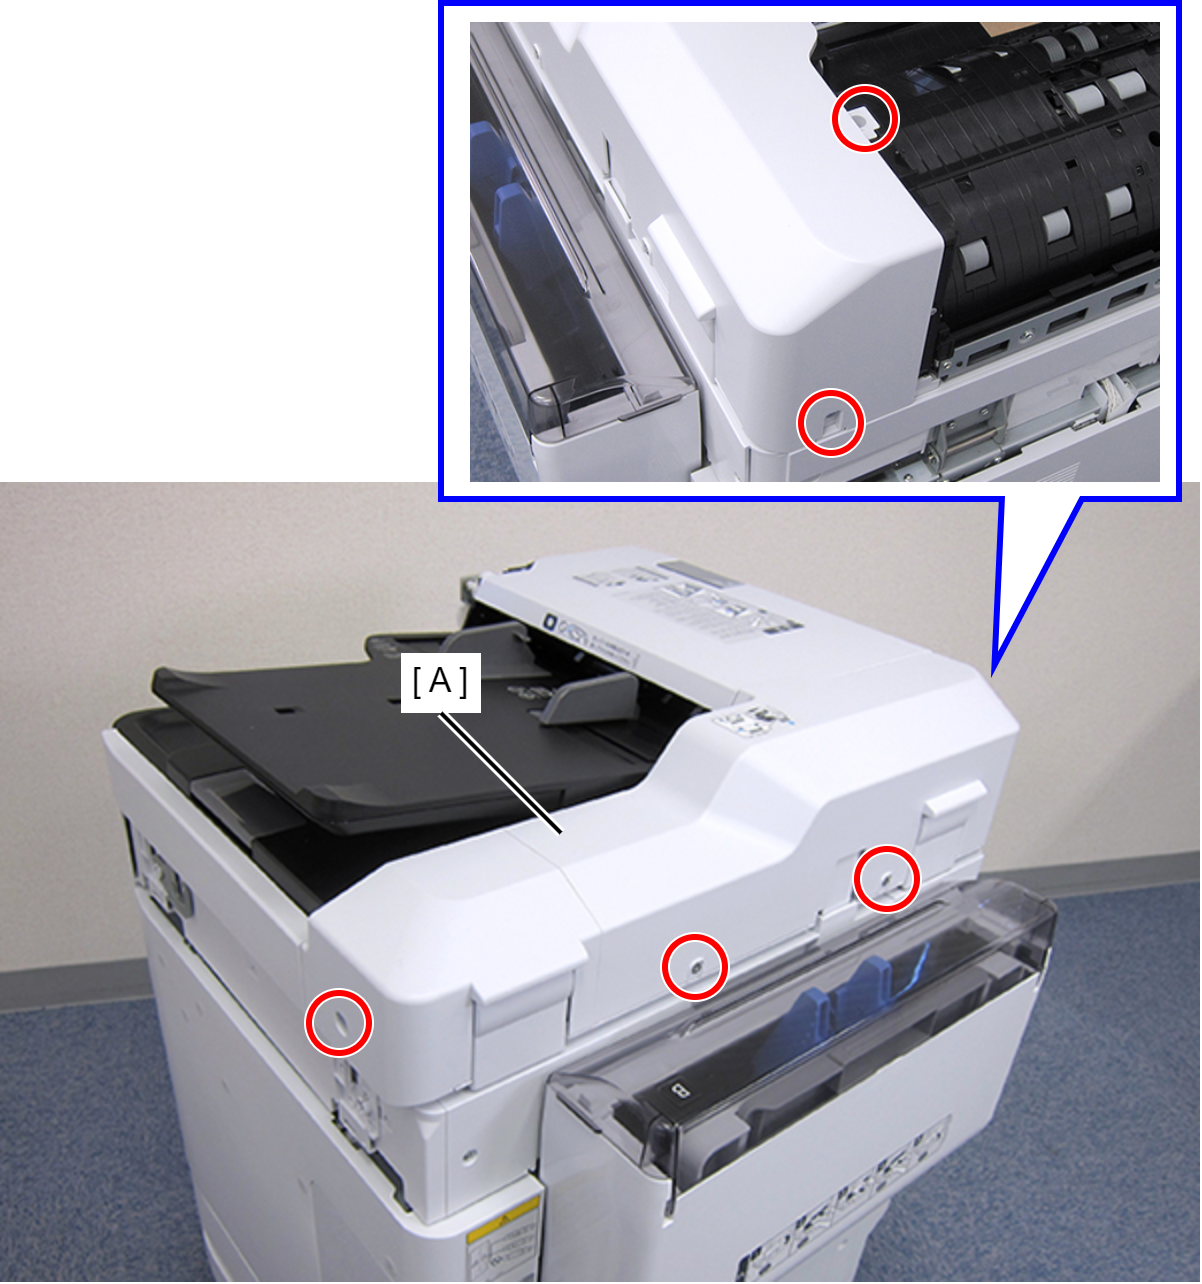
 : C.SHOULDER S-TITE,3X5
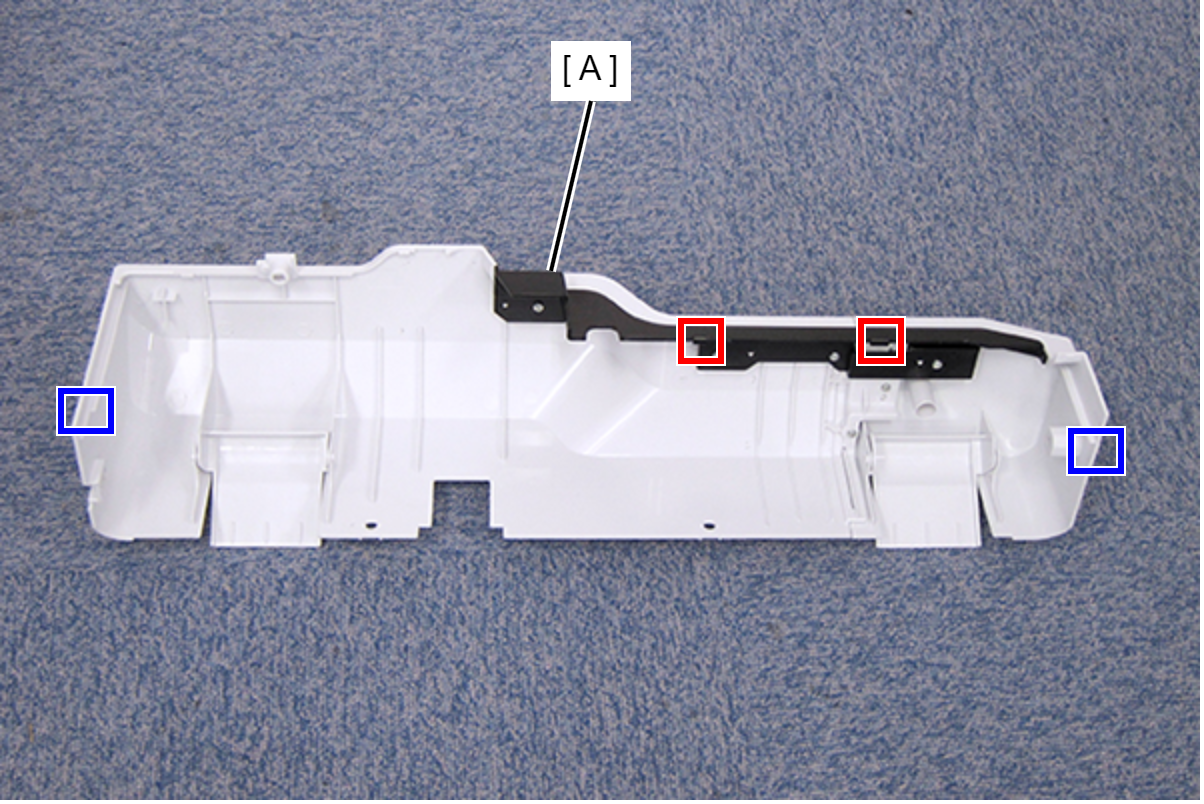
- Disengage the two hooks and the two tabs, then remove the Rear ADF Cover Assy (A).
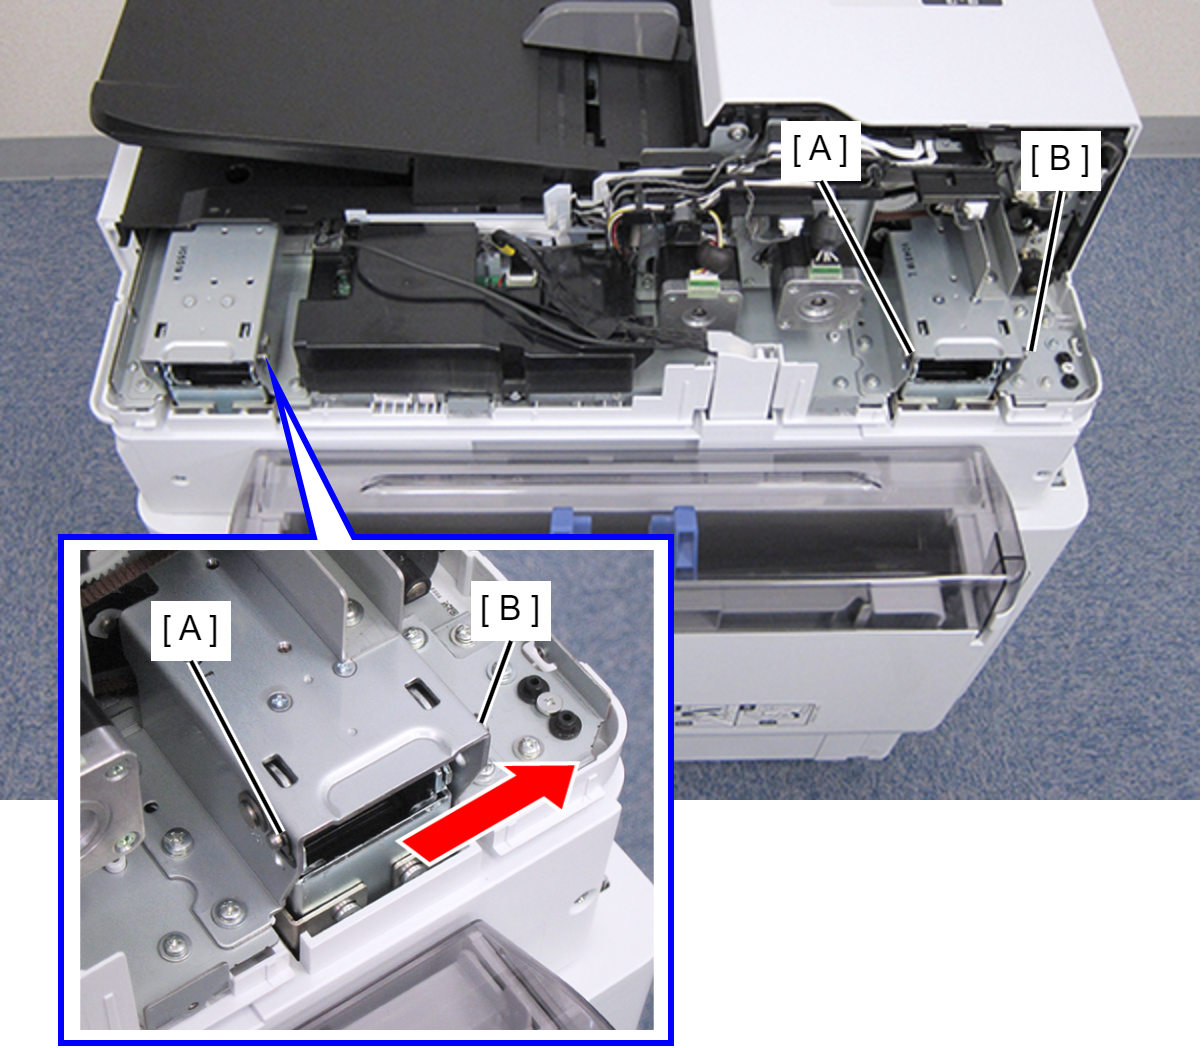
- Remove the two C-ring (A), and pull out the two Stopper Shaft (B).
- Remove the two screws.
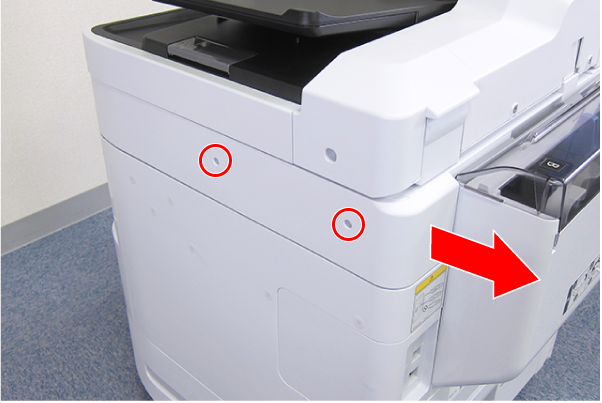
- : C.B.S-TITE-SCREW-3x8-F.ZN-3C
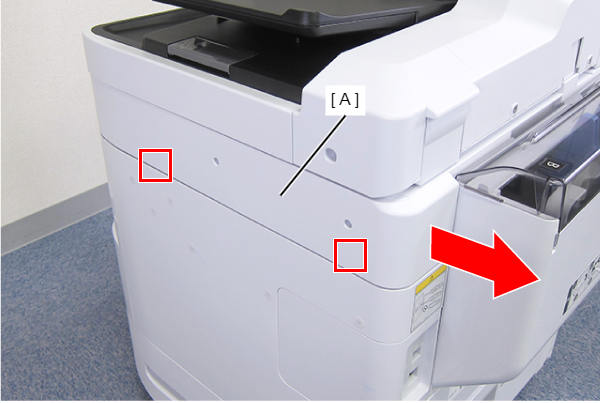
- Disengage the two hooks by sliding the Right SC Cover (A) toward the rear of the product, then remove it.
- Remove the screw.
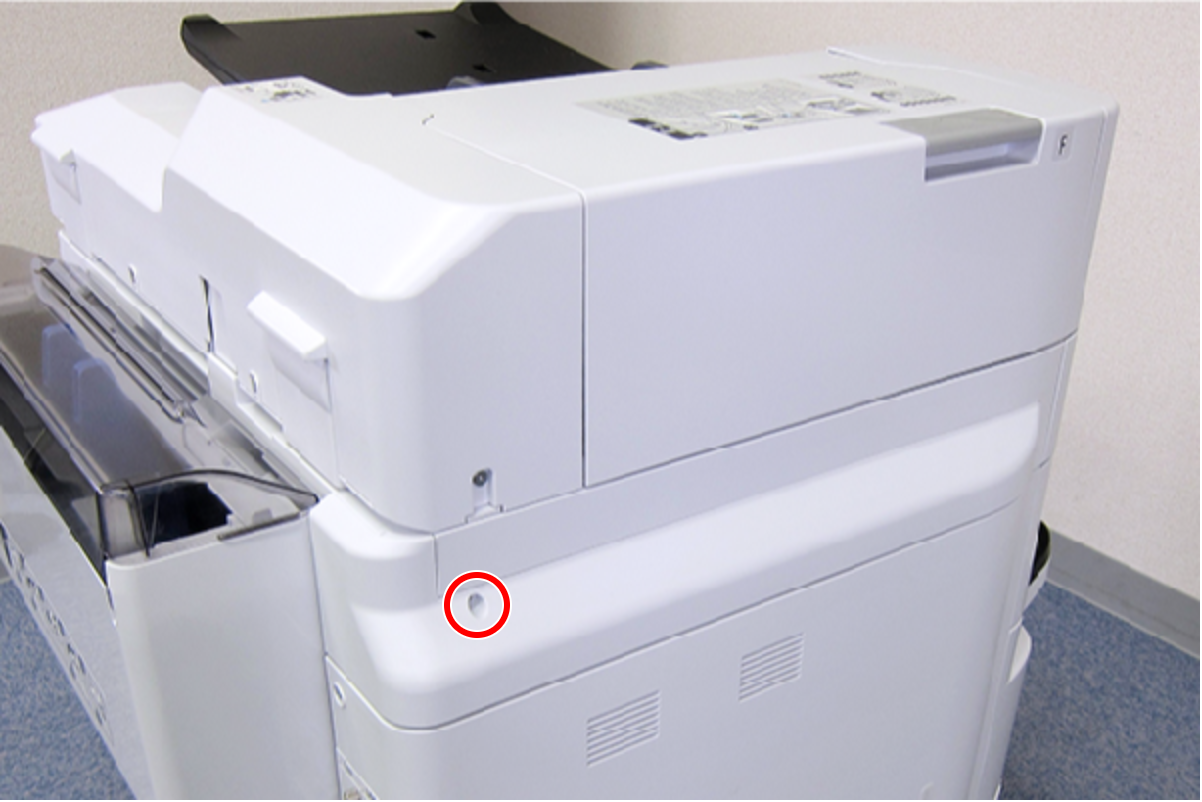
- : C.B.S-TITE-SCREW-3x8-F.ZN-3C
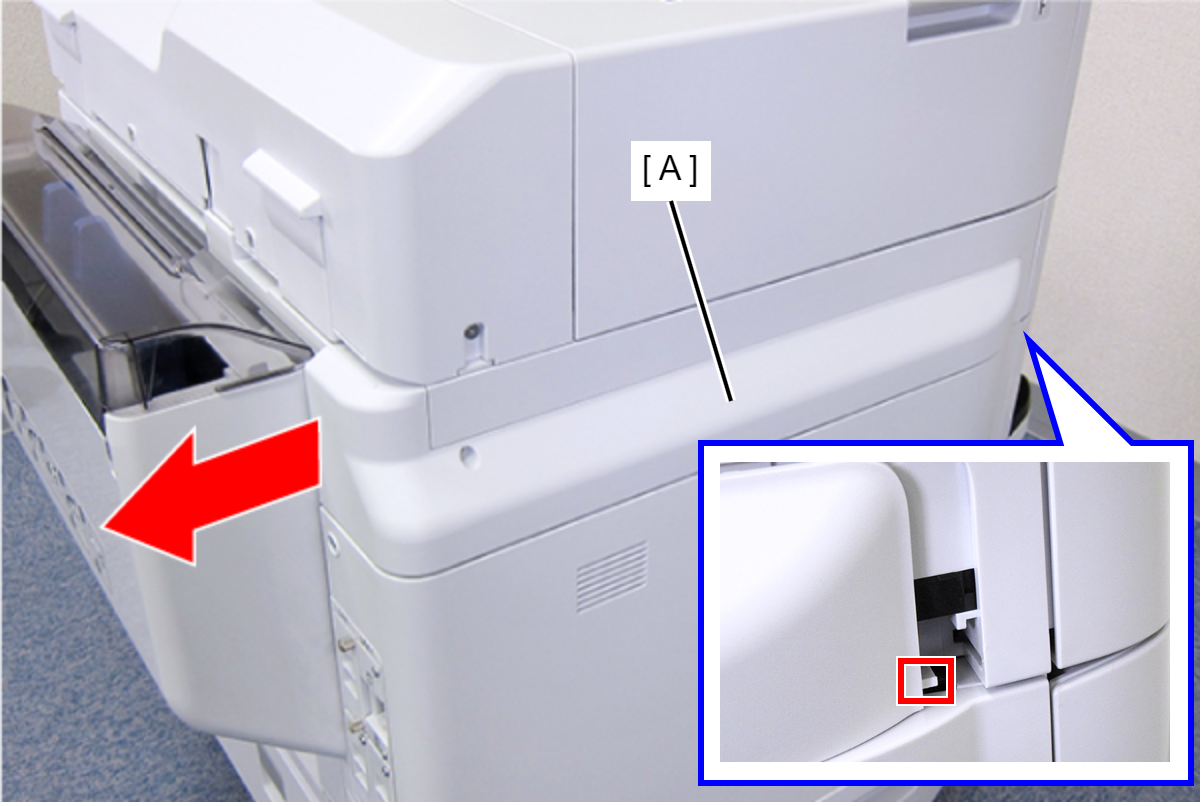
- Slide the Left SC Cover (A) toward the rear of the product to disengage the tab.
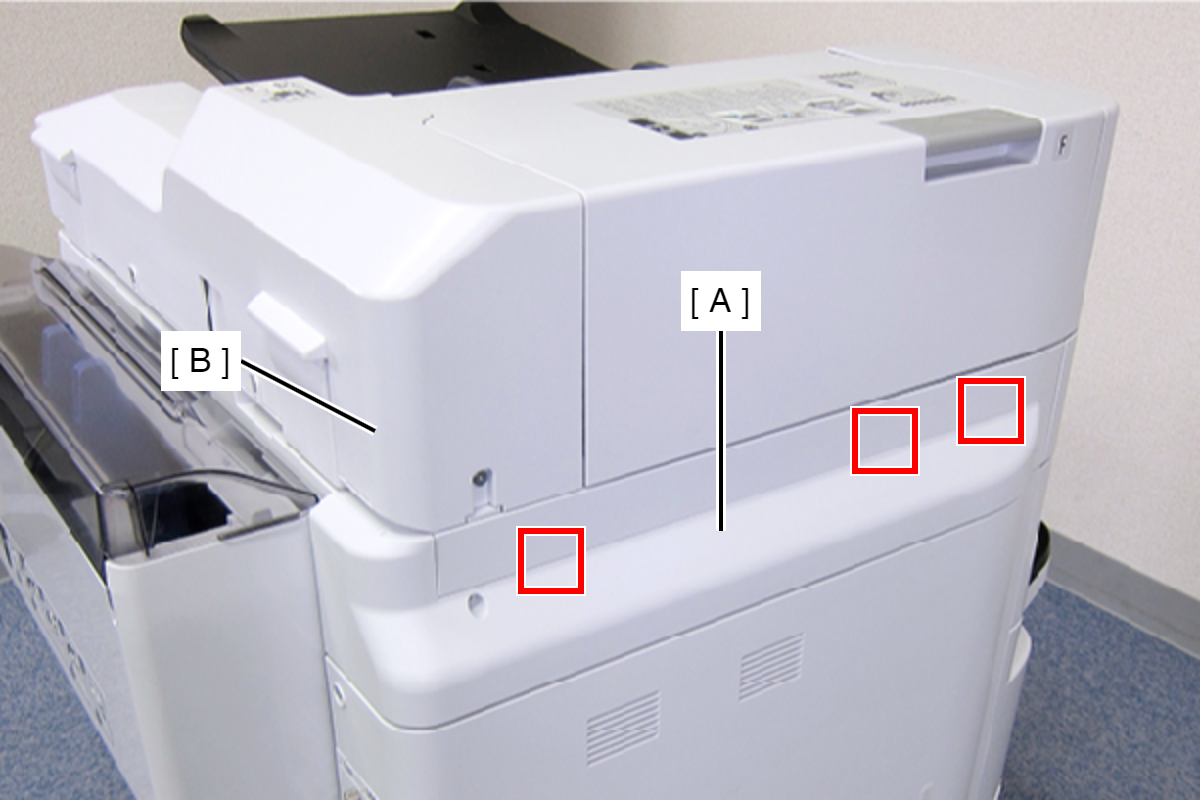
- Disengage the three tabs by inserting a flathead screwdriver into the gap between the Left SC Cover (A) and the ADF Unit (B), and then remove the Left SC Cover (A).
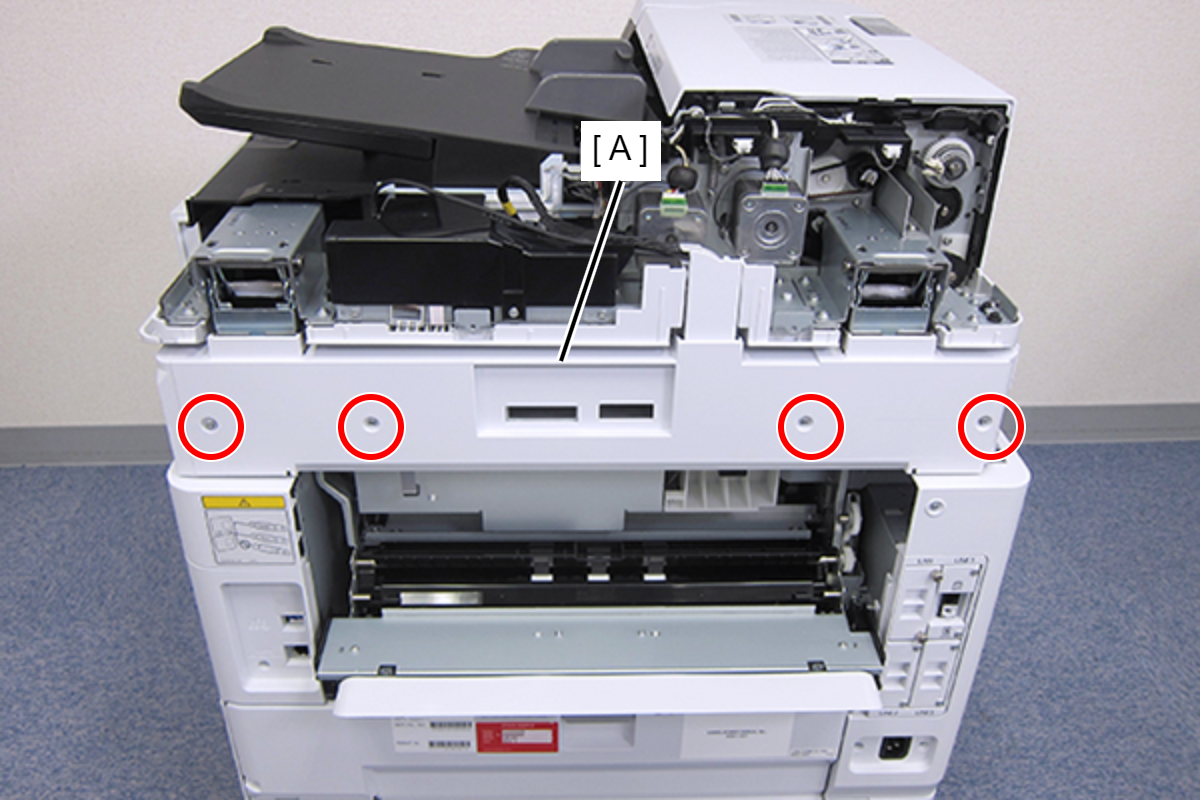
- Remove the two screws, then remove the Rear ASF Unit (A).
- : C.SHOULDER S-TITE,3X5
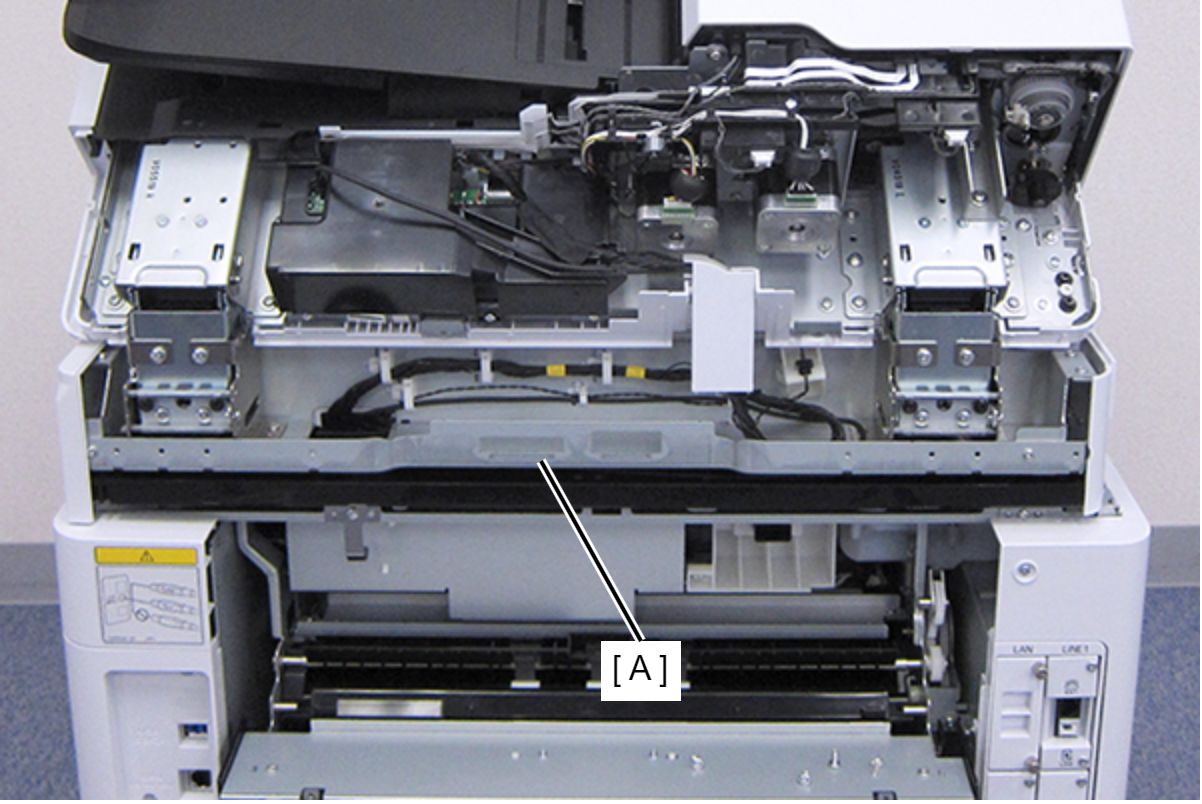
- Remove the screw, then remove the Rear SC Cover (A).
- : C.B.S-TITE-SCREW-3x8-F.ZN-3C
- Open the ADF Unit (A).
- Remove the eight screws.
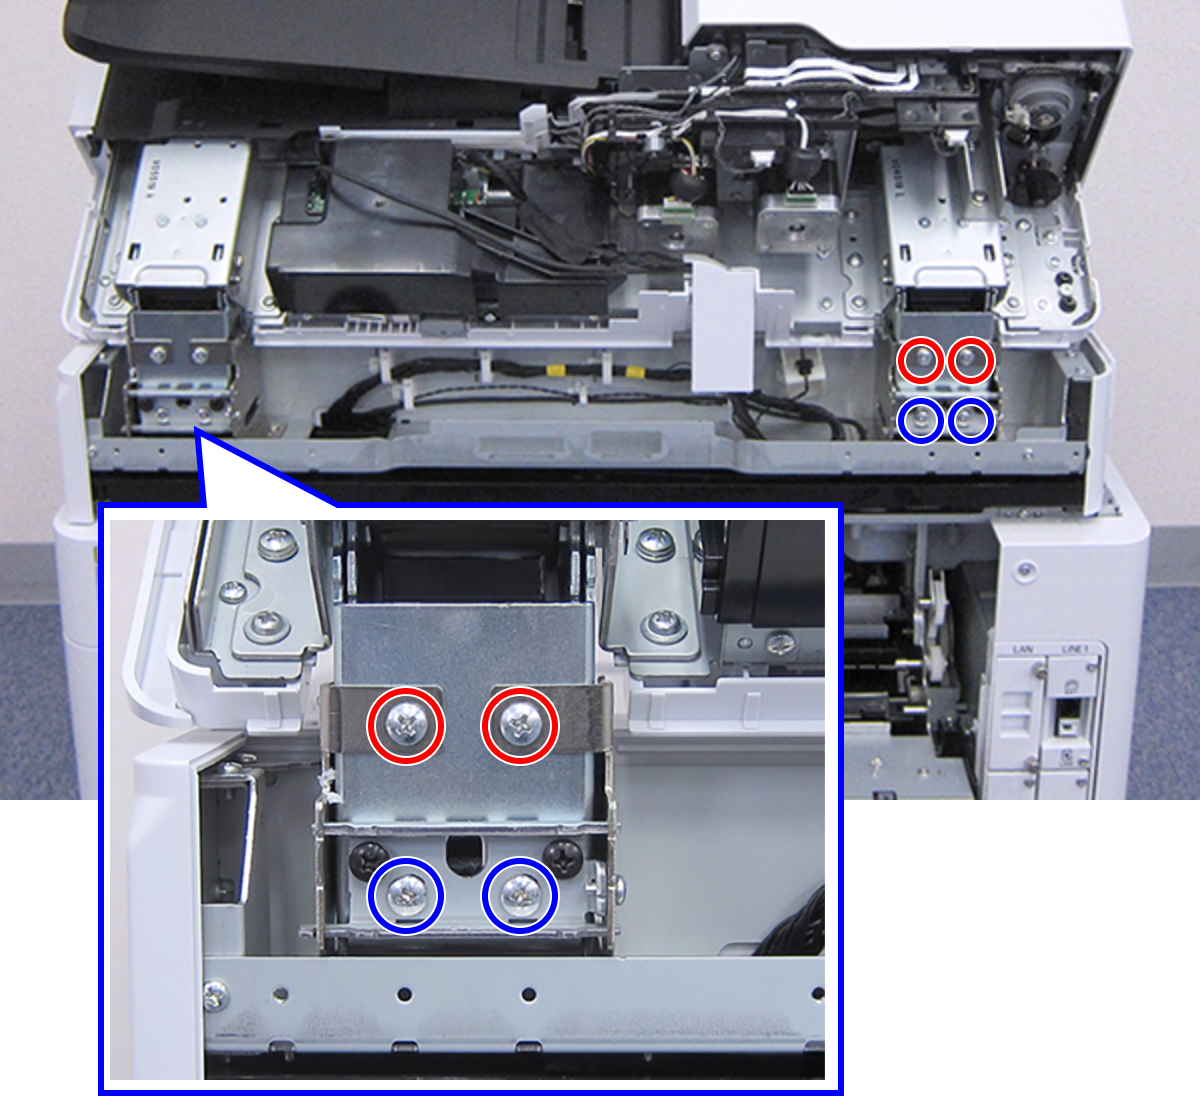
- : C.B.SCREW-4x6-F.ZN-3C
 : C.B.SCREW-4x8-F.ZN-3C
- Loosen the four adjustment screws.
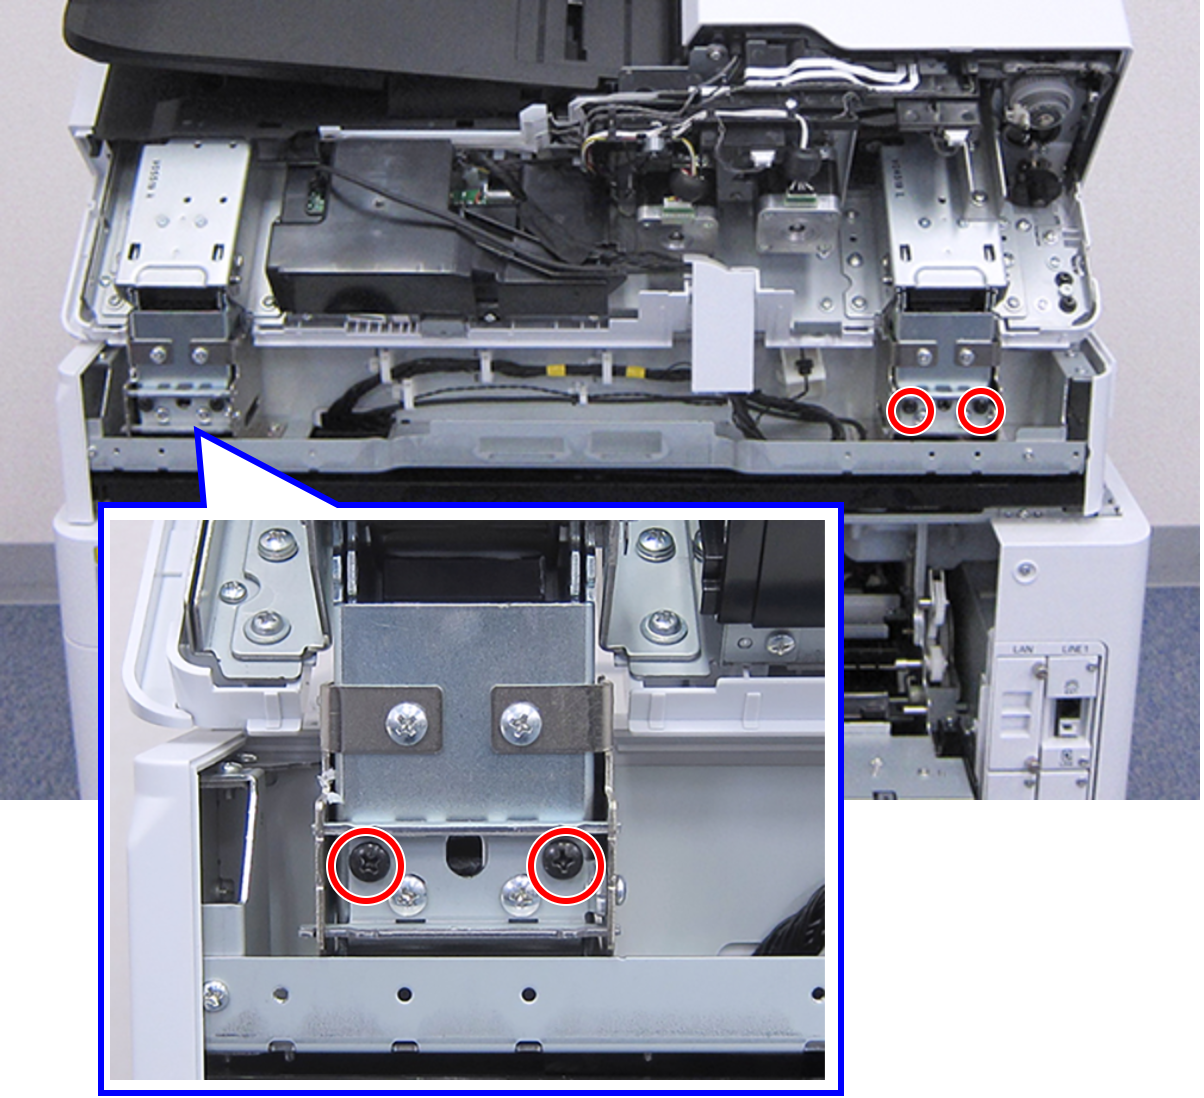
- : C.B.SCREW-4x6-F.ZB-3C
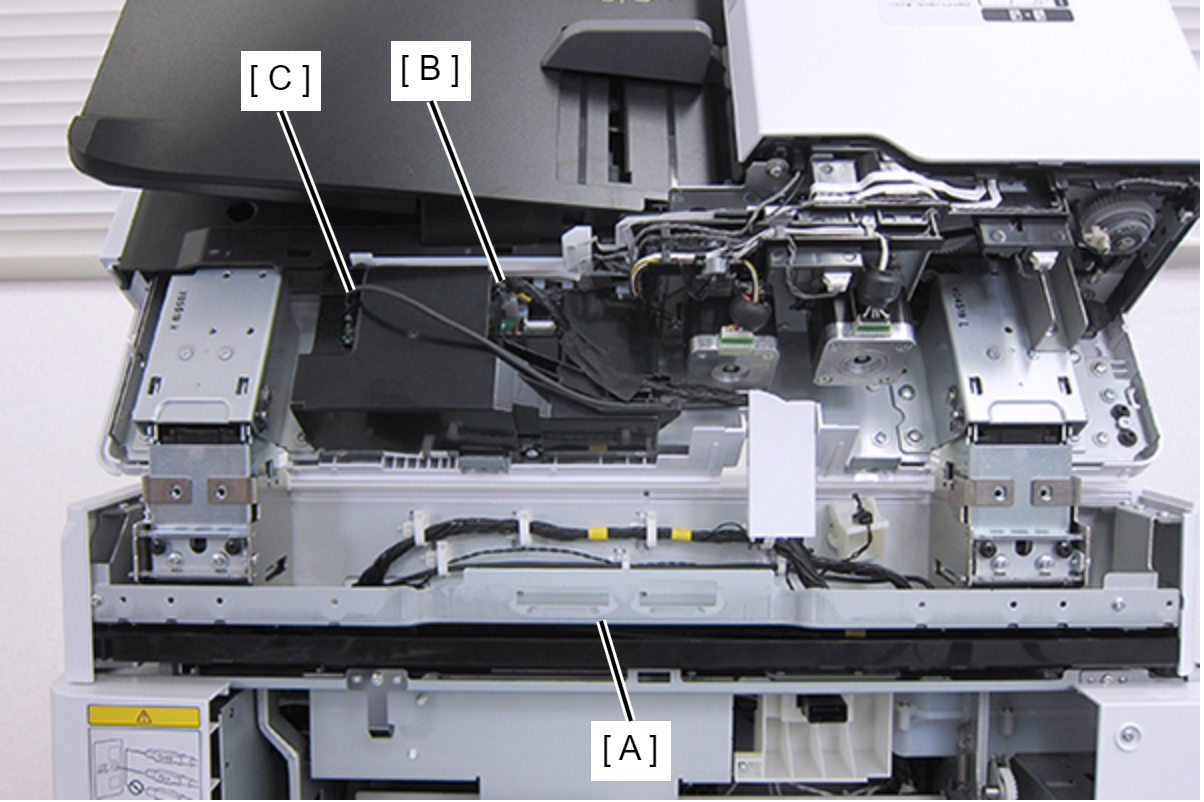
- Disconnect the following cables from the ADF Unit (A).
- Cable (USB) (CN823) (B)
- Cable (CN820) (C)
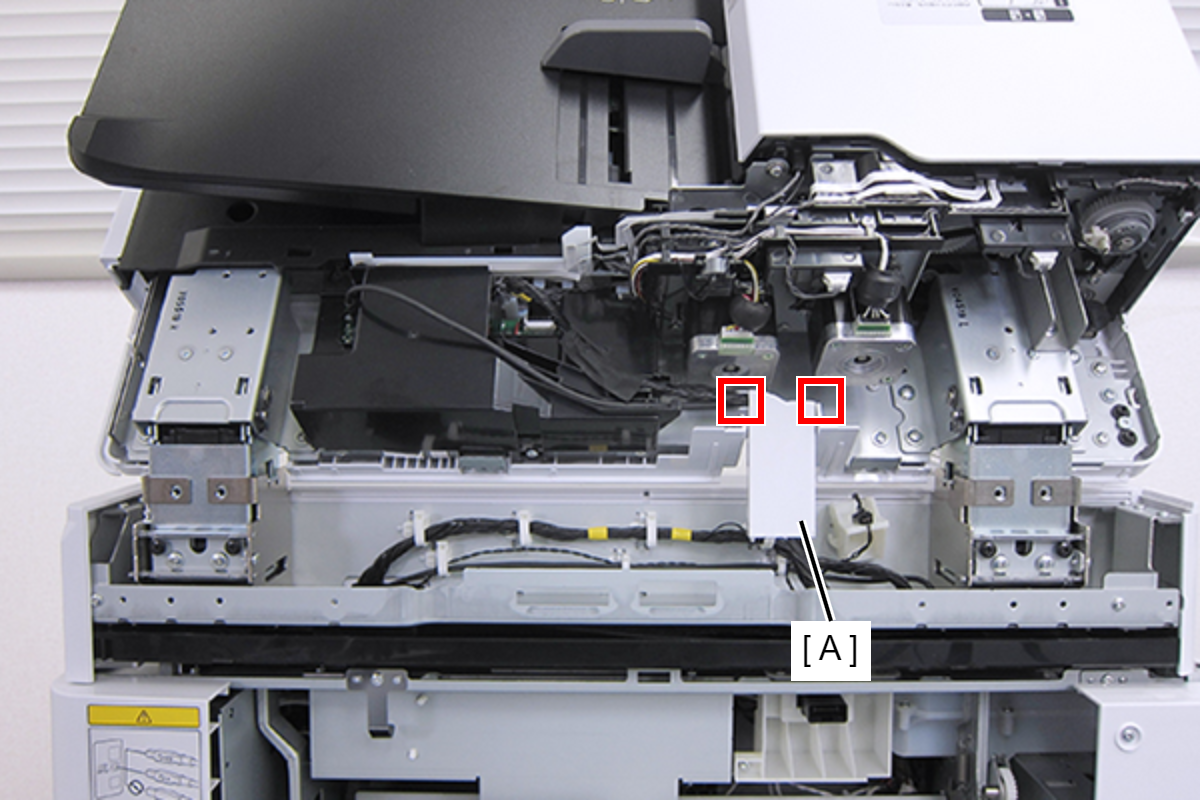
- Disengage the two hooks and remove the Cable Holder (A).
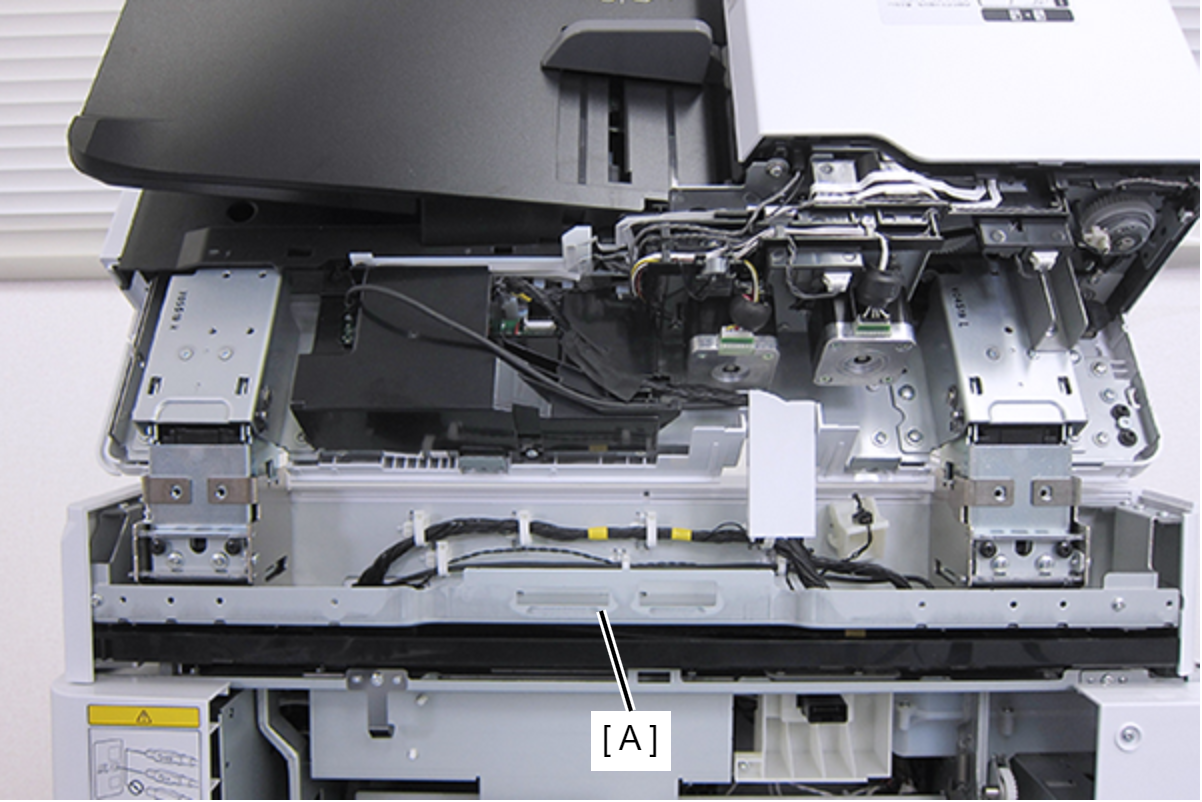
- Pull the ADF Unit (A) upward to remove it.
 Assembly / 組み立て
When reinstalling the ADF Unit, you need to check the ADF Unit for tilt in relation to the SCN Unit. Make sure to follow the procedure below to install the ADF Unit.
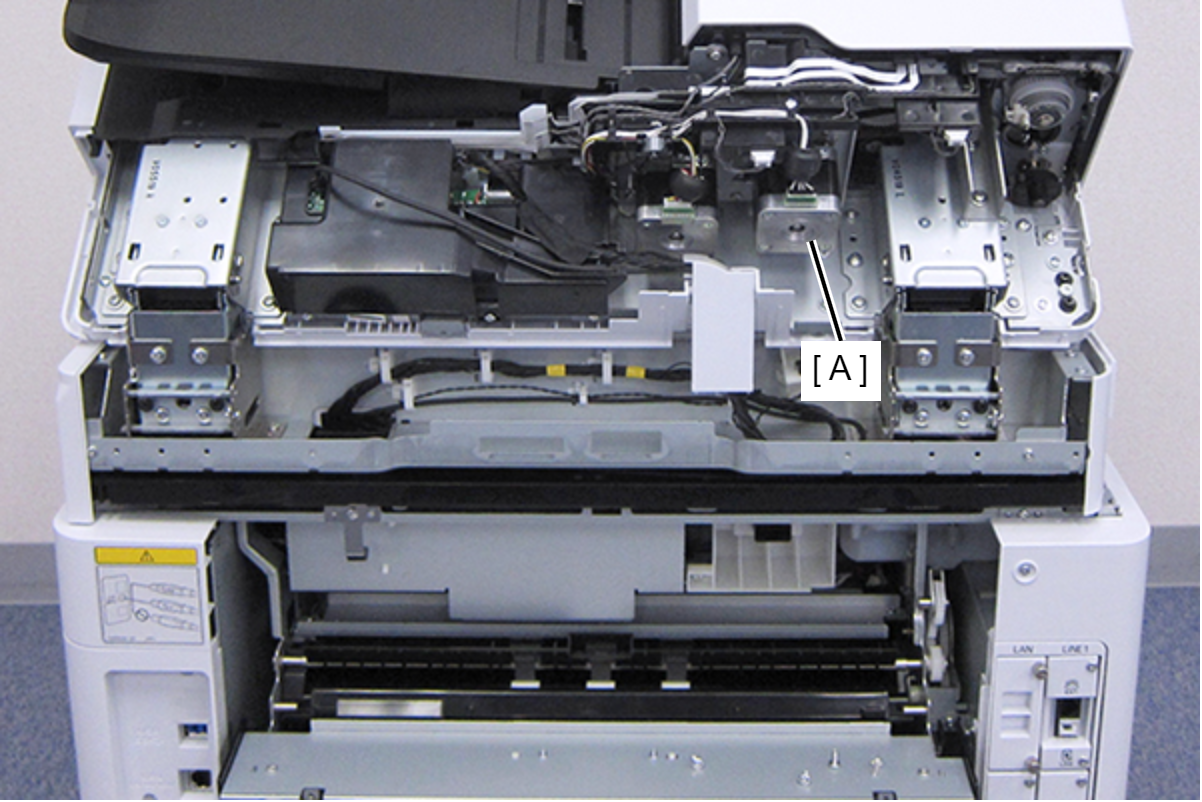
- With the ADF Unit opened, insert the feet of the unit into the ADF hinges.
- Remove the screw from the ADF Unit (A), and then remove the two tilt check jigs (B).
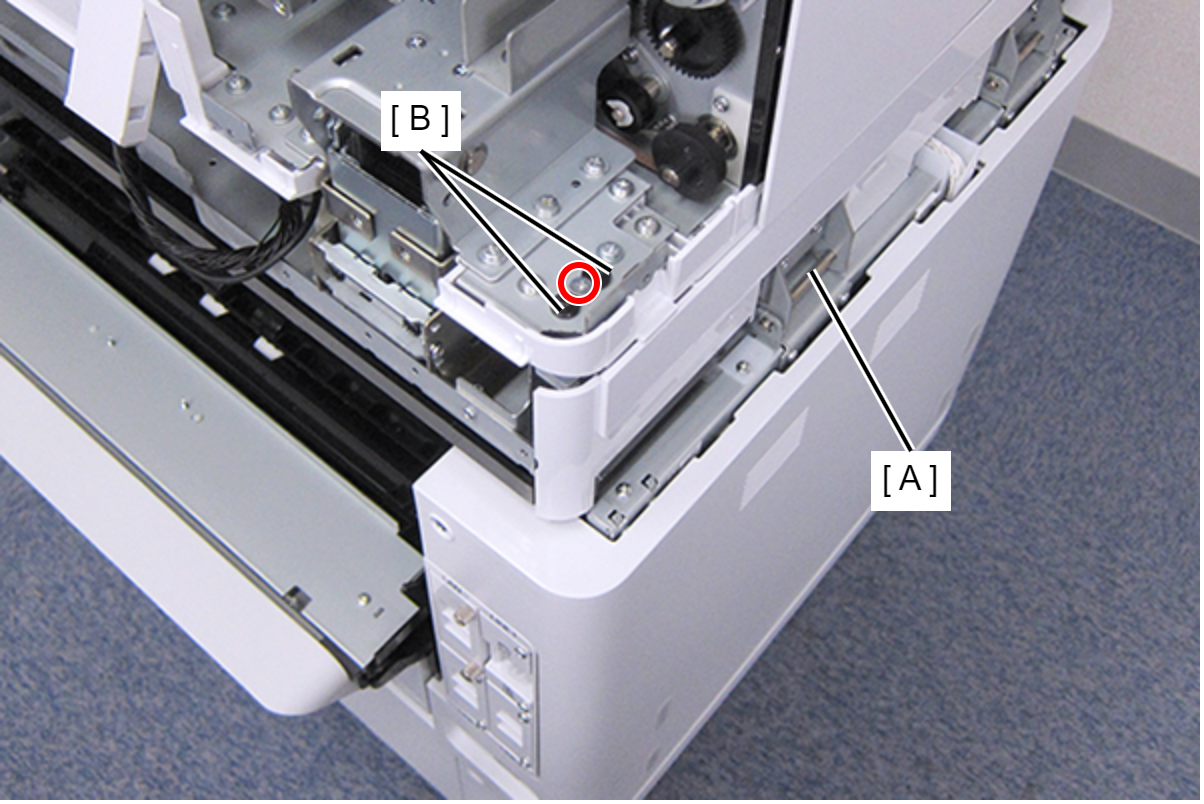
 : C.SHOULDER S-TITE,3X5
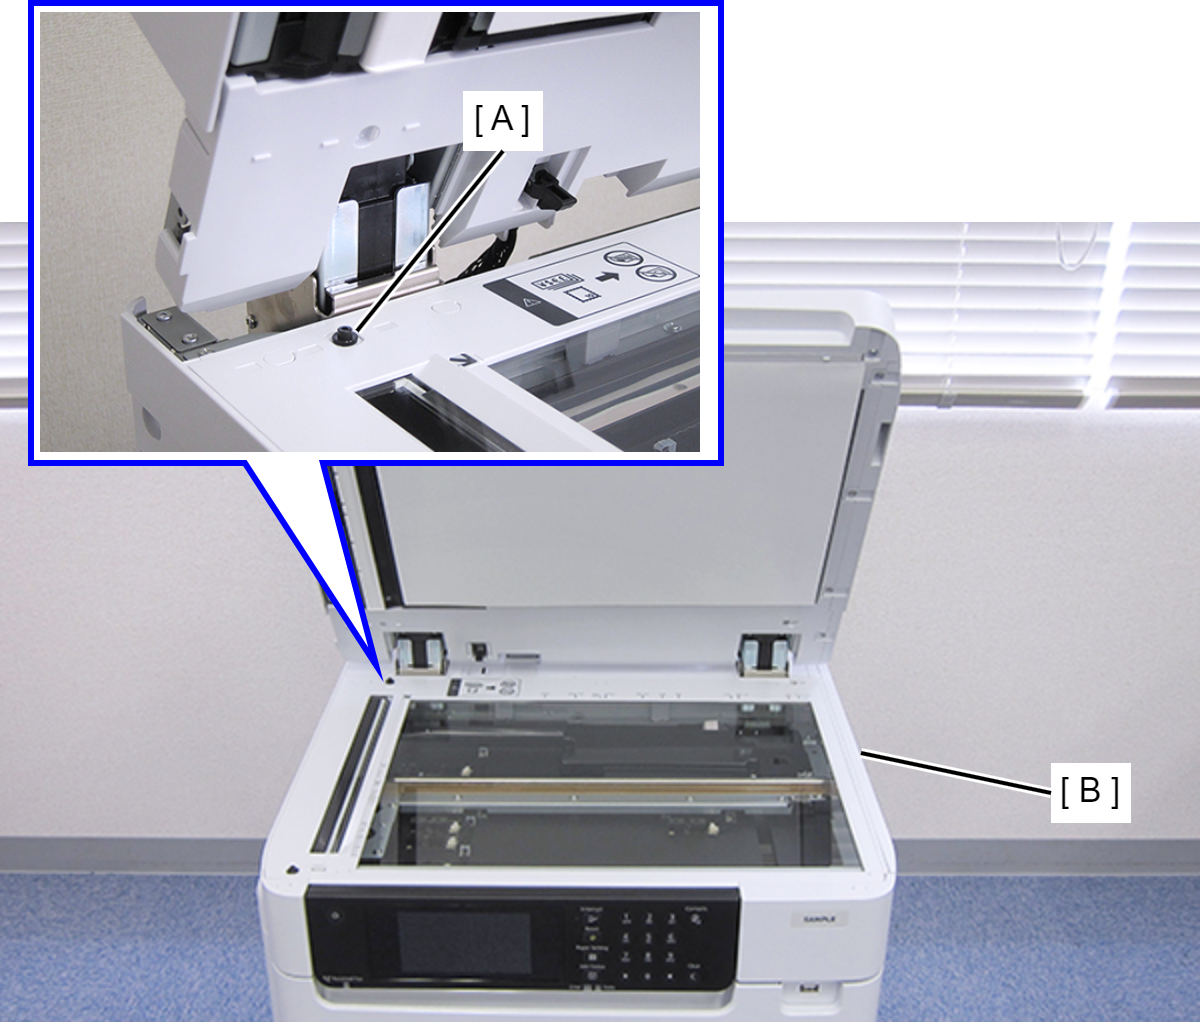
- Attach tilt check jig (A) on the rear side of the SCN unit (B). (Other one will be used later)
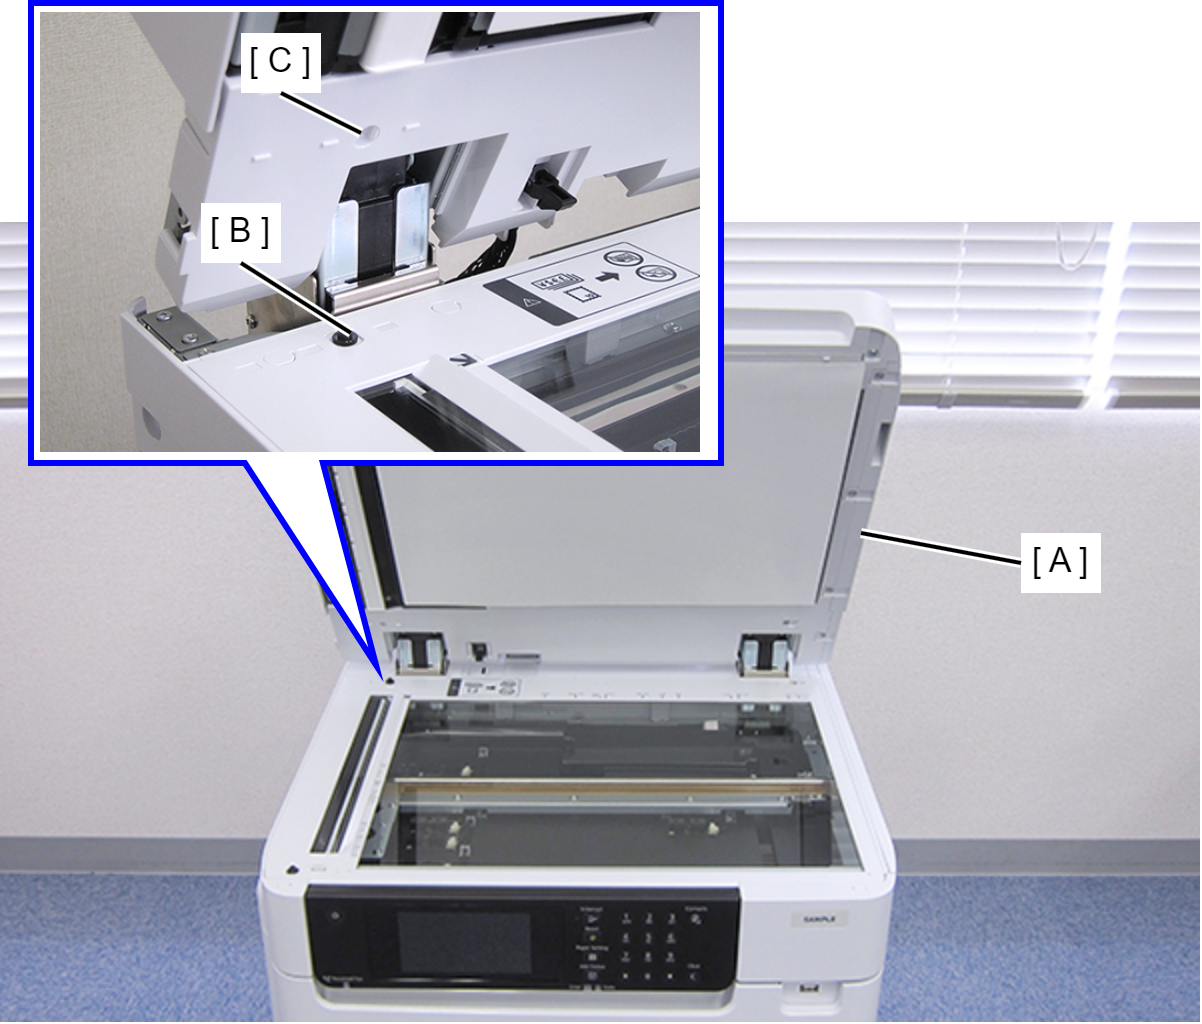
- Close the ADF Unit (A) slowly so that the tilt check jig (B) fits into the hole (C) on the bottom of the ADF unit without interference.
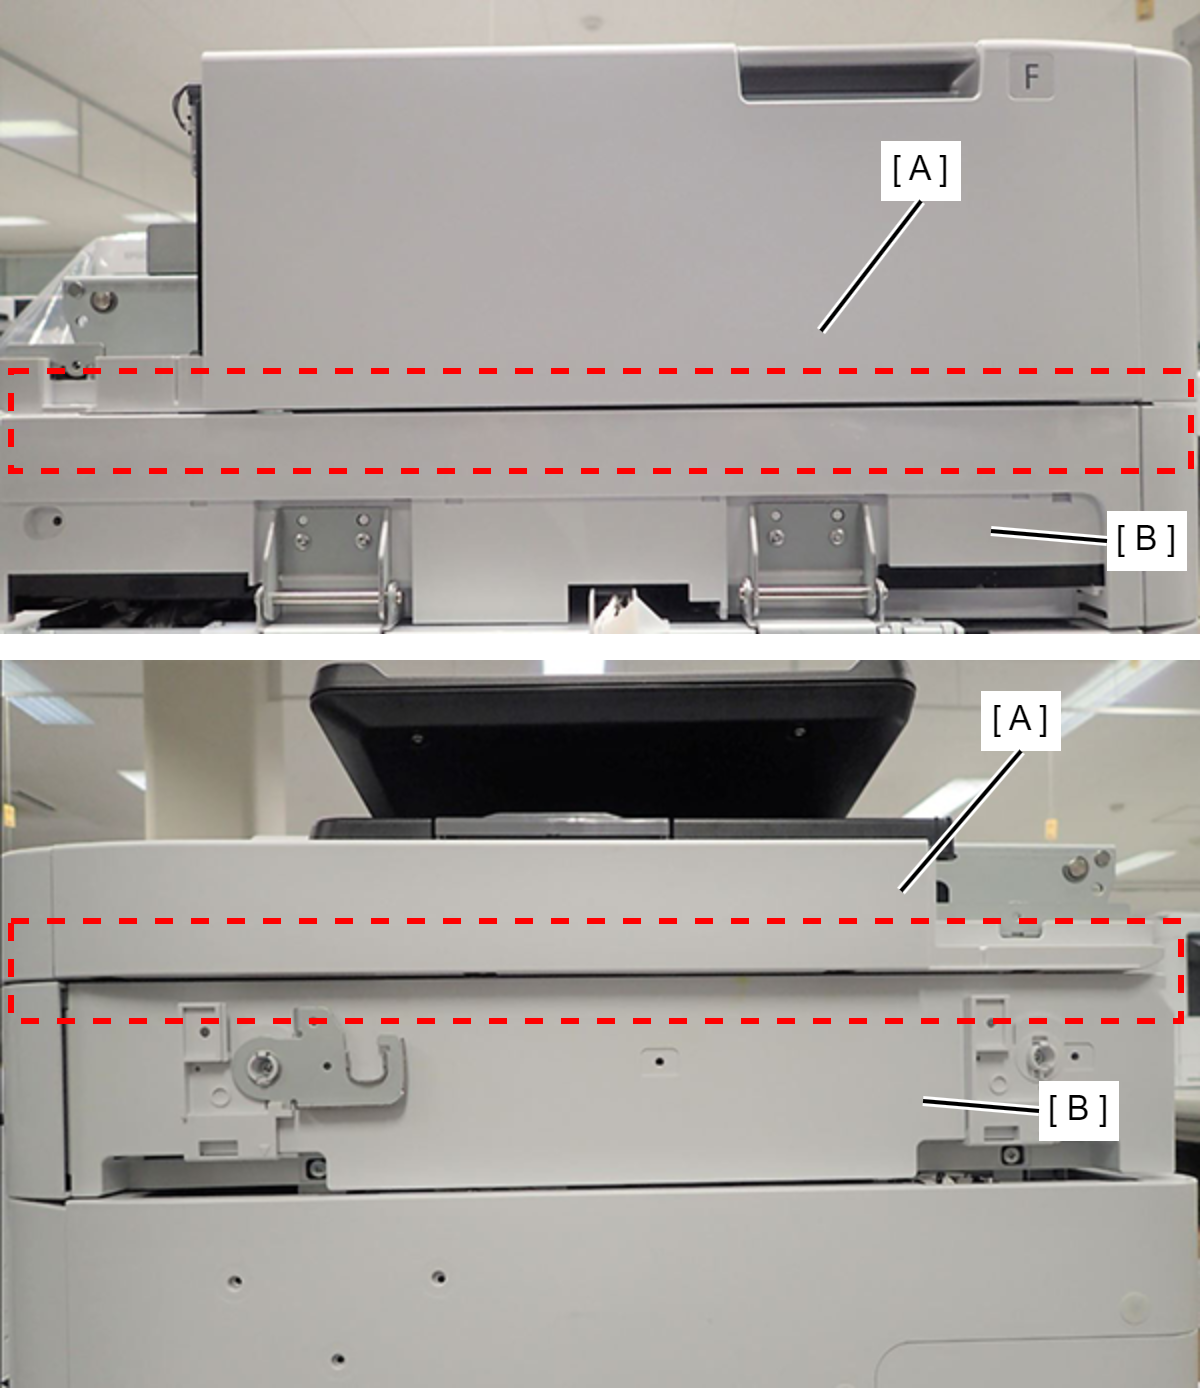
- Check that the distance (height) between the ADF Unit (A) and the SCN Unit (B) is parallel on the left and right sides.
- If they are parallel, go to Step 7.
- If they are not parallel, go to Step 6.
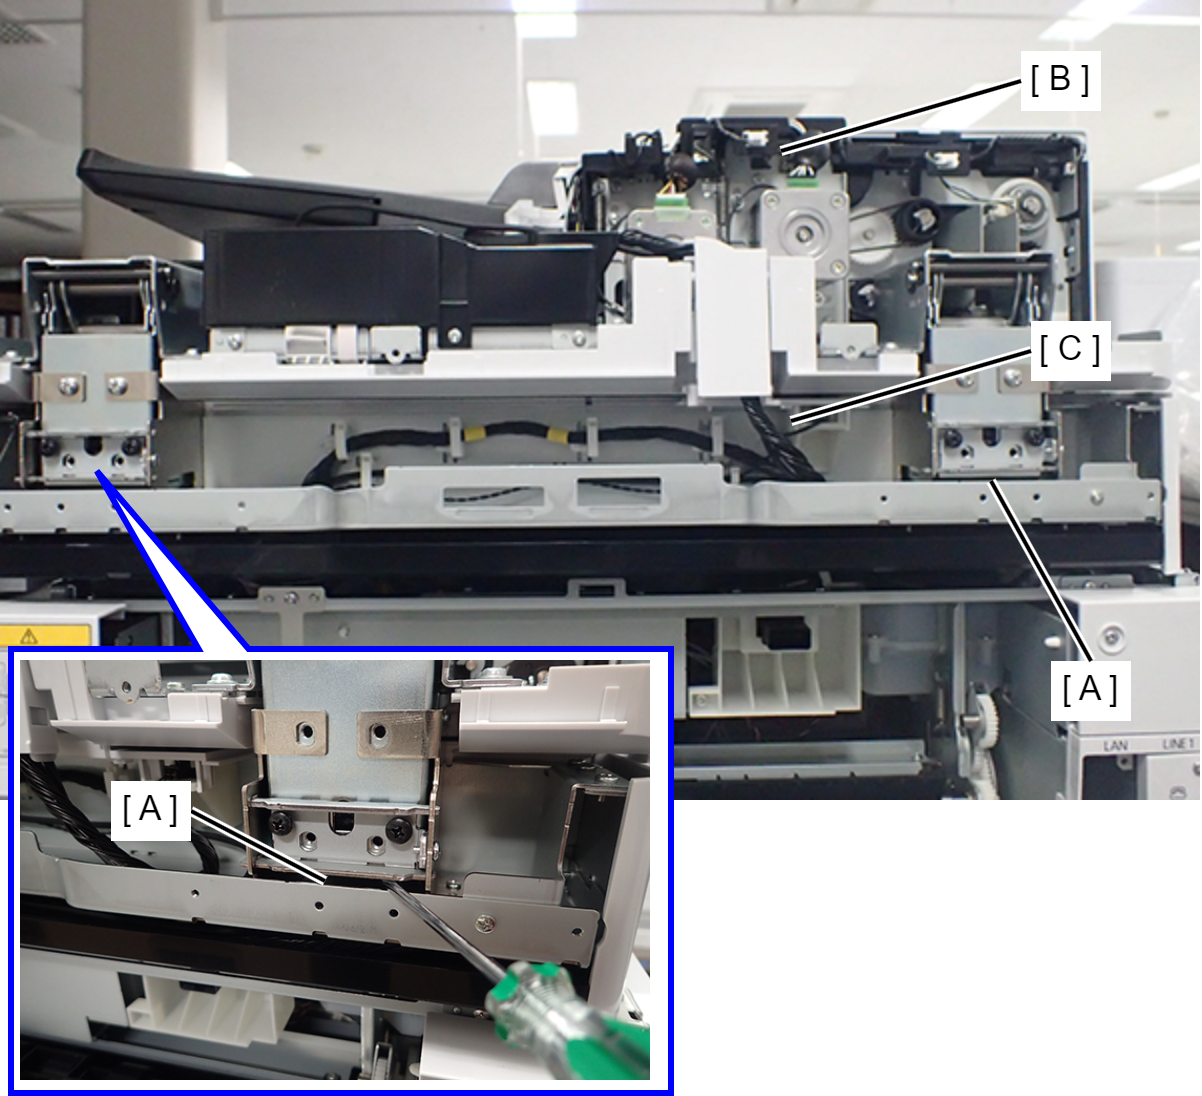
- Insert a flathead screwdriver under the ADF hinge (A), and then lift the hinge with a screwdriver until the distance (height) between the ADF unit (B) and SCN unit (C) is parallel.
 Check Point / チェックポイント
- Perform on each side of ADF hinges.
- If rear side of the ADF unit becomes higher due to the lifting of the hinge, open the ADF unit and repeat this step.
- If you open the ADF Unit at this point, the hinge lowers and you have to perform this step again. Keep closing the ADF Unit and go to step 7.
With the ADF Unit is closed, attach 4 screws and fix ADF Unit (A).
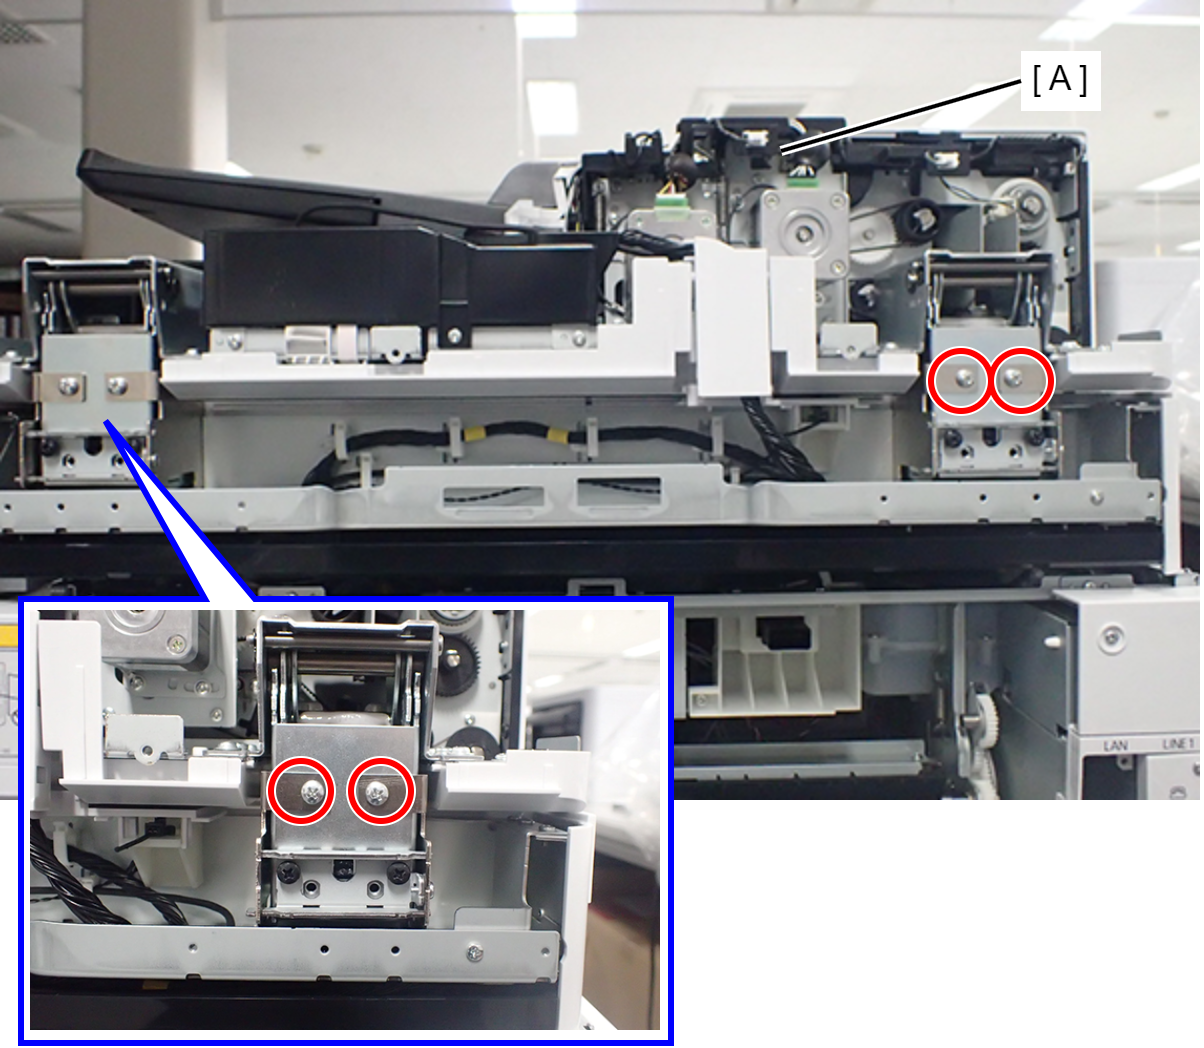
- : C.B.SCREW-4x6-F.ZN-3C
Check Point / チェックポイントIf you attach 4 screws removed at previous step, this adjustment after step 8 cannot be done correctly. Use 4 screws to fix the unit at this point.
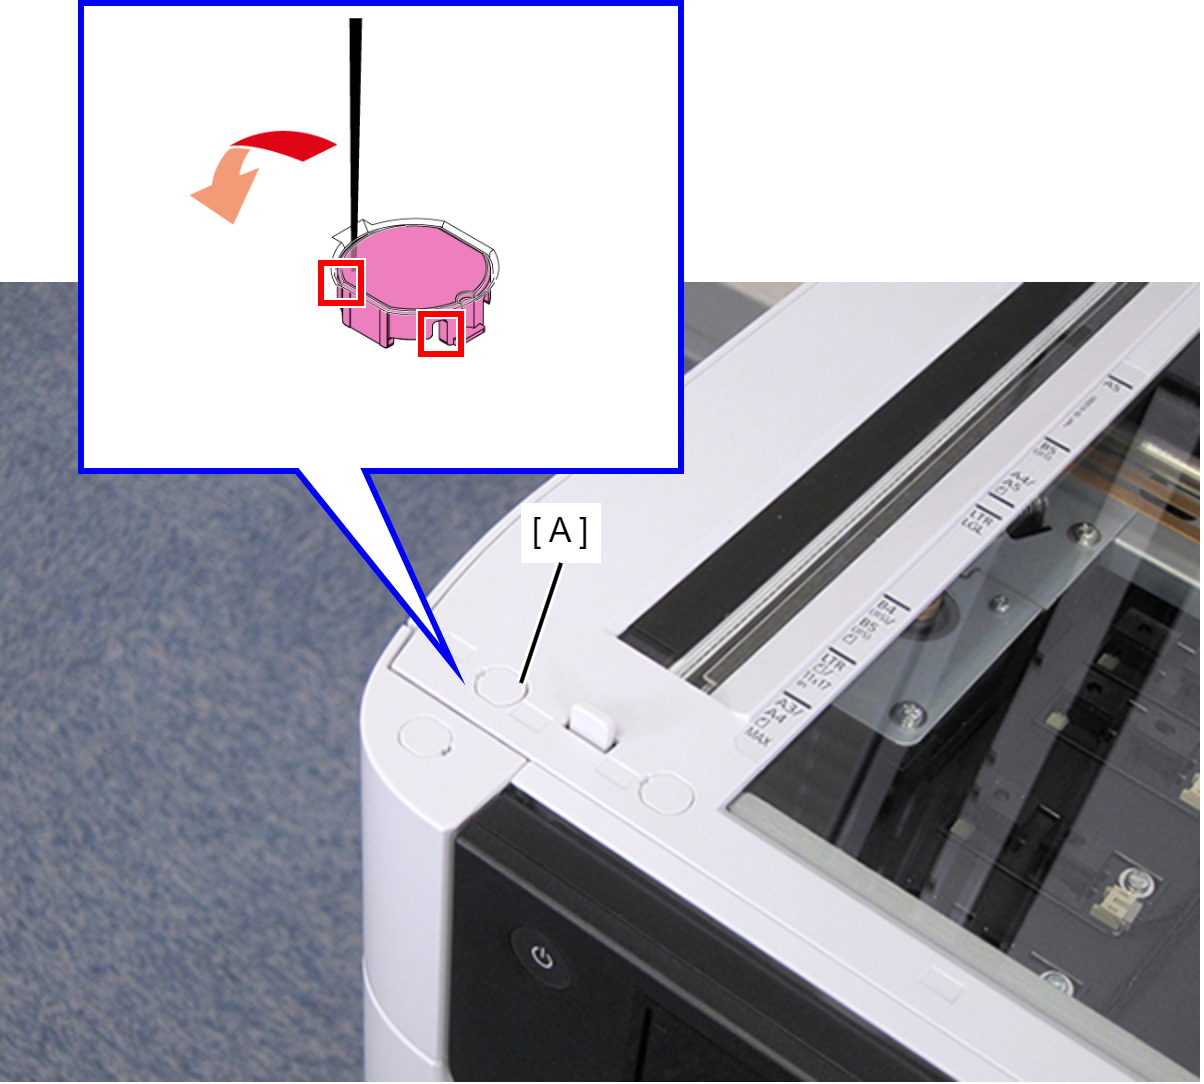
- Open the ADF Unit. Insert a fine-tipped tool such as tweezers to disengage the hook, then remove the SCN Housing Cap (A).
- Set one of the tilt check jigs (A) removed in step 2 at the mounting position on the front side of the SCN unit (B). (The tilt check jig (C) attached to the rear side of the SCN unit (B) in step 3 remains as it is).
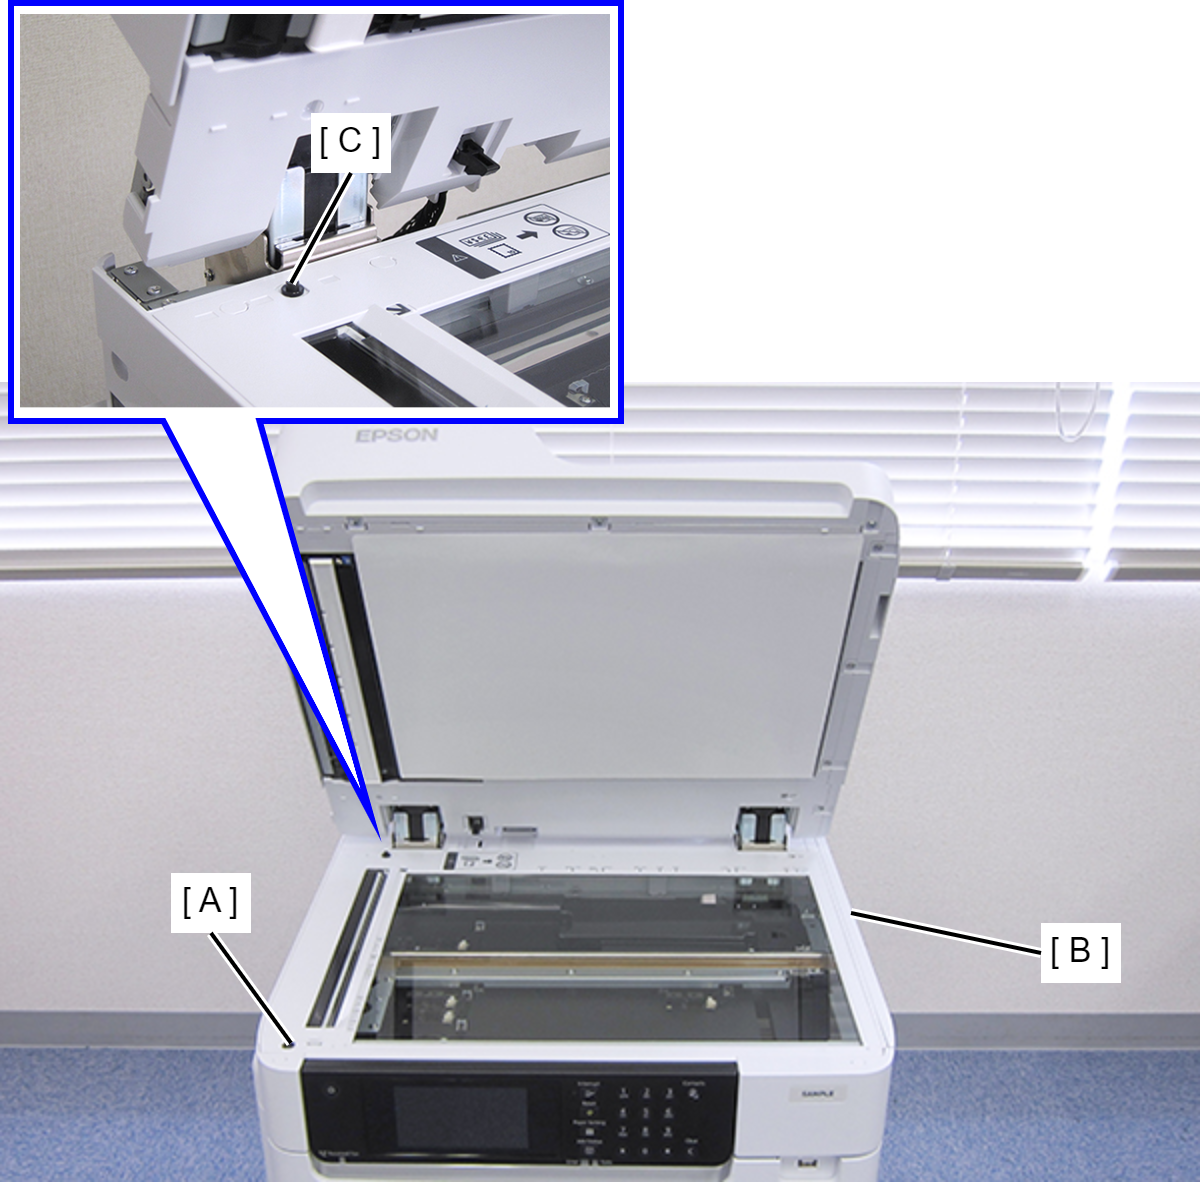
- Close the ADF unit (A) slowly and make sure that the inclination check jig (B) fits into the hole (C) (x2) on the bottom of the ADF unit without interference.
- If they fit inside the holes, go to Step13.
- If they do not fit inside the holes, go to Step12.
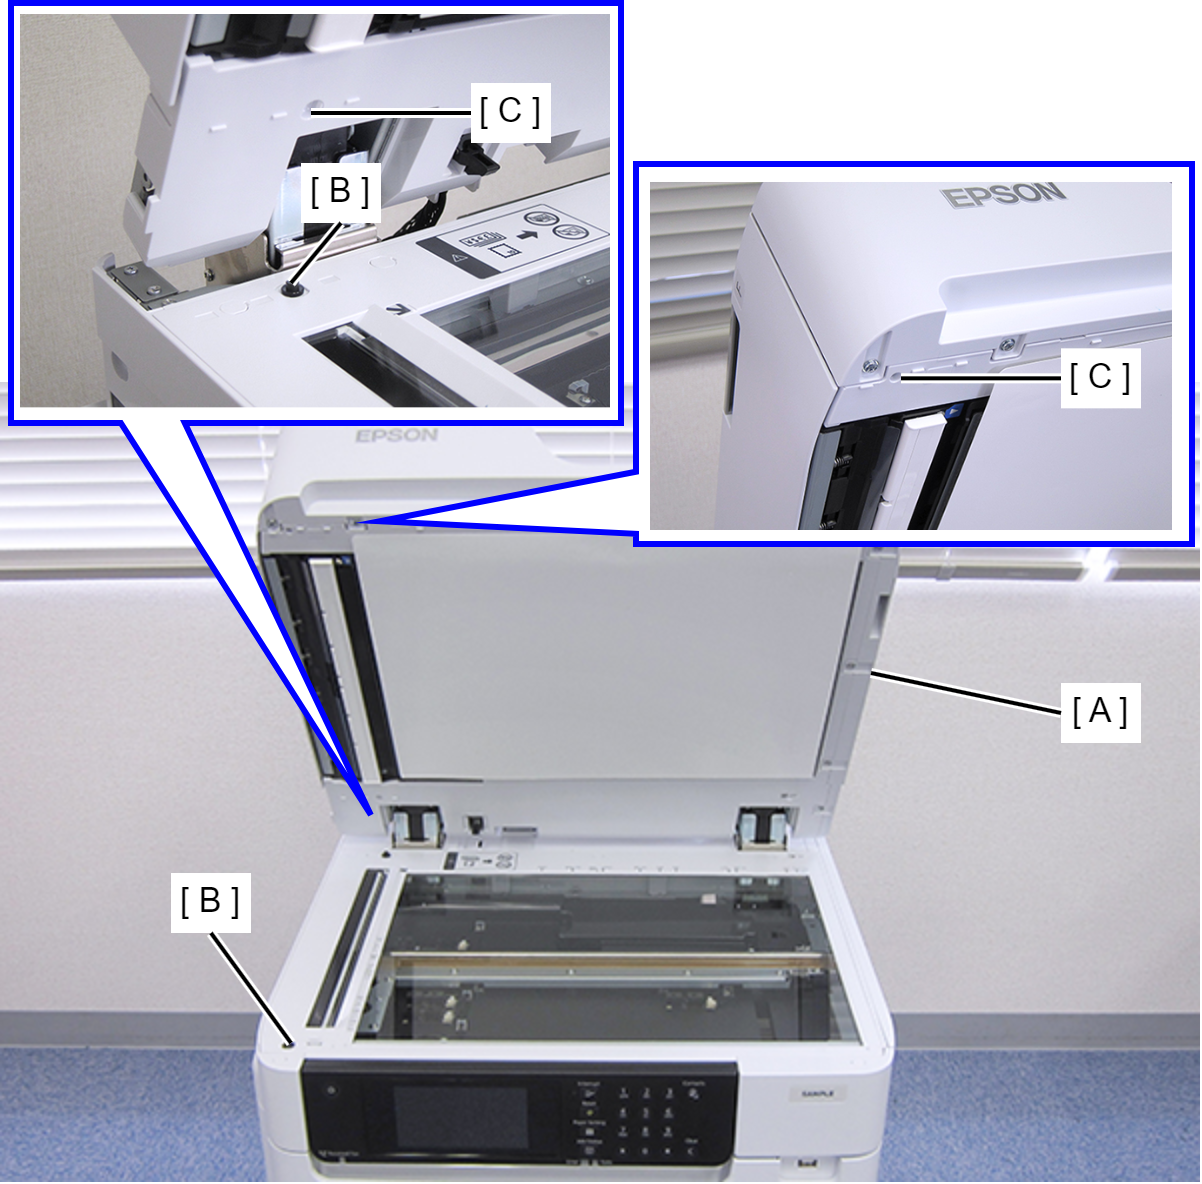
Following the above example adjustment procedure, correct tilt of the ADF Unit using the 4 screws each on the ADF hinges.
After the adjustment, check if the tilt check jigs smoothly fit inside the bottom holes of the ADF Unit.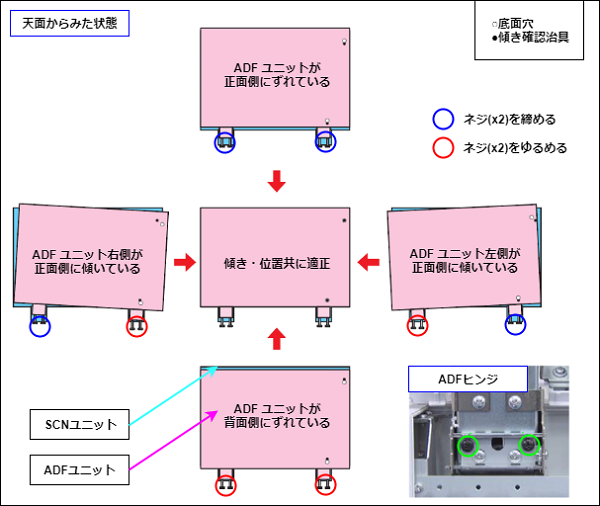
 : C.B.SCREW-4x6-F.ZB-3C
Check Point / チェックポイントCheck the inclination of the ADF unit when it is closed.
Easy to confirm that the tilt check jig is set in the hole on the bottom of the ADF unit.
(clicks)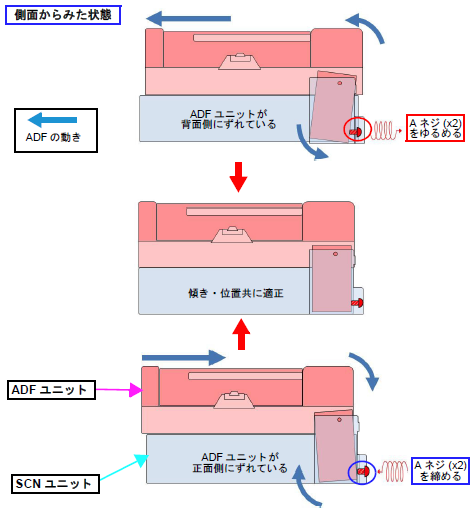
 Caution / 注意
Make adjustments with the 4 screws of the ADF hinge fixed.
- Attach the 4 screws to fix the ADF Unit (A).
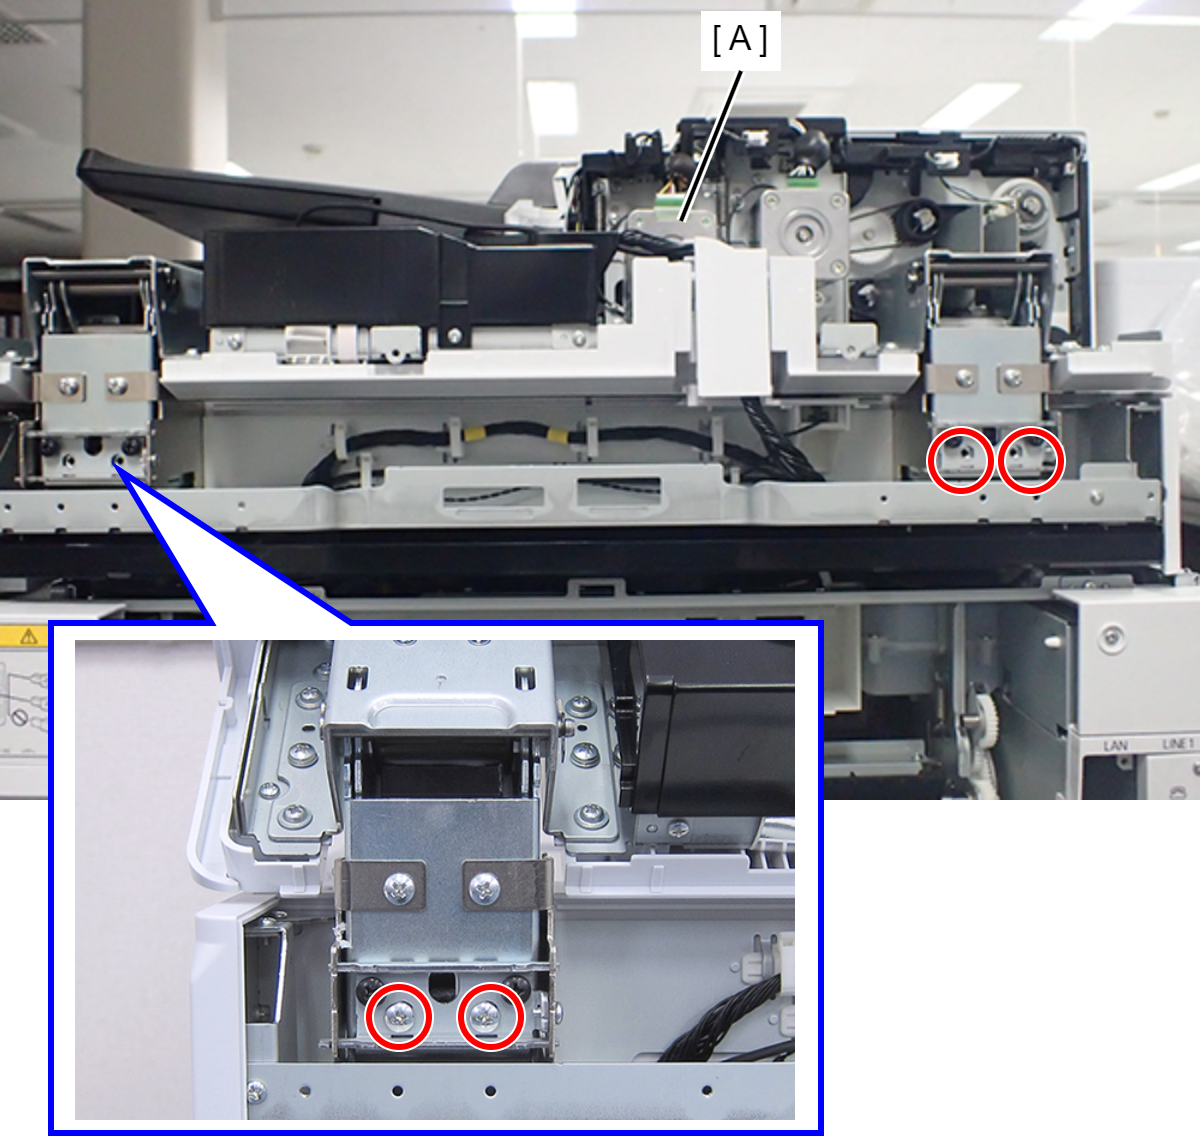
- : C.B.SCREW-4x8-F.ZN-3C
- Remove the tilt check jigs.
- Attach the SCN Housing Cap.
- Connect the cables.
- With the ADF Unit opened, insert the feet of the unit into the ADF hinges.
- Remove the two screws, then remove the Connector Cover (A).
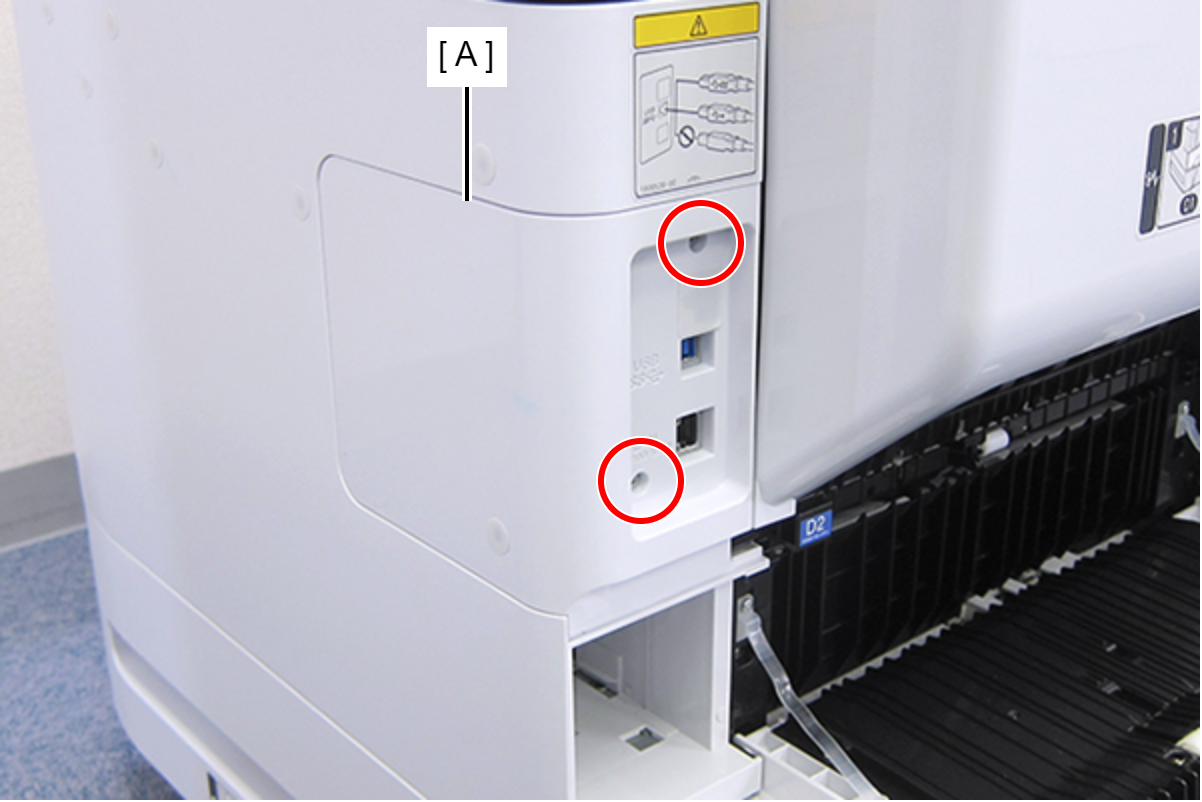
- : C.B.S-TITE-SCREW-3x8-F.ZN-3C
- Remove the two screws, then remove the Right Housing Assy (A) toward the rear of the product.
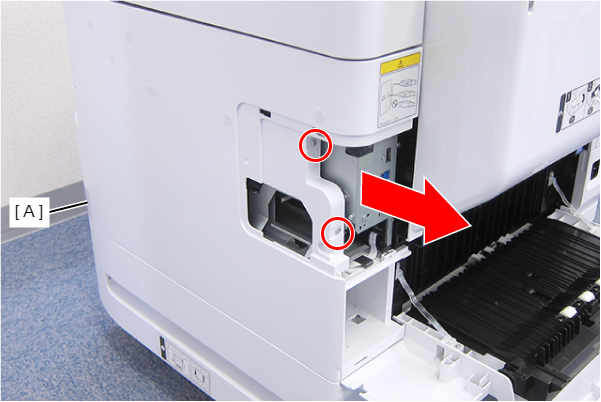
- : C.B.S-TITE-SCREW-3x8-F.ZN-3C
- Remove the three screws, then remove the Left Housing Assy (A) toward the rear of the product.
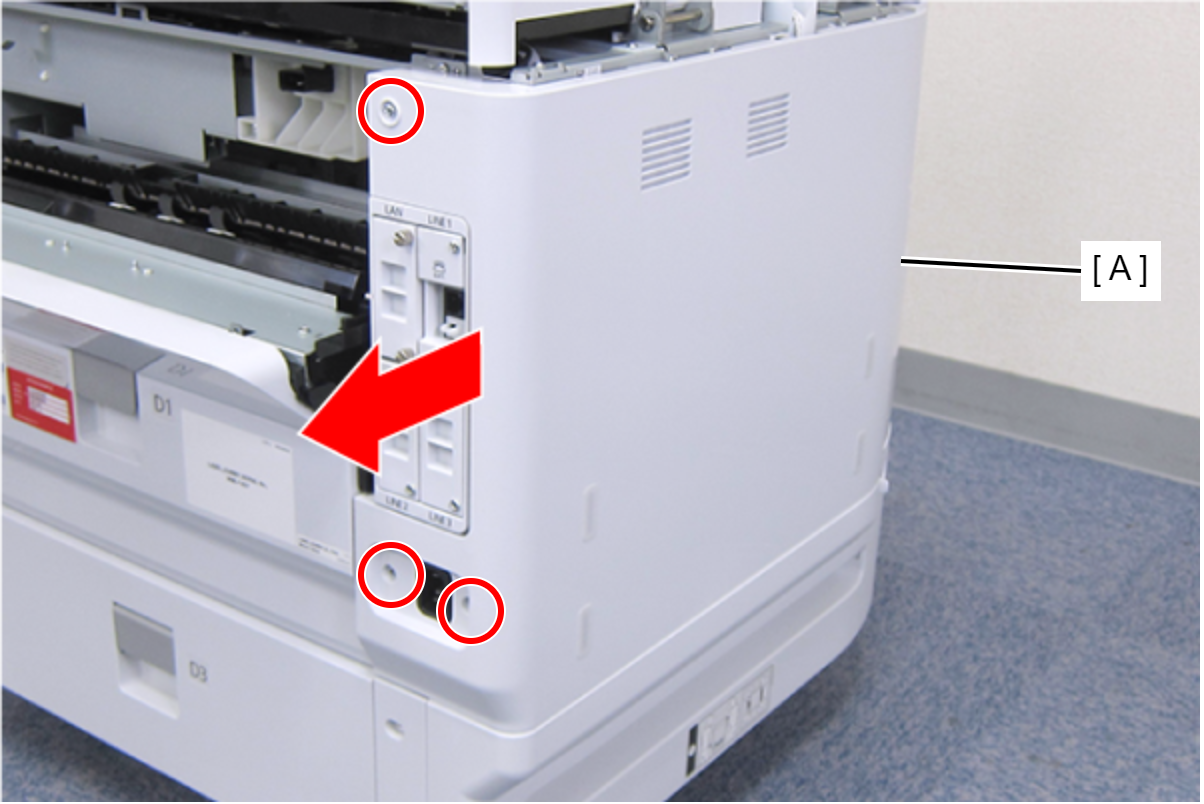
- : C.B.S-TITE-SCREW-3x8-F.ZN-3C
- Open the ADF Unit.
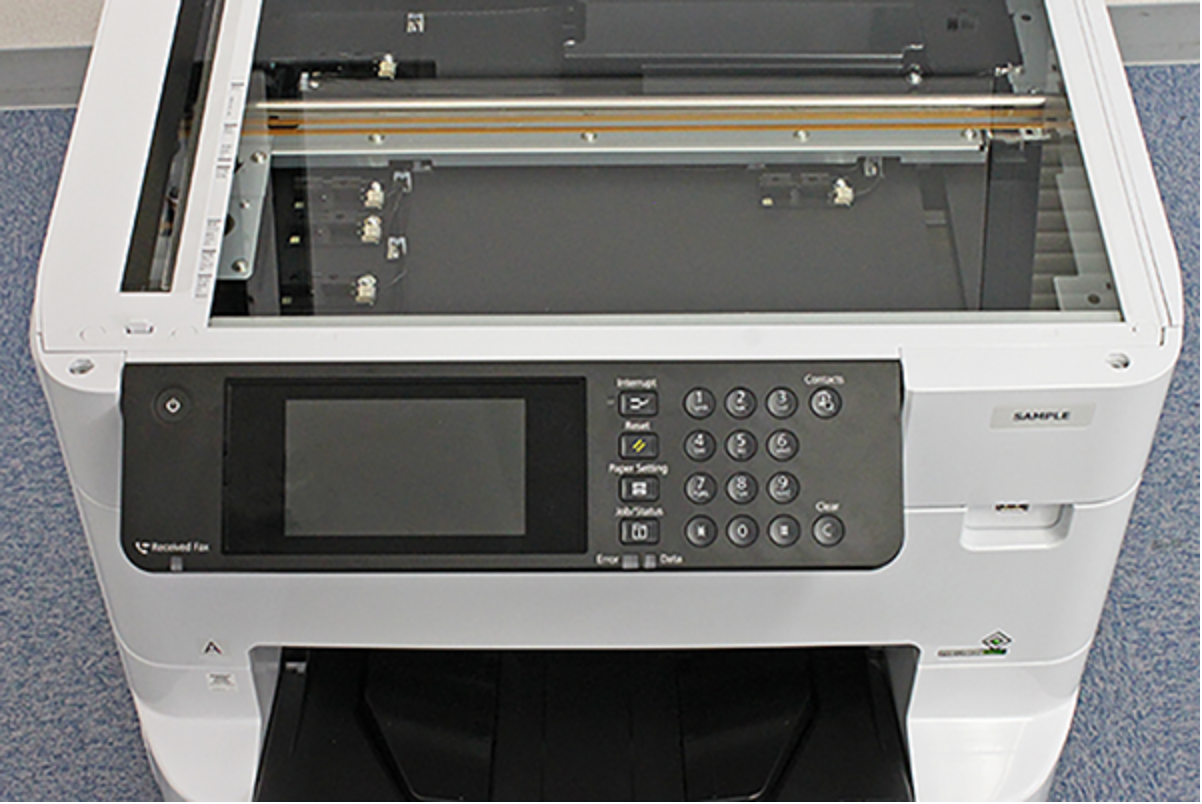
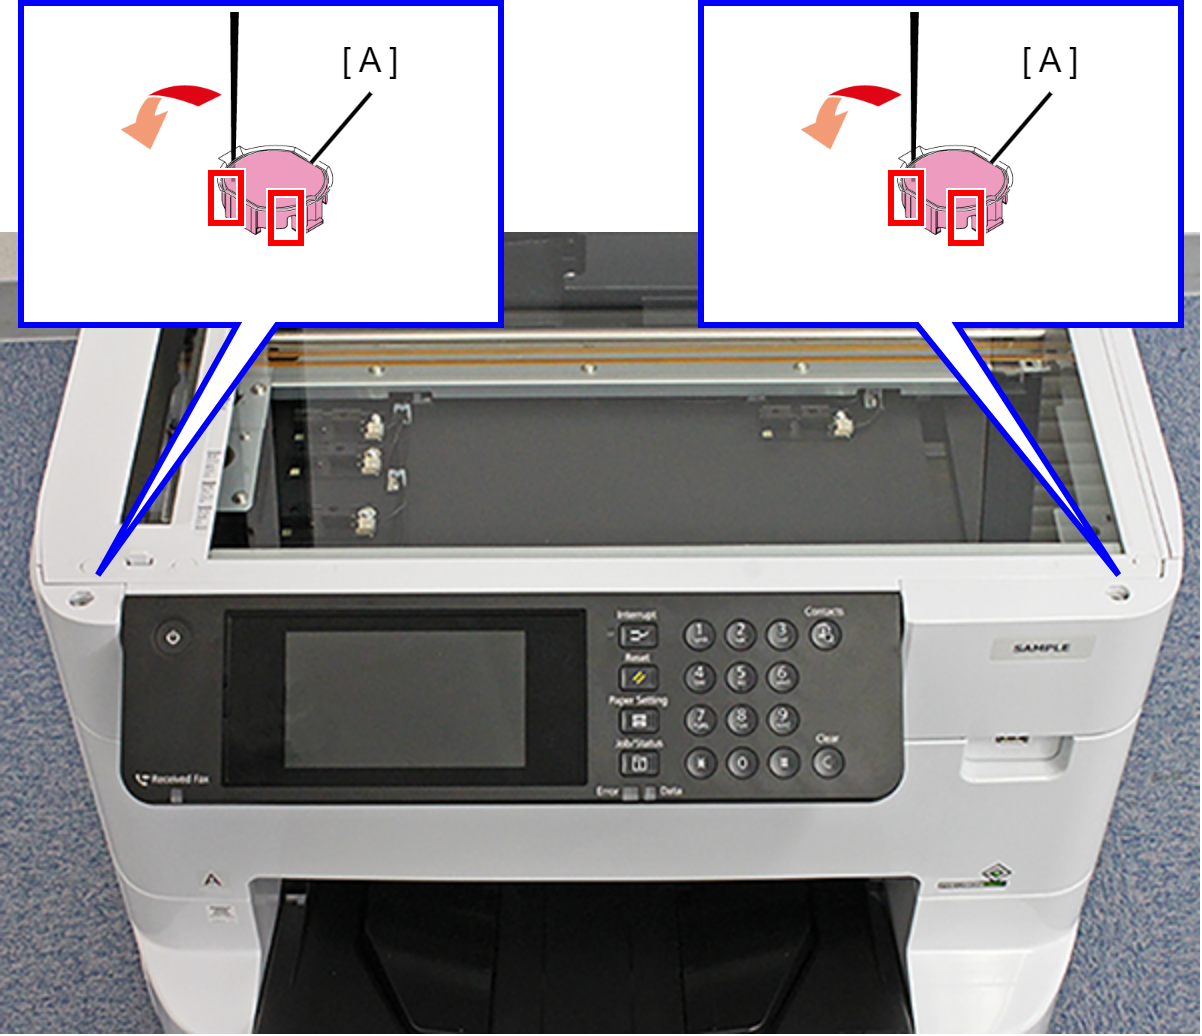
- Release the hook by inserting a narrow-tipped object, such as tweezers or the like, as shown above, and remove the two SCN Housing Caps (A).
- Remove the two screws.
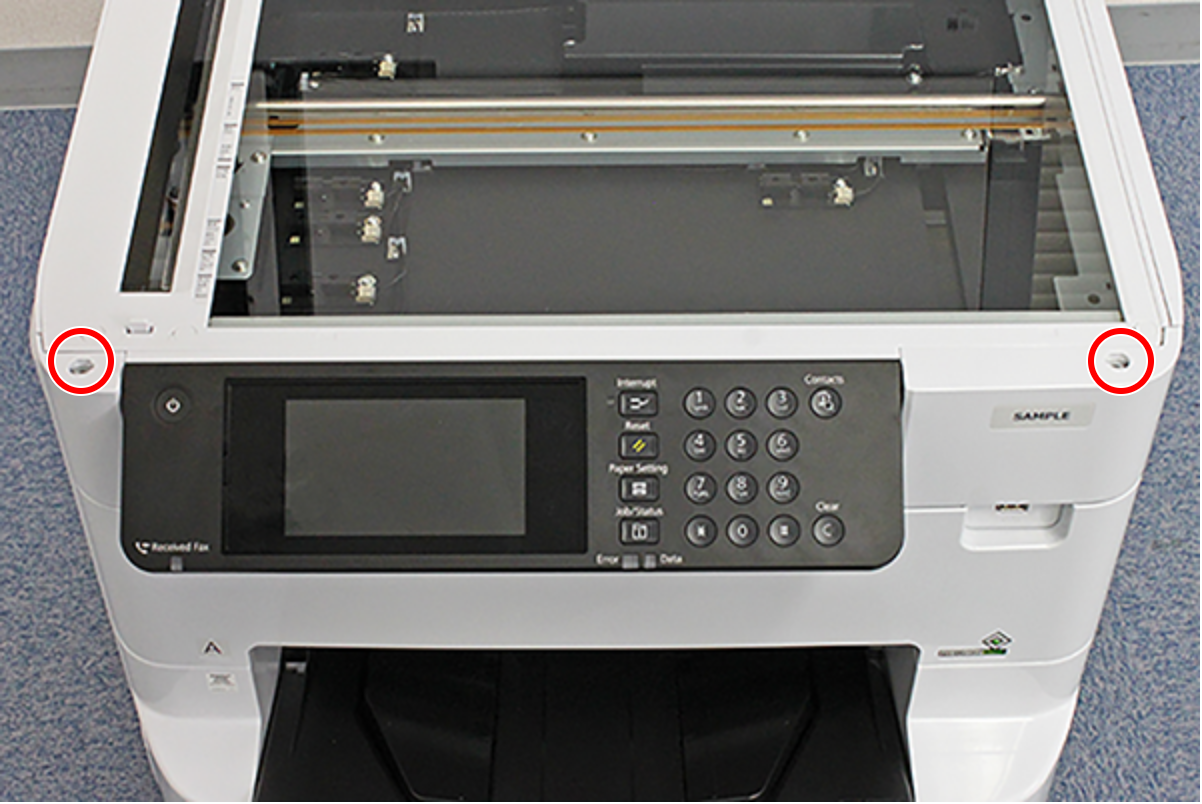
- : C.B.S-TITE-SCREW-3x8-F.ZN-3C
- Open the Panel Unit (A).
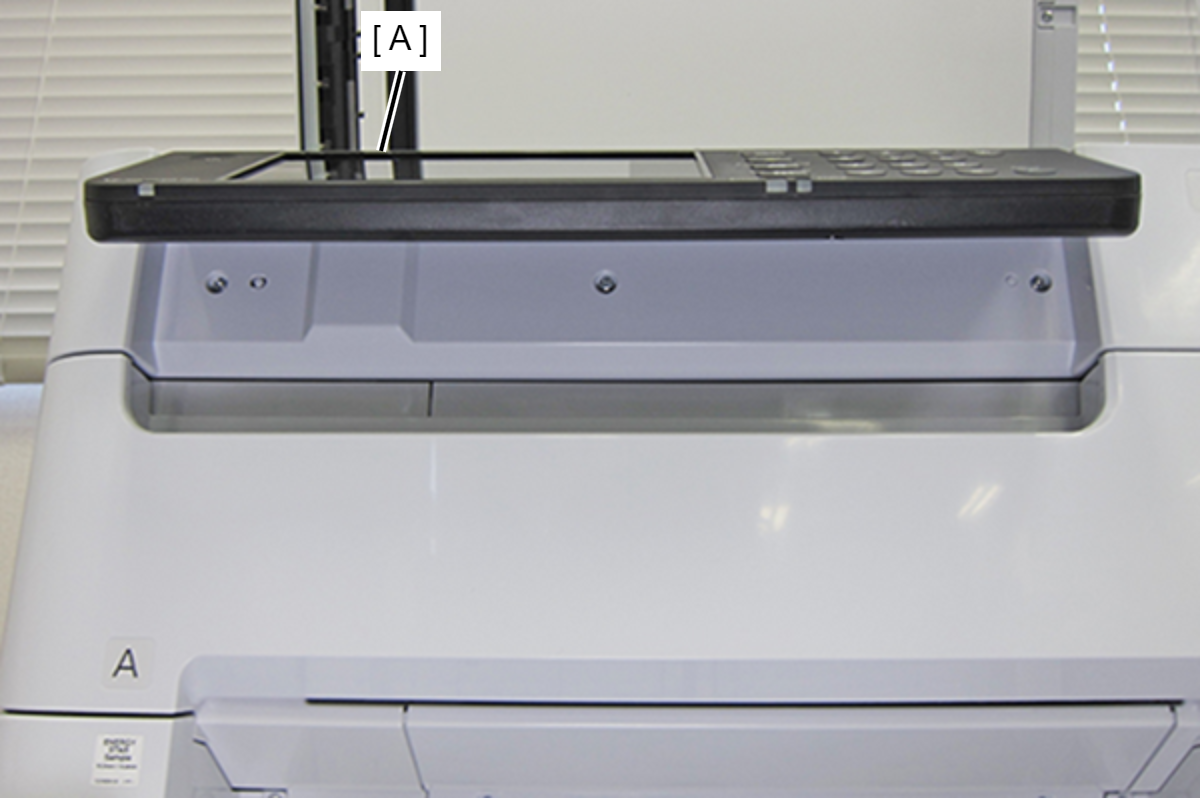
- Remove the three screws.
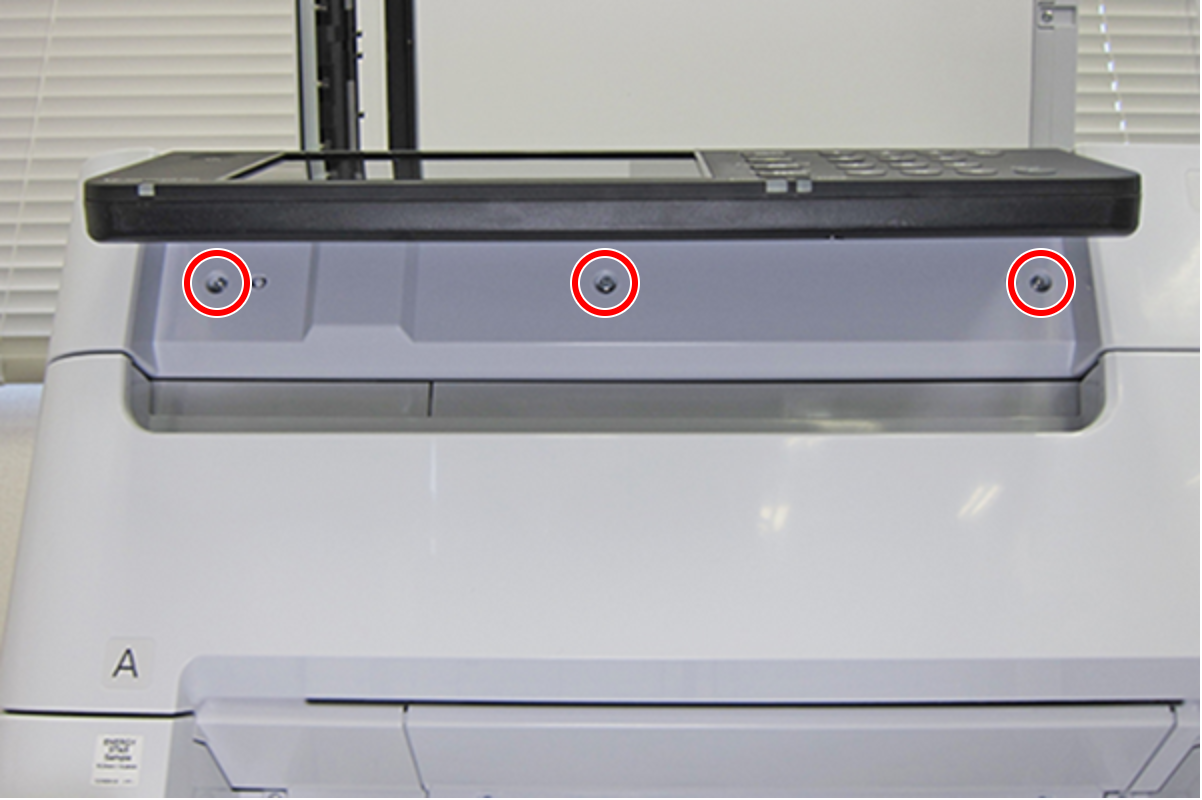
- : C.B.S-TITE-SCREW-3x8-F.ZN-3C
Check Point / チェックポイント- The three screws fastening the Front SC Cover are mounted facing downward, so it is possible to remove the screws from below the Panel Unit.
- Open the Front Cover Assy (A).
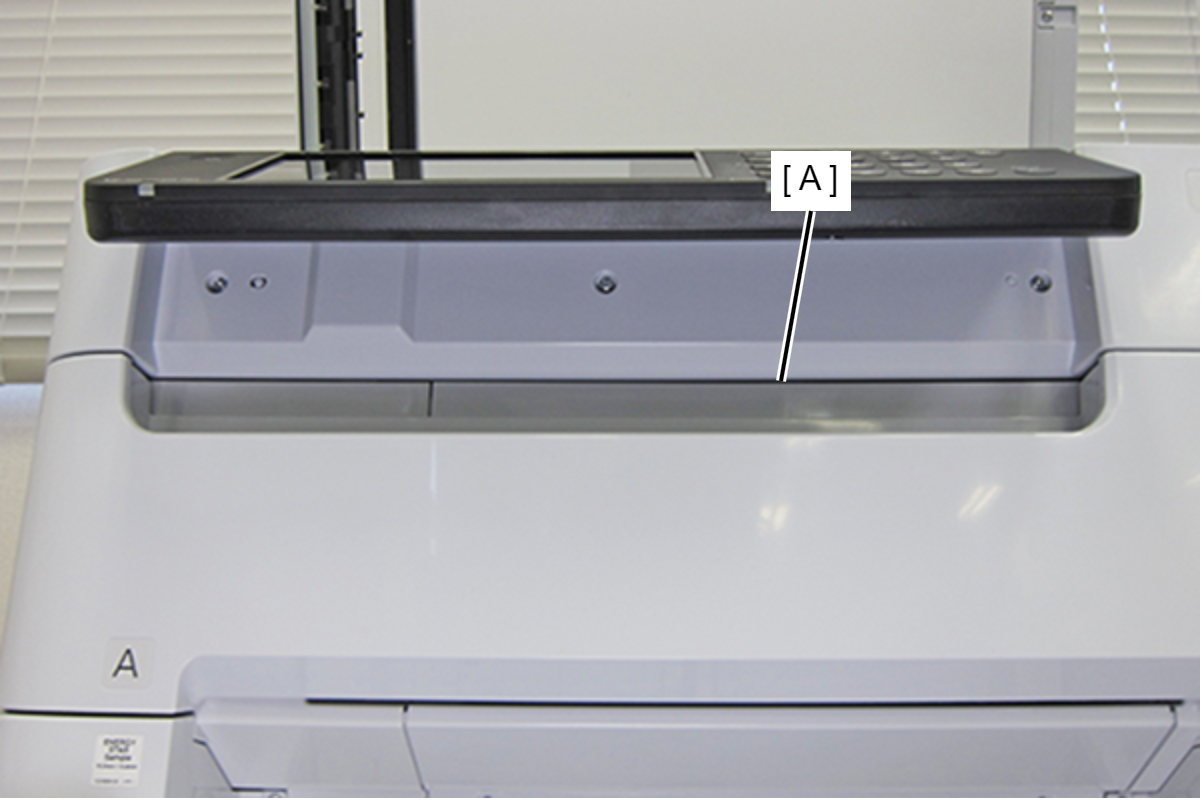
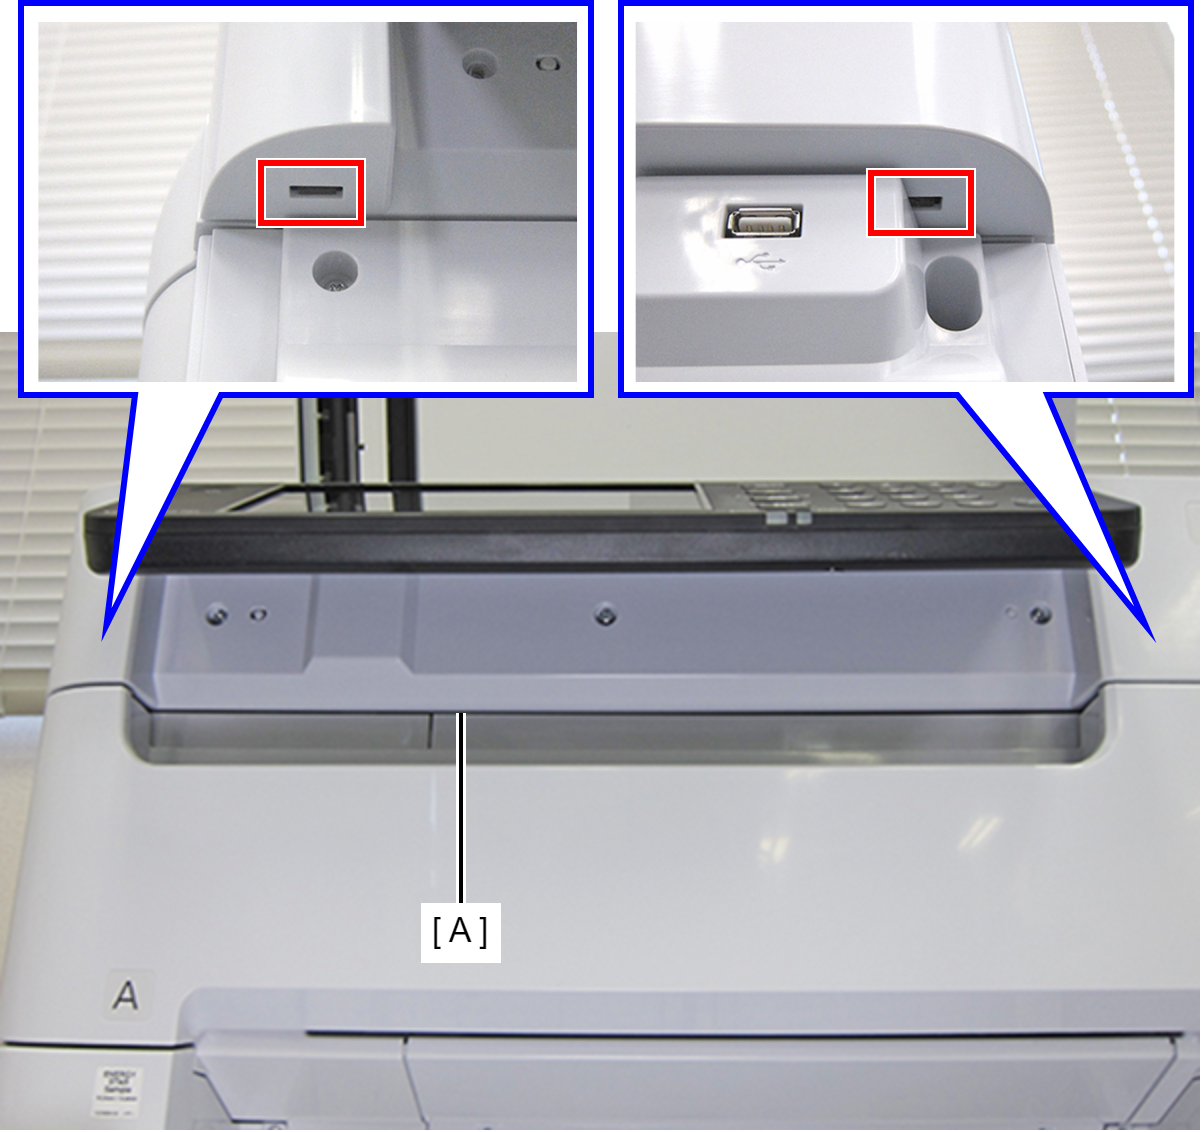
- Release the two hooks and remove the Front SC Cover (A).
- Disconnect the FFC (B) from the connector (CN302) of the Main Board (A).
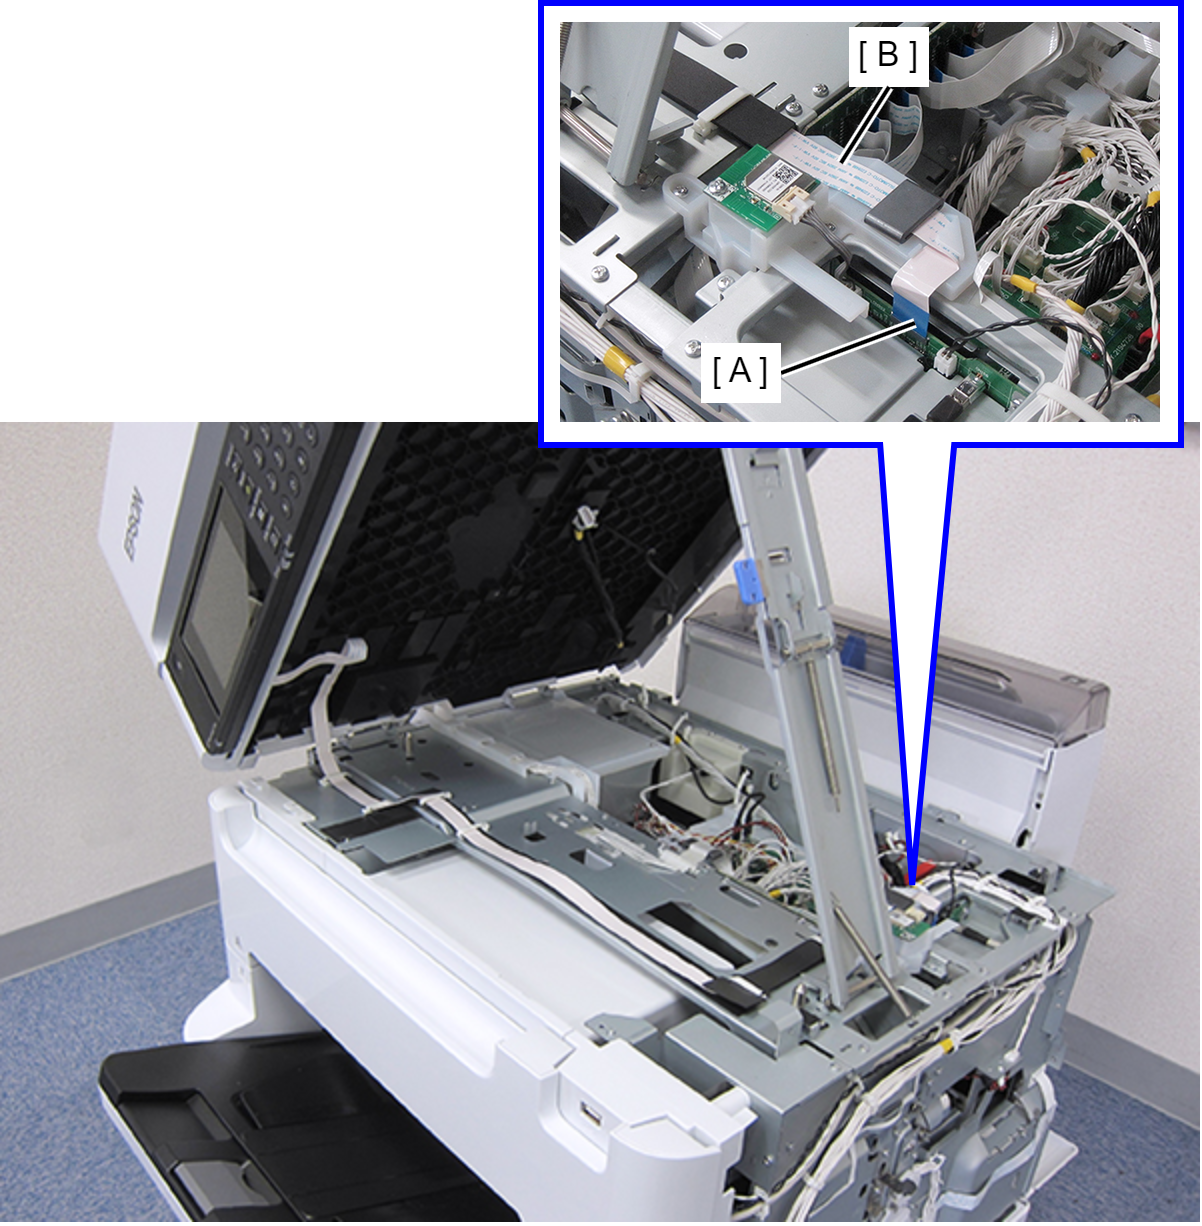
- Remove the Panel FFC (B) from the ferrite core (A).
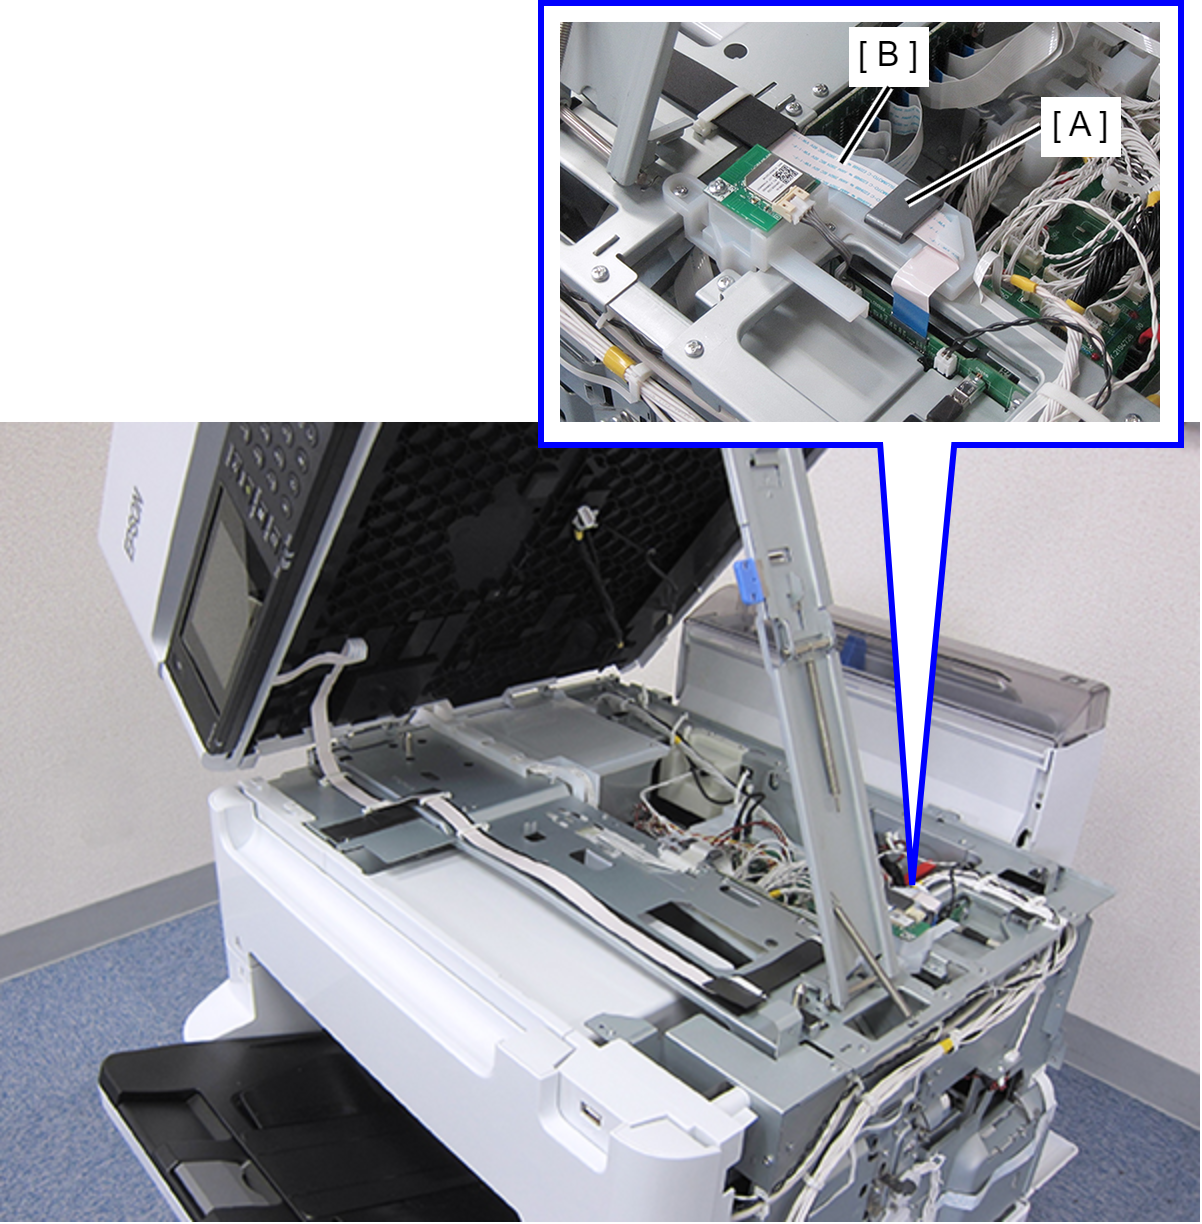
- Release the Panel FFC (B) from the six clamps (A).
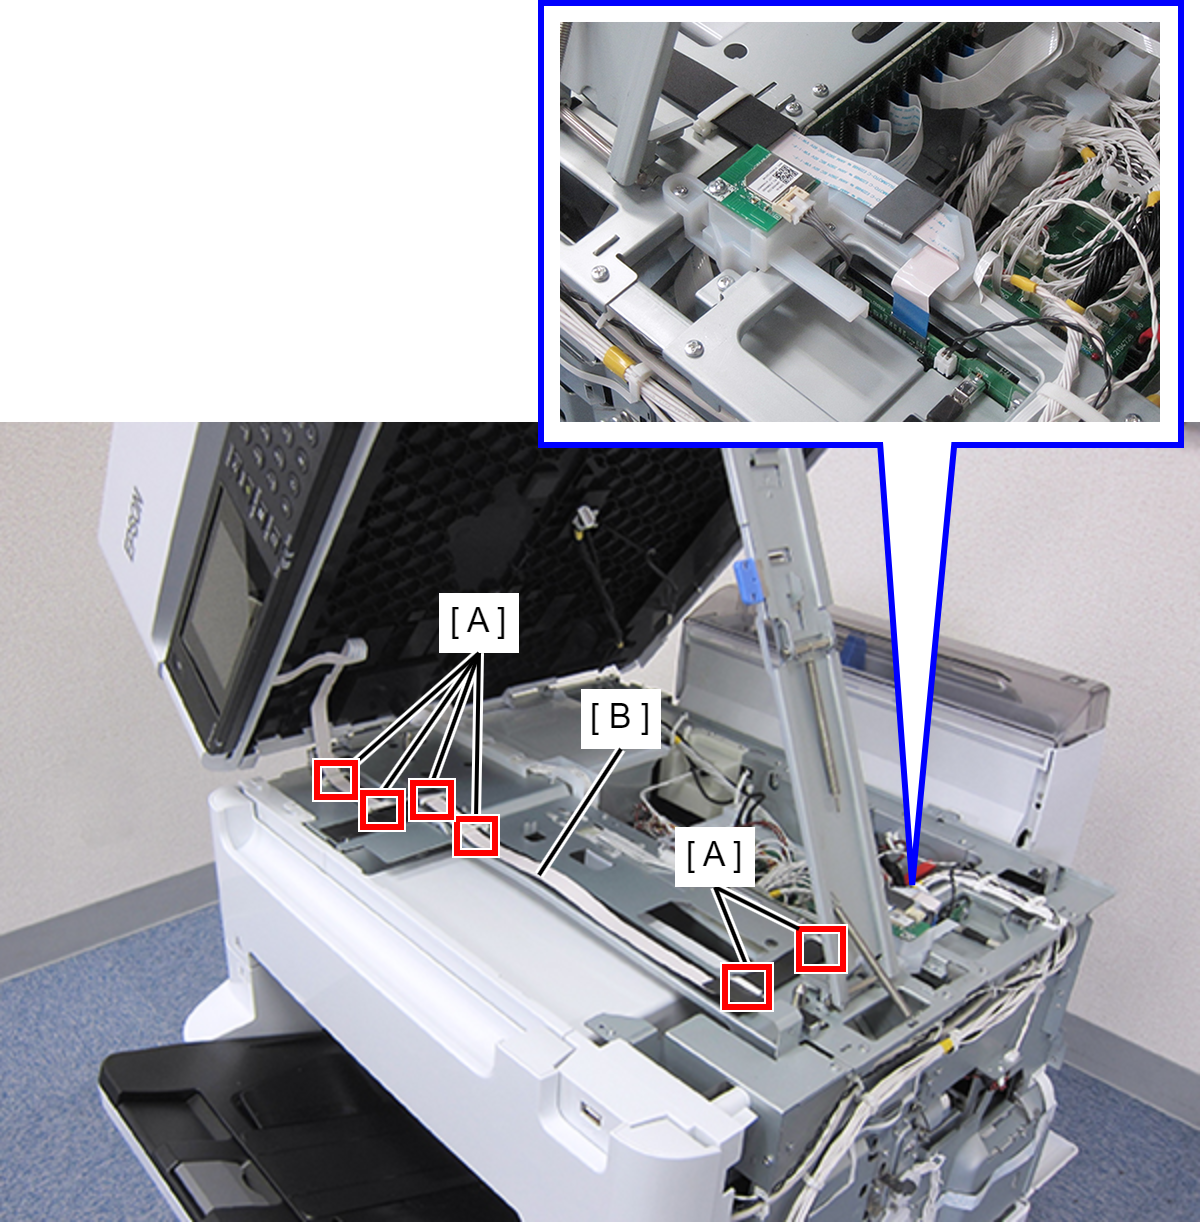
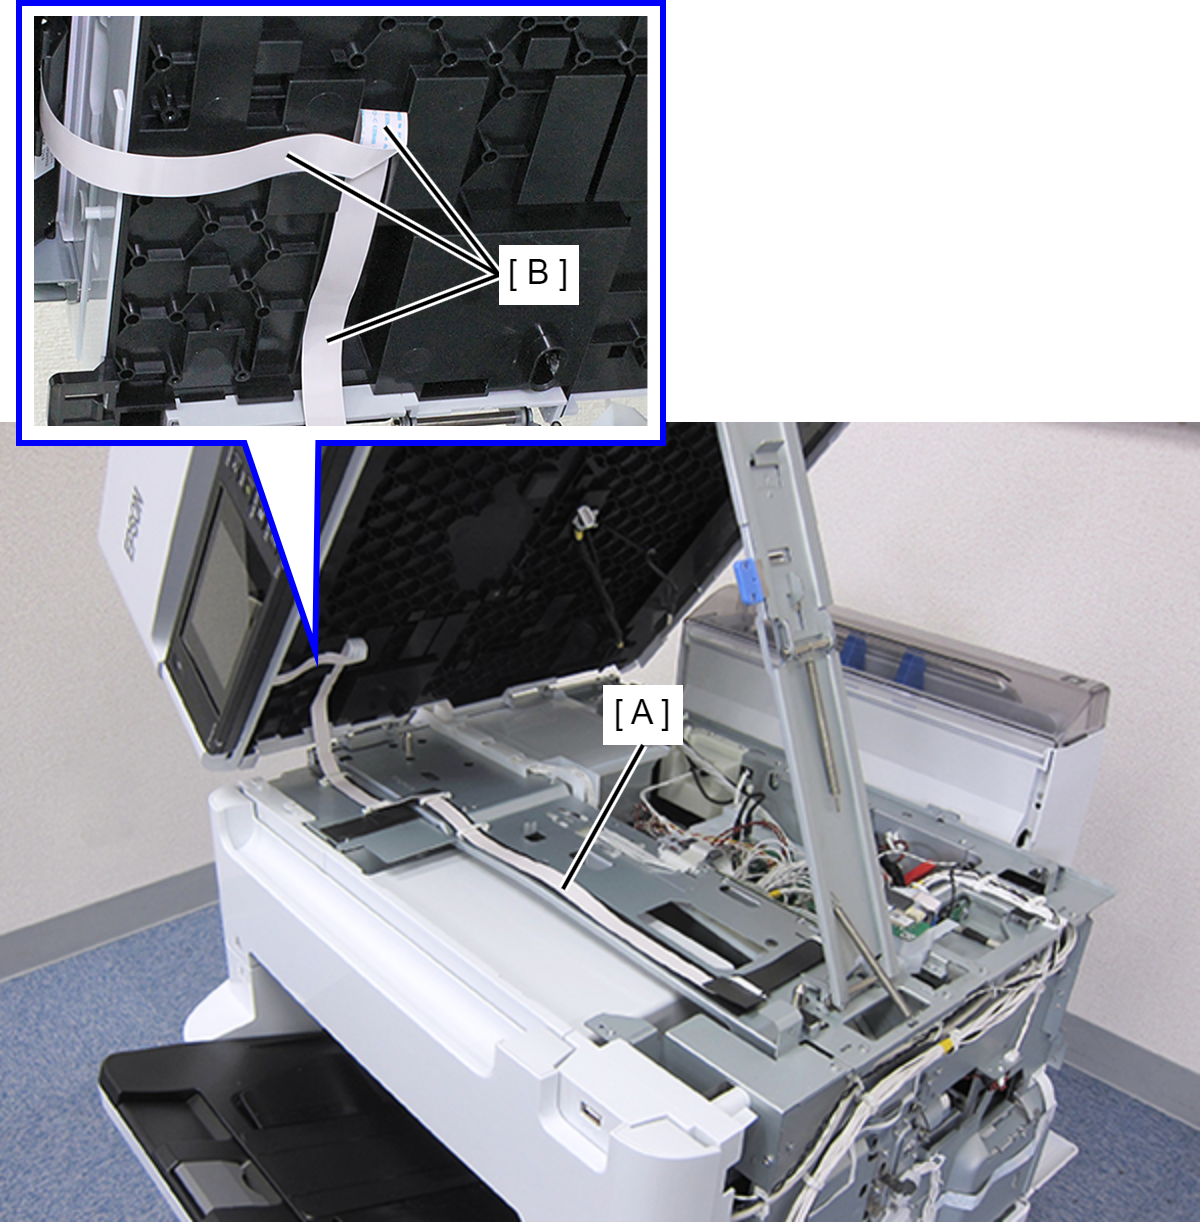
- Peel away the three double-sided tapes (B) on the Panel FFC (A).
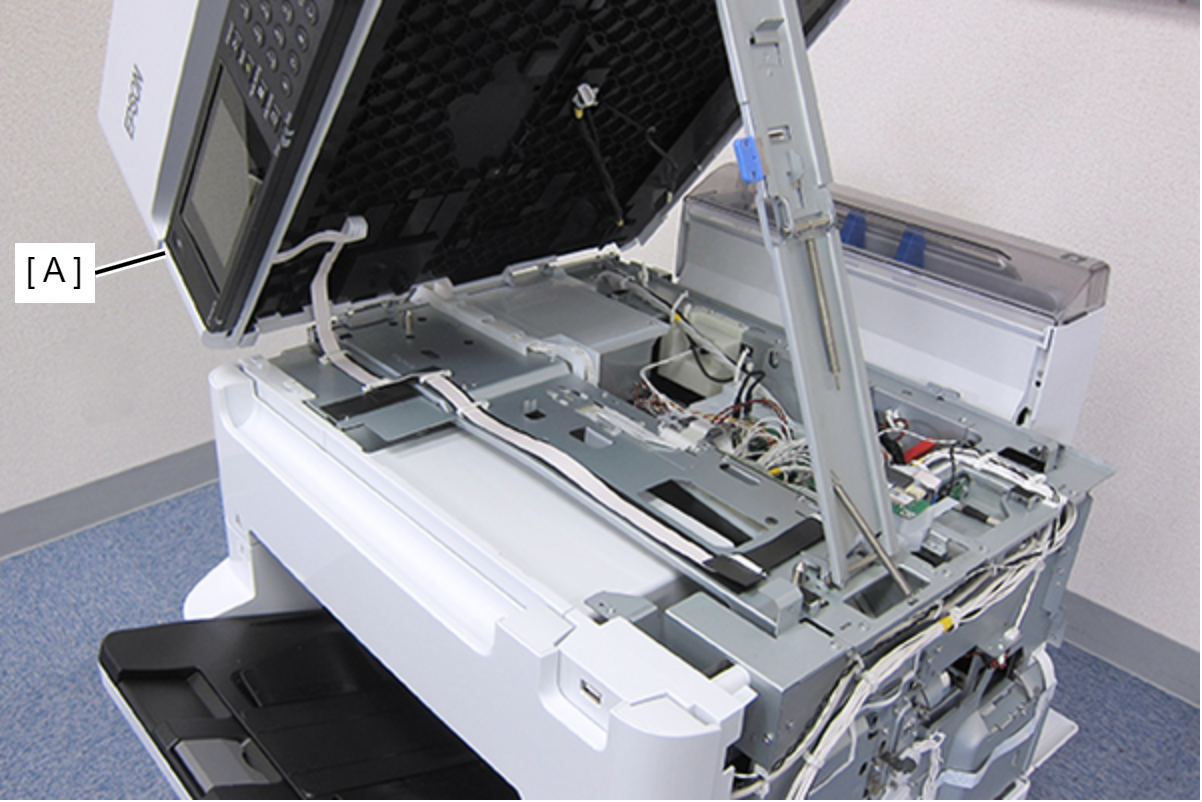
- Close the ADF/SCN Unit (A).
- Remove the two screws and remove the Panel Unit (A).
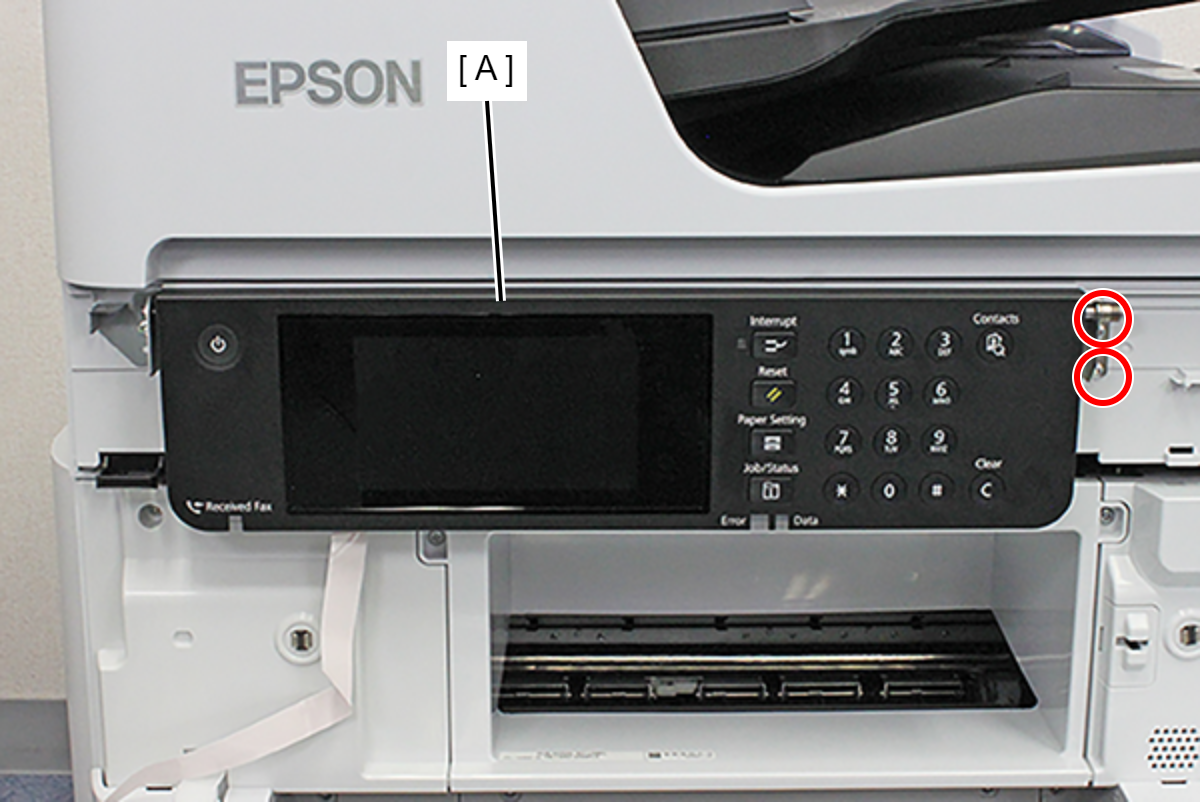
- : C.B.S-TITE-SCREW-3x8-F.ZN-3C
- Separate the upper spring (A) and lower spring (B).
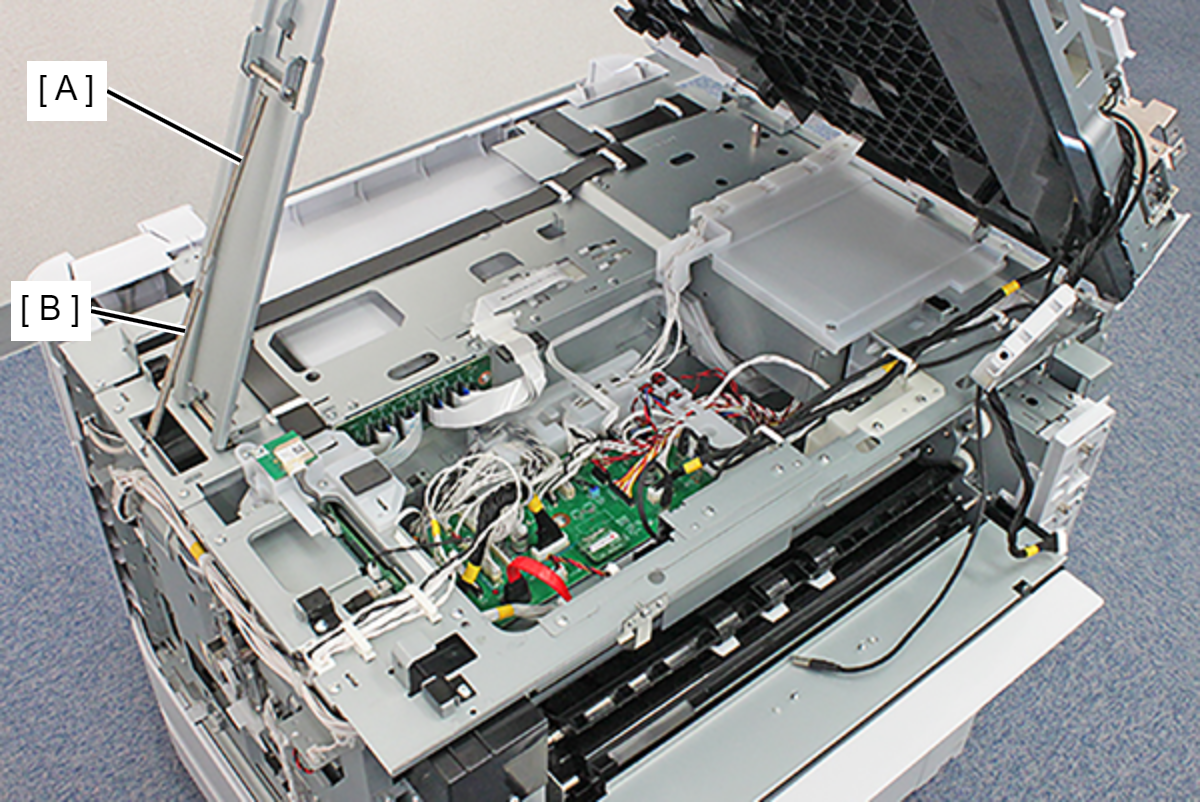
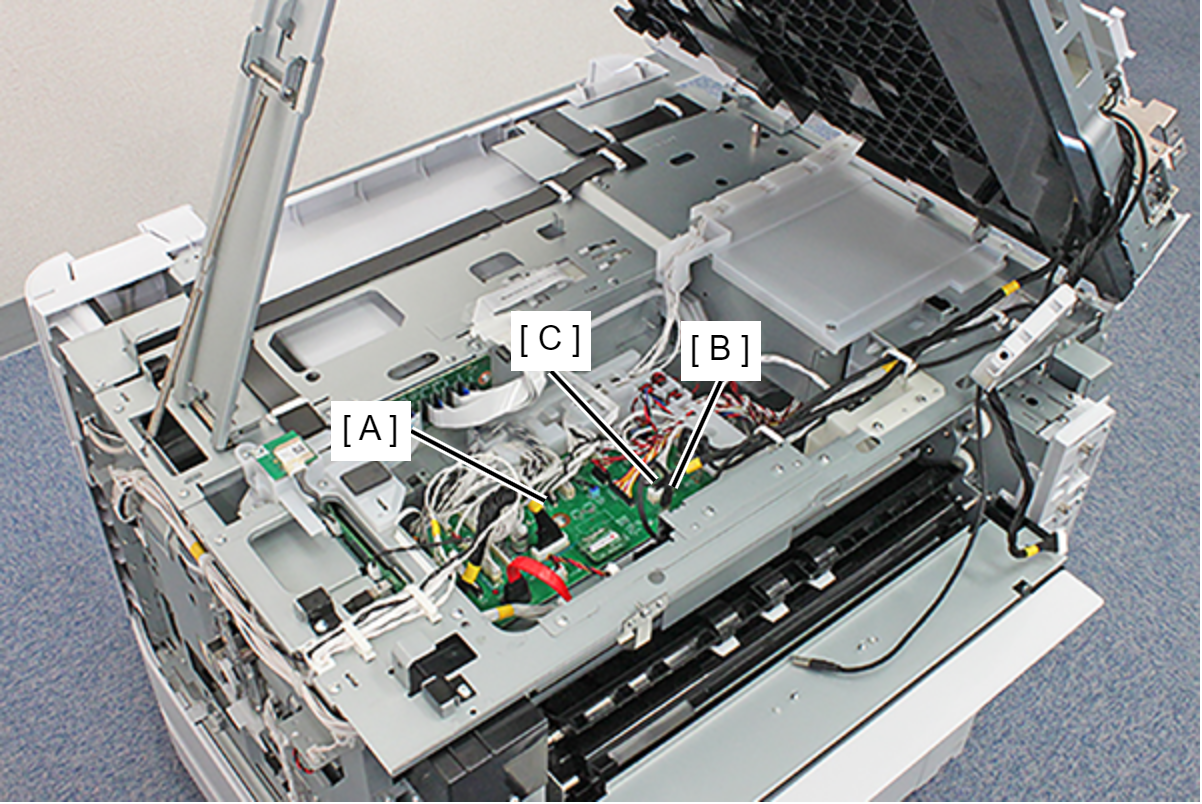
- Remove the following cables from the connector of the PCB Mechanism Relay Board (A).
- Cable (USB) (CN3) (B)
- Cable (CN9) (With hook) (C)
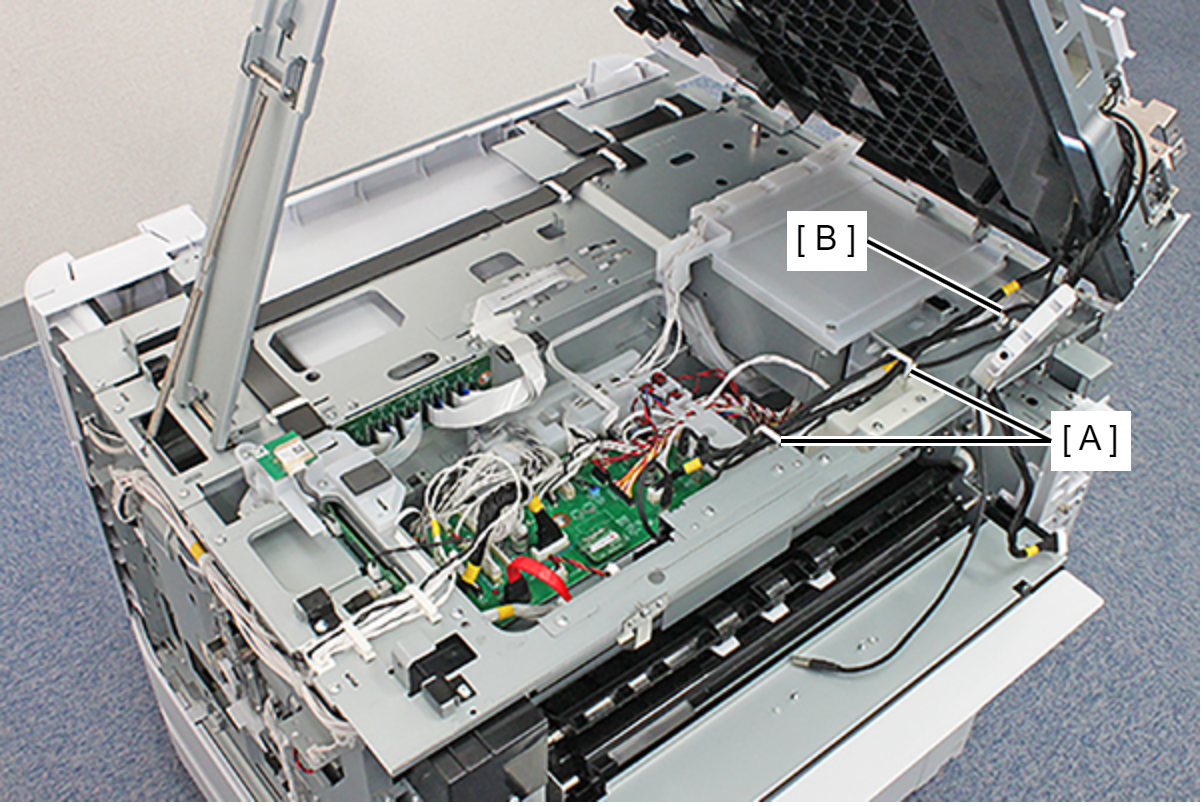
- Release the two cables from the three clamps (A) (B). (Only the cable (USB) is routed through the clamp (B))
- Fasten the two cables (A) to the two hooks on the SCN Unit (B).
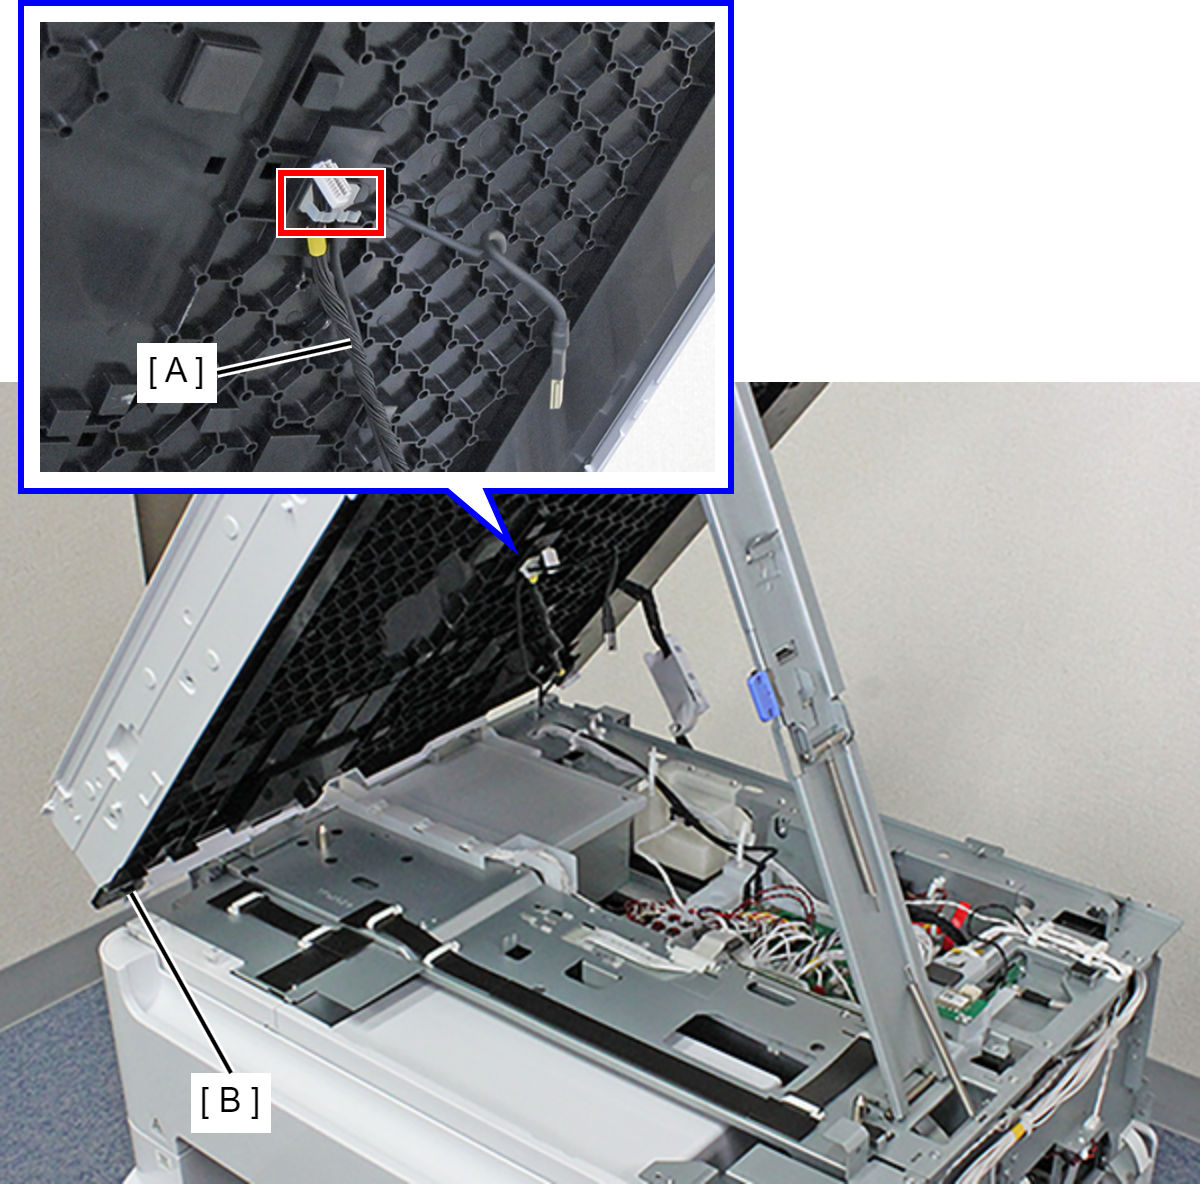
- Close the SCN Unit.
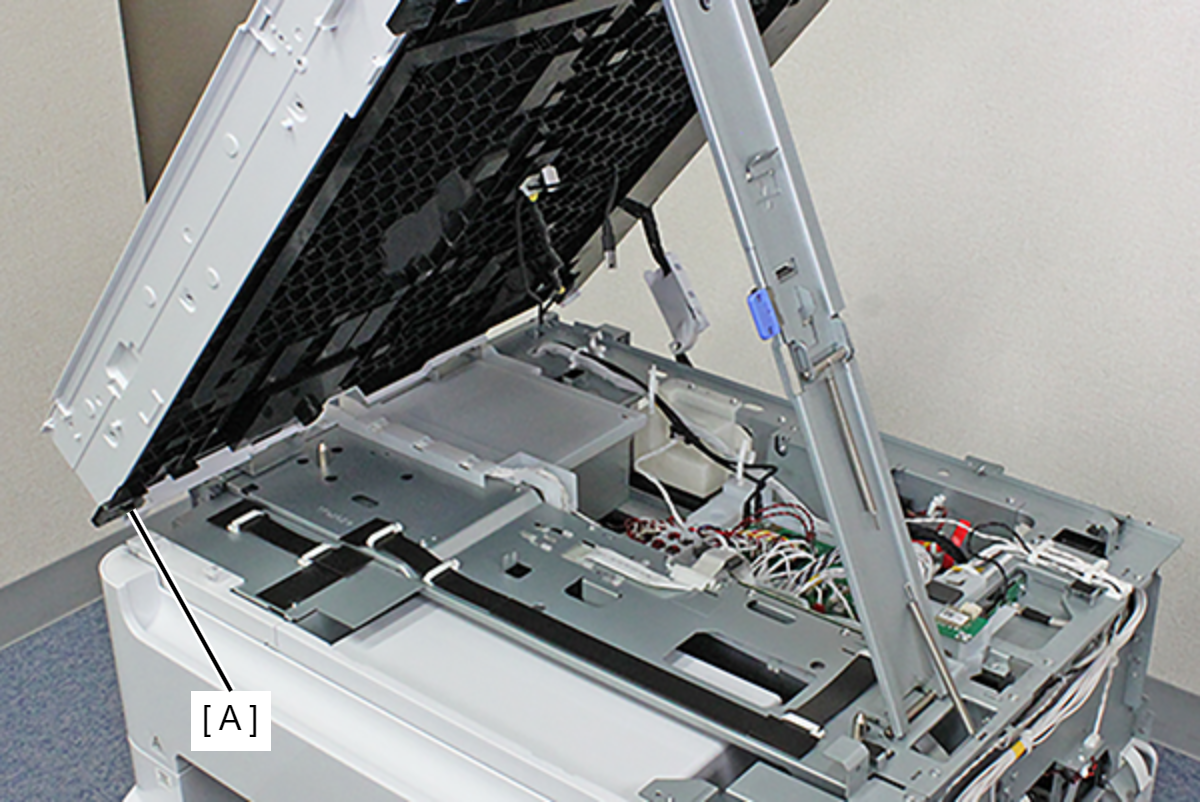 Assembly / 組み立て
When opening the SCN Unit, the upper spring and lower spring become separated. Be careful because even if the SCN Unit is pushed all the way, the Support Stand will not open automatically.
- Remove the six screws.
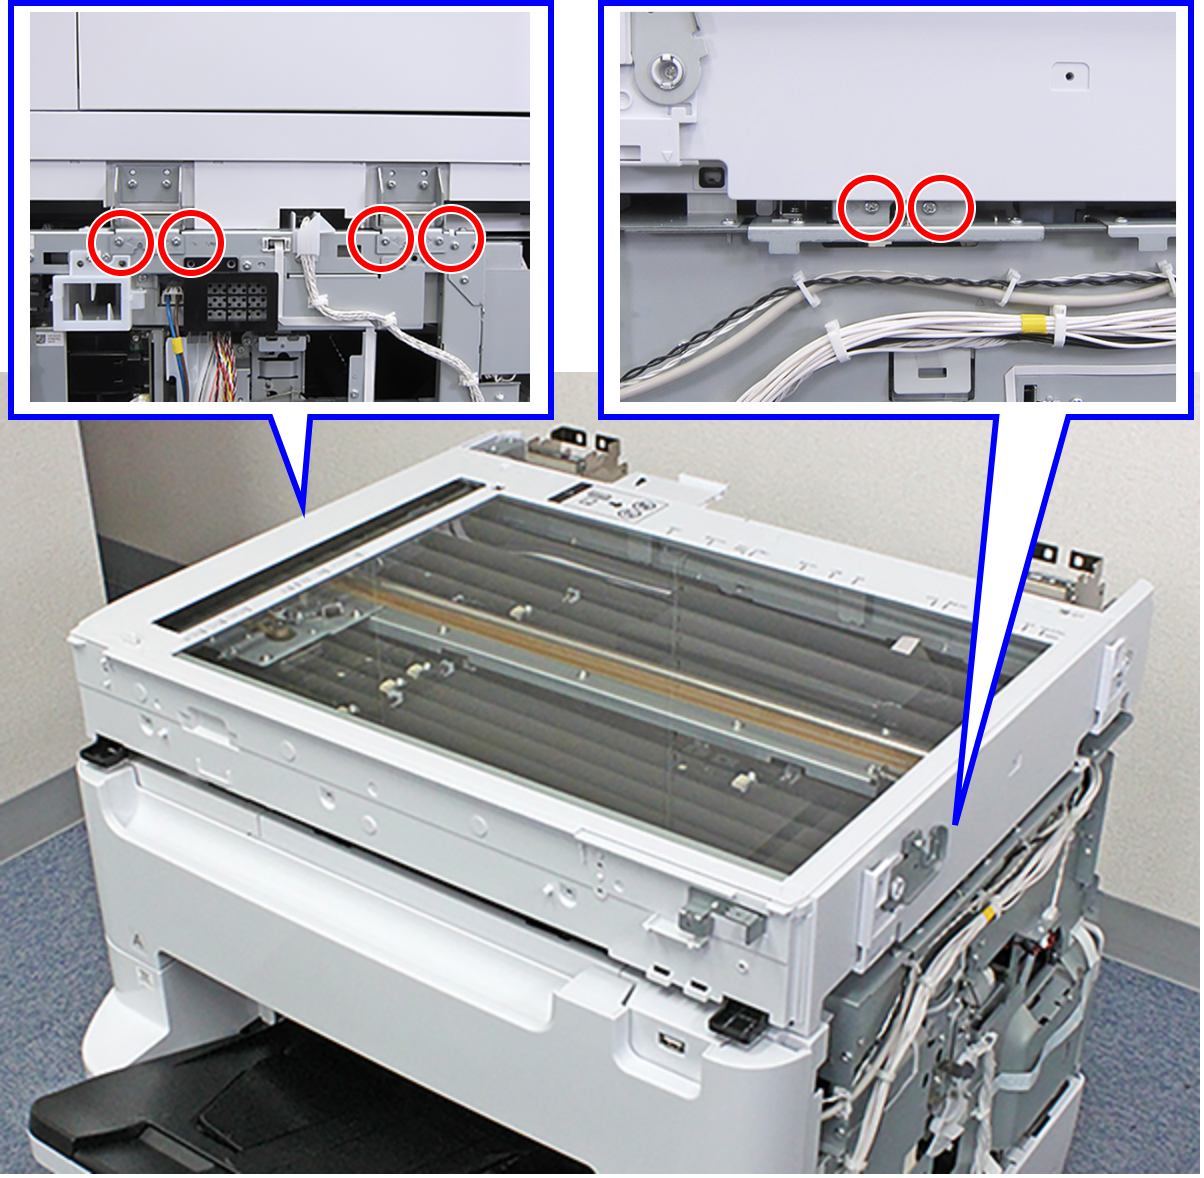
- : C.B.S-TITE-SCREW-3x8-F.ZN-3C
Check Point / チェックポイントThe screws to be removed have a triangle mark.
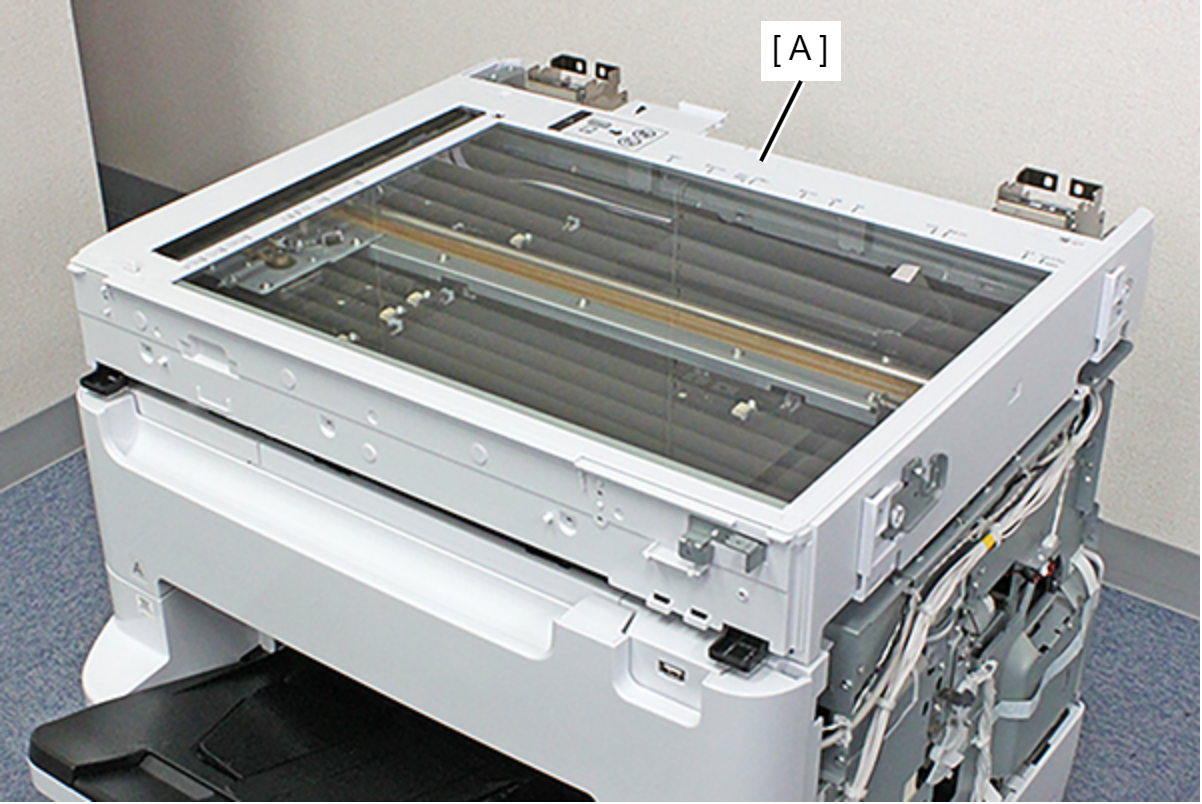
- Remove the SCN Unit (A) upward.
 Adjustment / 調整 Adjustment / 調整 |
After replacing this part, you need to run the menu from the service support mode before replacing it. |