
Incorrect Colors
Symptom
- Expected color and printed result differs.
- Printed colors differ when compared with each other.
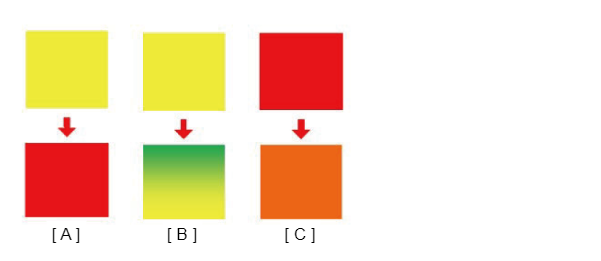
Example
A: Colors are completely different.
B: Another color is mixed creating a gradation.
C: Color is slightly different.
Suspected cause
- Different comparison conditions
- ADF/SCN Unit reading abnormal condition
- Paper type
- Output Setting
- FW failure
- Printhead failure
- Ink system assy failure
- Air bubbles collected in ink tubes
Troubleshooting
| Step | Confirmation and action | YES | NO | ||
|---|---|---|---|---|---|
| 1 | Check the conditions Check that any conditions below the lowest limits are the same when comparing colors in two or more different printouts.
|
When conditions are the same |
When the conditions differ Print a document or image from the printer in question and from another printer that has no problems under the same conditions. Then check if the two printouts differ in color. |
||
| 2 | Check whether printing or copying Check whether the symptom occurs with printing or with copying. |
Occurs with printing and copying. Go to step 3 |
Occurs with copying only Refer to ADF/scanner trouble |
||
| 3 | Check implementation of printing troubleshooting (answer and handing an incoming call) Check implementation of printing troubleshooting at an incoming call. Has printing troubleshooting been performed? |
Go to step 4 |
Get a service engineer to perform printing troubleshooting. If the symptom is not resolved even after performing printing troubleshooting, judge that this needs to be dealt with by a service engineer, and go to step 4. |
||
| 4 | Check the paper Check the following point about the paper.
|
Go to step 5 | Change to suitable paper. If nozzle missing is not improved after performing the above, go to step 5. |
||
| 5 | Check the settings Check the settings of the main unit/printer driver listed below.
Are the printer/driver settings appropriate? |
Go to step 6 |
|
||
| 6 | Check the nozzle check pattern Print nozzle check patterns and check whether there are nozzles missing or deflection. Nozzle check pattern print method is below.
|
Go to step 7 | Obtain the information as follows from the service status sheet and execute head cleaning according to the nozzle missing state check matrix table.
* If nozzle missing is not improved, refer to Nozzles missing . If nozzle missing is not improved after performing the above, go to step 7. |
||
| 7 |
Check the Ink system Assy Check the following point about the Inksystem Assy.
Inksystem Assy is correct condition? [Confirmation details]
|
Go to step 8 |
If nozzle missing is not improved after performing the above, go to step 8. |
||
| 8 | Check the ink tubes Visually check that air bubbles have not collected in the ink tubes. If there are parts where the color is unmistakably pale in the supply system ink tubes, air bubbles may have collected. Ink tube is correct condition? |
Go to step 9 | In the service support mode, execute "401 Head Cleaning" "40104 Power CL" to remove the bubbles in the tubes. |
||
| 9 | Replace the Printhead Replace the Printhead. |
Replace the Printhead. (Refer to Printhead ) If the trouble is not resolved after replacing the Printhead, contact the Epson Service Support department. |
|||
